Delam Repair Technique - Fiberglass RV
Journey with Confidence RV GPS App RV Trip Planner RV LIFE Campground Reviews RV Maintenance Take a Speed Test Free 7 Day Trial ×

Go Back   Fiberglass RV > Fiberglass RV Community Forums > General Chat
Click Here to Login
Register Registry FAQ Community Calendar Today's Posts Log in

Reply
 
Thread Tools Search this Thread Display Modes
 
Old 10-17-2011, 11:54 PM   #1
Junior Member
 
Name: 89
Trailer: 89 rexhall airex
Oregon
Posts: 7
Delam Repair Technique

Hey, y'all, newbie here! I paid a modest amount of money for an 89 Rexhall Airex 29' this spring and am gonna make 'er as pretty and solid as I can on a shoestring and then go on driveabout for awhile. I looked hard and long and far and she was the best I could find at the time. The 100 mi drive home was a delight, she seems to run well down the road, handles well and the stereo is quite powerful. ;-) LOVE the big bay window. All in all, quite solid, no more delam than I was seeing on units for twice the price, etc. When she's cleaned up and redmaxed I think she'll be quite handsome and we'll be perfectly bonded. The only thing I fear is 6 mpg. LOL.

I'd like to report on some delamination repairs I'm doing, perhaps they'll be of value to someone else.

Thanks to George, who gave me the idea here:

http://www.fiberglassrv.com/forums/f...oot-38073.html

(last post, page 1)

"...feed epoxy resin directly into separated space and provide mechanical force to joint components together during resin polymerization...Use of multiple feeding tubes into this separation area and low viscosity epoxy resin...mechanical force could be applied by placing braces inside the trailer and forcing the fiberglass into the original shape from outside..."

I purchased 3 of these (the deepest clamps I could find), which I found for a mere $17.82 ea with free shipping:

Amazon.com: Irwin / Hanson / Vise Grip (VIS24R) 24 in. Locking C-Clamp: Home Improvement

and I already had two 18" bar clamps and a few very large old iron c screw clamps.

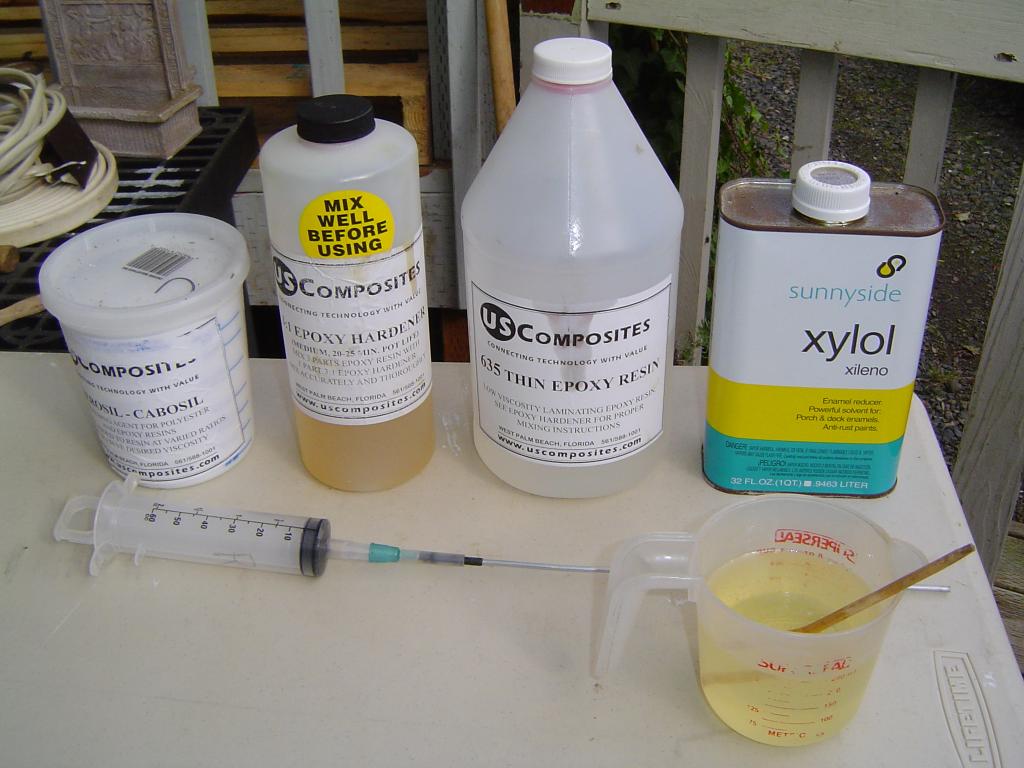
And ordered up some thin resin here:

Epoxy : Epoxy Resins and Hardeners

Bought some 60cc syringes and some very small aluminum tubing and made a needle about a foot long, which was about 6" of overkill but fun. ;-) Got some xilene for cleanup.

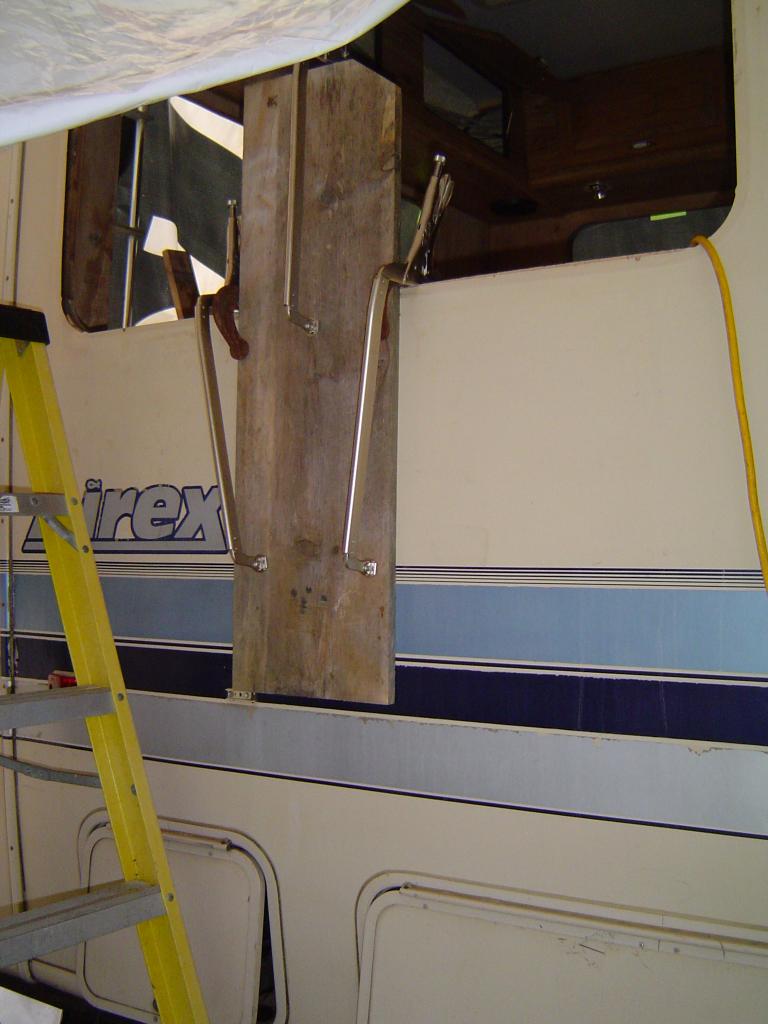
There was significant delam around the passenger side rear window in the bedroom with some leakage from the awning rail above and a good deal of water ending up below. The interior panel under that window was fairly well gone so I removed it, as well as a chunk of the floor, replaced with some scrap wood. I basically gutted all of the crap in the bedroom as it had two bunks and desperately needed new wall covering.. I removed all 3 windows in the bedroom and tarped the whole thing up well with a used 30'x50' ad banner as I am in the great moist north.

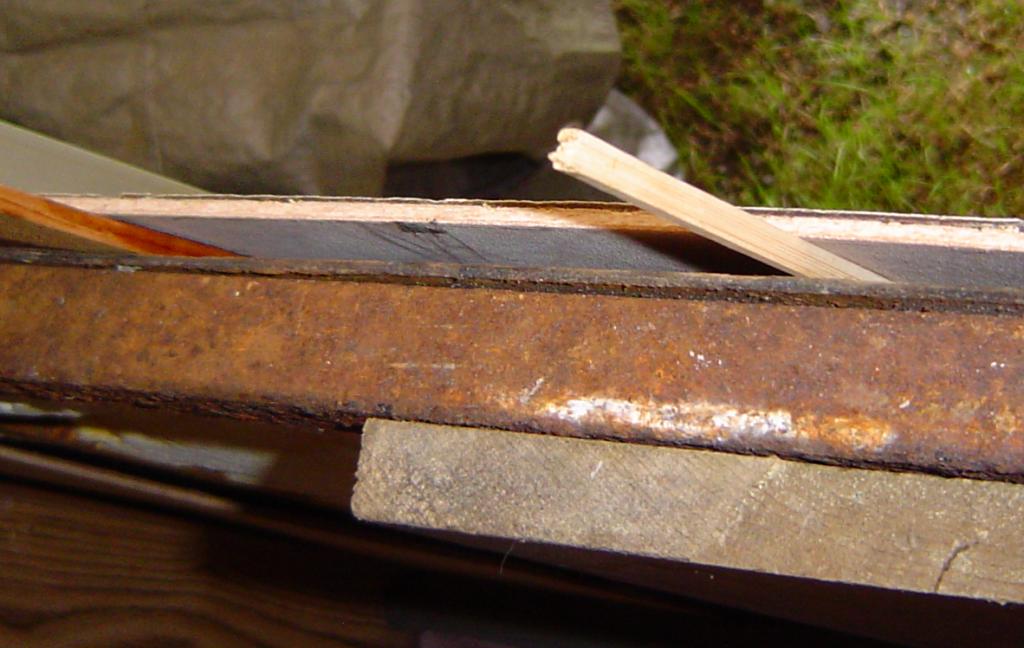
Used some bamboo sticks to kind of prop open the layers and used the hole saw in two areas inside at floor level, just breaching the inner layer of ply, then employed a cheap ol' blow dryer on low in multiple sessions to make sure any moisture was gone. Used the syringe/needle and drenched everything with 99% isopropyl. Figured that was the best I could do for clean and dry.

I began at the front side of the window (warming it up with the blow dryer first for the helluvit), the highest point to stick back together, pre-clamping below the area to isolate the goo to just the upper area. Used the bamboo sticks to kinda hold the layers open while I injected about 2 oz of epoxy all over. Used .5" boards and clamps, left it for 48. I began here because it was a small but tricky area, maybe 7" wide by 24" high. IT WORKED EXACTLY AS I HAD ENVISIONED IT. HALLELUJIAH AND THANK YOU, GEORGE!!!

I've repeated this process another 3 times, with 2 - 8 oz each time for variances in area and how far down the side the delam had progressed, left clamped up for 48 hours. I'm having to work around hardware in vertical strips, limited by my long clamps. If I had a dozen of these things this would go a lot faster. For the area below the window I'm using 1x12's inside and outside, with the heavy screw clamps on the top, the long reach vise grips over the window frame as far as they'll reach, and a board wedged laterally on the lower portion of the outside board to mash in further down than I can clamp. That's backstopped by a table with a weighted patio umbrella and a few cinder blocks, funky yet quite effective.

I'm a bit more than half done, just taking it slow as it's fairly cool here and I want to make sure it sets up completely before I declamp and I avoid glueing up on a rainy day.

I could not be more thrilled with how absolutely effective the epoxy resin is for this application. Most folks I spoke with prior didn't think this would work, but after cogitating muchly I couldn't think of a better plan and now I'm feeling vindicated. We'll see how it holds up with time and vibration, but it looks solid as a rock.

This is just the first of many little repairs and enhancements I have planned... Thanks for all the great tips!

T
89airex is offline   Reply With Quote
Old 10-18-2011, 05:29 AM   #2
Senior Member
 
Trailer: 1990 Bigfoot 5th Wheel
Posts: 604
Congratulations on your repairs! Pictures?
Cam A is offline   Reply With Quote
Old 10-18-2011, 09:39 AM   #3
Senior Member
 
Donna D.'s Avatar
 
Trailer: 1988 16 ft Scamp Deluxe
Posts: 25,709
I'm sure glad I don't have a stick built fiberglass trailer. I don't think delamination is going to be much of a problem with my molded fiberglass egg....
__________________
Donna D.
Ten Forward - 2014 Escape 5.0 TA
Double Yolk - 1988 16' Scamp Deluxe
Donna D. is online now   Reply With Quote
Old 10-18-2011, 10:30 AM   #4
Junior Member
 
Name: 89
Trailer: 89 rexhall airex
Oregon
Posts: 7
I'm just glad my choice was a Rexhall - if this baby had a wooden frame I think it would have been a loss in the pass rear. It looked great from what I could see prepurchase, but there are always problems with a 20+ year old vehicle. This one appears to have been kept well except for the last few years it sat. And not lived in and absolutely filthy, a problem in this area in my price range.

The little eggs are so cute and look so much simpler than a larger motorhome, but I needed something to drive so I can tow a trailer with my tools and toys.

It's prompted my imagination as to the goodies I could craft out of fiberglas/resin. My first fab project might be a vent hood or two - there's another big streak of delam on the other side between the kitchen fan outlet at the top and the heater outlet at floor level below it. The cover at the top has no rain shielding, just a flat louvered panel, recipe for disaster. I hit plenty of sites online looking for a hood to deflect water and found nothing.

Also, I was astounded when we pulled the windows. The putty did not appear ever to have been in play for sealing - it was all shrunken and completely unsquished inside the frame and just basically fell off when I cleaned 'em up. Thank the deities that the silicon bead held all those years or it would have been a complete basket case.

I'll snap some pics today before/after gluing up another bit. I failed to take before pics of anything, and now that it's cocooned up I can't get any shots of the exterior.

Thanks for the encouragement! Friends and neighbors eyes glass over when I begin to obsess... LOL.
89airex is offline   Reply With Quote
Old 10-18-2011, 08:02 PM   #5
Senior Member
 
Donna D.'s Avatar
 
Trailer: 1988 16 ft Scamp Deluxe
Posts: 25,709
T. You've landed at a forum that focuses on molded fiberglass towables, eggs as it were. You may find more enthusiasm and help at a forum that covers your brand. I'd suggest checking out:

iRV2 - RV Forum Community

Open Road forums at RV.net

__________________
Donna D.
Ten Forward - 2014 Escape 5.0 TA
Double Yolk - 1988 16' Scamp Deluxe
Donna D. is online now   Reply With Quote
Old 10-19-2011, 03:04 PM   #6
Junior Member
 
Name: 89
Trailer: 89 rexhall airex
Oregon
Posts: 7
I did check out numerous forums, and I like you best (at least for the topic here). Why?

1) Fiberglas
2) Do-it-yourselfers
3) Helpful
4) George's post that started this journey

I'm sure when it comes to engine and household gear I'll have to toddle off elsewhere...

Here are some pics of the mess:


The prior glue up, no need to wedge the bottom in this case, the hatchkeeper was in the way, and it was solid below it.

I have to get goo on both sides of the ply inside the wall, so I prop open the inner side and insert goo, then repositon the sticks to get goo on the outer side, next to the fiberglas. I try to dribble it in so that it will drool down each separate surface. There's a new piece of wood a couple inches high in there, the old piece was done.


New glue up. Oops, went a bit wider than I planned, so this time I used 12 oz. I have yet to see a drop of it come out anywhere.

The implements of undestruction. the "aerosil/cabosil" is fumed silica for thickening the epoxy, which I will need to do to get it to stick in a few spots above the window that need to be reattached. I used the syringe to get in on the sides of the window, but the measuring cup is just dandy to pour from when I've got a straight shot.
89airex is offline   Reply With Quote
Old 10-20-2011, 06:19 PM   #7
Senior Member
 
cpaharley2008's Avatar
 
Name: jim
Trailer: 2022 Escape19 pulled by 2014 Dodge Ram Hemi Sport
Pennsylvania
Posts: 6,710
Registry
Interesting post, where did you get those clamps? I guess after 21 years it was due, have you found the source of leaks or was it just the glue drying out?
cpaharley2008 is offline   Reply With Quote
Old 10-20-2011, 06:38 PM   #8
Junior Member
 
Name: 89
Trailer: 89 rexhall airex
Oregon
Posts: 7
There's a link in the first post to the clamps, tho' matching the price I paid might not be possible.

Leaks from the awning rail, around the window, and intermittently from the upper corner in the rear where the body/rear/roof panels meet up that I discovered after putting pressure on the rack. I'm gonna try to shore that one up from inside before I remove all the old sealant and reseal on the outside. It seems a bit soft so I figure some firm closed cell foam wedged tightly will firm it up and make it less likely a new seal will give way. Hm, maybe I'll use a spray foam, it's a tight spot and maybe just tight enough to put pressure on the skin when the foam expands. Or not. ;-)

The whole thing is tarped up now so I don't have to worry about that as I kinda work from the bottom up and back to front.
89airex is offline   Reply With Quote
Old 11-03-2011, 03:19 PM   #9
Senior Member
 
cpaharley2008's Avatar
 
Name: jim
Trailer: 2022 Escape19 pulled by 2014 Dodge Ram Hemi Sport
Pennsylvania
Posts: 6,710
Registry
We have problems with leaks in the Eggs, mainly around windows, roof vents and rivet caps. No delamination issues but still a possibility of floor damage and mold. I guess it may be better to have wall issues vs floor issues. Easier to fix?
cpaharley2008 is offline   Reply With Quote
Old 03-26-2012, 08:37 AM   #10
Junior Member
 
Name: Brian
Trailer: Rexhall Aerbus XL2800
Florida
Posts: 2
Hi 89airex,

Did you sand down the steel beams and repaint? The reason I am asking is because I am in a similar situation. I bought a 95 Rexhall Aerbus and there is rust on the beams around the fan in the bathroom. I was wondering if I should just fix the leak and replace the interior panels and not bother with sanding down the beams? If you did sand it, how did you get to the side of the beam facing the fiberglass?

Also, could you post some pictures of the results? Thanks.
brianf21 is offline   Reply With Quote
Old 03-26-2012, 05:40 PM   #11
Senior Member
 
Donna D.'s Avatar
 
Trailer: 1988 16 ft Scamp Deluxe
Posts: 25,709
Brian, 89airex came across FiberglassRV because of the name. However, this is a niche forum for molded towables. They're not built the same way and our trailers do not suffer the kinds of delamination 89airex went through the effort to document. In fact, 89airex had Last Activity: 10-20-2011 05:43 PM on FiberglassRV.

You might see if he has migrated to IRV2.com, which I recommended in an earlier post. It's doubtful he'll be back. IRV2.com is also owned by Social Knowledge who owns FiberglassRV. You'll have more luck finding like minded brand owners there.

Best of luck
__________________
Donna D.
Ten Forward - 2014 Escape 5.0 TA
Double Yolk - 1988 16' Scamp Deluxe
Donna D. is online now   Reply With Quote
Old 03-26-2012, 10:59 PM   #12
Junior Member
 
Name: Brian
Trailer: Rexhall Aerbus XL2800
Florida
Posts: 2
Unfortunately, there is not a lot of information about Rexhall on IRV2.com. The one thread I did find was referring people to a yahoo group.
brianf21 is offline   Reply With Quote
Old 03-27-2012, 05:10 AM   #13
Senior Member
 
Donna D.'s Avatar
 
Trailer: 1988 16 ft Scamp Deluxe
Posts: 25,709
This is the only thread here on FiberglassRV. I'd suggest becoming a member on IRV2 and start a discussion. You can also check at the Open Road Forums on RV.net

Best of luck with your endeavor.
__________________
Donna D.
Ten Forward - 2014 Escape 5.0 TA
Double Yolk - 1988 16' Scamp Deluxe
Donna D. is online now   Reply With Quote
Old 07-03-2012, 08:04 PM   #14
Junior Member
 
Name: 89
Trailer: 89 rexhall airex
Oregon
Posts: 7
I'm baaaaack...

Well, this picture:


from this thread:

http://www.fiberglassrv.com/forums/f...oot-38073.html

pretty much looks like the situation I had going... Is an 86 bigfoot a molded trailer?

brianf21 - haven't buttoned the wall up yet, but I was just reading up on penetrol, and perhaps I'll slosh some of that on the steel before I do. BUT - probably not much point - can only get to one side of the metal, the other 3 are buried in spray foam and you'd have to rip it all out. There are pics further up the thread that show the process, but there's not really much to see "finished". The exterior wall is now tight and good as new below the window. I have yet to do the space ABOVE the window which is trickier due to gravity, and the holdup is that I need to reset the durned awning rail that's the source of the problem, which I should have done before I did anything else. Doh. Dunno what I was thinking.

I'll use penetrol on the chrome and wood, but I think the red max is a less intimidating option for the fiberglas exterior. I've also discovered eternabond tape, which I'll use to seal the roof seams, and the doublestick eternabond for the front and rear seams that go completely up one side, over the top and down the other and have a cap on them. The bead has been blown on them all, the doublestick will seal all of that up forever, including the fasterners, without having to run a bead of something else on both sides of each. I like that. Then the roof will get some kool seal after the seams are cleaned and done. I'm gonna use that doublestick on the awning rail, as well as back it inside with 1X2 since I don't have a frame member to sink into. I think using the doublestick will allow me to use about half the through fastenings with much more overall strength, more good stuff. The fewer the intrusions the better.

Someone on another forum used the doublestick only on their awning rail and a few wiser folks suggested that perhaps some fasteners might be prudent. LOL.

It'll be gorgeous if I ever get 'er done. ;-)

I've registered over at iRV2 and asked that a rexhall owners group be created, but I don't know when or if that will happen. I'll report back here with a url if it does and we can be out of donna's hair.
89airex is offline   Reply With Quote
Old 07-03-2012, 09:29 PM   #15
Senior Member
 
Tom Trostel's Avatar
 
Trailer: 1973 Compact Jr and 1980 Bigfoot 17 ft
Posts: 1,339
Registry
Send a message via AIM to Tom Trostel Send a message via MSN to Tom Trostel
A 1986 17' Bigfoot is molded fiberglass with an upper and lower half. When the owner speaks of delamination, he isn't talking about filon sheet fiberglass in a stickbuilt trailer that can split into many layers. The Bigfoot walls, ceiling and floor are made of a sandwich of thin exterior fiberglass, stryfoam insulation and inner wall plywood that in glued together. If the glue fails in the wall, the exterior fiberglass is not strong enough to support the weight of the roof and the wall will sag. By adding new glue and clamping with pressure, the original strength is restored and no more sag.
__________________
1980 Bigfoot 17' & former owner of 1973 Compact Jr
Tom Trostel is offline   Reply With Quote
Old 07-03-2012, 10:12 PM   #16
Junior Member
 
Name: 89
Trailer: 89 rexhall airex
Oregon
Posts: 7
Yup

Same problem, different layers perhaps...

So I think there IS relevance, and it's at this site I got the original inspiration. Using the epoxy resin and pressure to mash it all back together is the winning ticket. That stuff is pretty indestructible. ;-)

But we'll see over time.
89airex is offline   Reply With Quote
Old 07-04-2012, 09:35 AM   #17
Junior Member
 
Name: 89
Trailer: 89 rexhall airex
Oregon
Posts: 7
Denied

> We add forums when we see a sufficient number of posts relating to a
> brand to sustain the forum.
>
> However, we have no plans to add new forums at this time.
>
>
> Thanks for your support of iRV2.
>
> Adios, Dirk
> Site Staff

That's a shame.
89airex is offline   Reply With Quote
Reply


Currently Active Users Viewing This Thread: 1 (0 members and 1 guests)
 

Posting Rules
You may not post new threads
You may not post replies
You may not post attachments
You may not edit your posts

BB code is On
Smilies are On
[IMG] code is On
HTML code is Off
Trackbacks are Off
Pingbacks are Off
Refbacks are Off


Similar Threads
Thread Thread Starter Forum Replies Last Post
Restoring/compounding technique Peggy Care and Feeding of Molded Fiberglass Trailers 9 09-16-2010 02:28 PM
best technique for air flow with Maxx Air Fan with 13 footer lloyd cicetti General Chat 4 06-18-2010 05:04 PM
wheel well repair Kelly G Problem Solving | Owners Helping Owners 1 05-22-2009 07:20 PM
Fiberglass Repair mwinslow Problem Solving | Owners Helping Owners 4 11-18-2006 08:12 AM
fiberglass repair Legacy Posts Care and Feeding of Molded Fiberglass Trailers 29 01-22-2003 10:18 AM

» Trailer Showcase

Hunter

Gmakt

Bigfoot

K Ross
» Upcoming Events
No events scheduled in
the next 465 days.
» Featured Campgrounds

Reviews provided by


All times are GMT -6. The time now is 04:36 PM.


Powered by vBulletin® Version 3.8.11
Copyright ©2000 - 2024, vBulletin Solutions Inc.