Please don't do this to your trailer! - Fiberglass RV
Journey with Confidence RV GPS App RV Trip Planner RV LIFE Campground Reviews RV Maintenance Take a Speed Test Free 7 Day Trial ×


Reply
 
Thread Tools Search this Thread Display Modes
 
Old 08-14-2014, 08:27 PM   #1
Senior Member
 
sarahspins's Avatar
 
Name: Sarah
Trailer: 1984 13' Scamp named "Ramblin Rose"
Texas
Posts: 158
Registry
Please don't do this to your trailer!

Yet another "what on earth were they thinking" discovery today.... I am almost speechless. I knew there was a "patch" of some sort over the previously rotted rear floor, but this is truly not what I expected when I finally removed one of the benches and peeled back the linoleum to take a look.


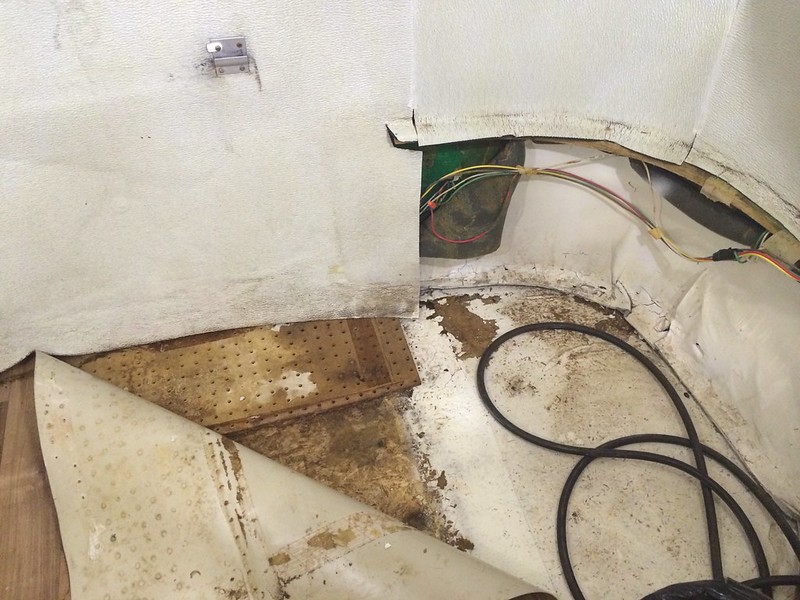
I really just don't get this... no matter what this was always going to be a half-assed job because of the way the prior owner approached fixing it (which I could feel under the linoleum), but peg board is the absolute last thing I would have expected to uncover.

Granted, I expected to replace most of the rear floor because of water damage visible under the bench (where the OSB had chipped away under the fresh coat of paint it got at some point) and because the old leaks were never really fixed (as you can see by the trails down the ensolite under the rear window), so whatever, but I just don't get it.. if you are going to go through the trouble to pull everything out and put down new linoleum, why not actually take the time to fix the floor better than this? Or better than that, fix the cracked and leaking window seals that led to most of this in the first place... that job took me all of 30 minutes per window, it honestly wasn't that difficult (it was easier than I expected to get the lockstrip in, once I lubed up the channel very well), and I even did one of them in the dark

I should have snapped a shot of what was underneath the soggy rotting peg board, but the OSB has completely disintegrated, there were some holes patched with who knows what that was barely clinging on (might be caulking, might be construction adhesive... I'm honestly not sure).

We won't even get into the wiring.. it's a mess and full of splices wrapped in nothing more than wire nuts and electrical tape, and I can't even imagine how corroded everything is since none of the leaks were ever fixed until just recently, and it's coming out as soon as I get the other bench free (I needed a flashlight to locate the screws attaching it to the closet cabinet, so that seemed like a good place to stop for the evening) so I have easy access to everything all at once. I did "replace" the taillights a while back, but they're not wired in yet since there was no continuity in these wires from the front of the trailer. I have all of my supplies ready to go, but re-wiring has been low on the list of priorities

On tomorrow's agenda is to get the other dinette bench out and start working on removing the rotted floor... should be fun
sarahspins is offline   Reply With Quote
Old 08-14-2014, 09:32 PM   #2
Senior Member
 
Name: Dale
Trailer: 2010 EggCamper; 2002 Highlander 3.0L; 2017 Escape 21'; 2016 F-150 5.0L Fx4
Colorado
Posts: 746
Sarah, Maybe yours can be the first entry of a new "What were they thinking?" contest. I'm sure there are lots of other photos and restoration horror stories out there. Find a way to post them in a photo gallery and eventually let people vote for the "Worst of the Worst (WOW) Award".
War Eagle is offline   Reply With Quote
Old 08-15-2014, 01:31 AM   #3
Junior Member
 
Name: Kevin
Trailer: Boler
British Columbia
Posts: 5
Hi, I have recently had almost the same situation in our newly acquired old boler. I am curious as to your steps to replace the floor? I'm to the point of Lino pulled up and now plan on cutting the rotten section out.
Shields is offline   Reply With Quote
Old 08-15-2014, 01:58 AM   #4
Senior Member
 
Borrego Dave's Avatar
 
Name: Dave
Trailer: Casita SD17 2006 "Missing Link"
California
Posts: 3,738
There was a recent post on the strangest thing you've found in your trailer. I think Sarah has the winner so far
Borrego Dave is offline   Reply With Quote
Old 08-15-2014, 05:44 AM   #5
Senior Member
 
Name: Steve
Trailer: 2018, 21ft escape— 2019 Ram 1500 Laramie
NW Wisconsin
Posts: 4,500
It appears to be a combination of stupid and cheap A common malady
steve dunham is offline   Reply With Quote
Old 08-15-2014, 07:07 AM   #6
Senior Member
 
papa-t's Avatar
 
Name: Ted
Trailer: (Dark side)Crossroads Now
Glade Valley, North Carolina
Posts: 990
Well you just can't fix stupid. Huh
__________________
“I have tried to live my life so that my family would love me and my friends would respect me. The others can do whatever the Hell they please!” —John Wayne
papa-t is offline   Reply With Quote
Old 08-15-2014, 07:52 AM   #7
Senior Member
 
GMike A's Avatar
 
Name: Mike
Trailer: 2001 Spirit Deluxe 17" K5NAN
Texas
Posts: 688
Perhaps the logic was that the holes would provide proper aeration.
__________________
Mike
K5NAN
"Miss Adventures"
If you Rest, You Rust
GMike A is offline   Reply With Quote
Old 08-15-2014, 09:04 AM   #8
Commercial Member
 
tractors1's Avatar
 
Name: Charlie Y
Trailer: Escape 21 - Felicity
Oregon
Posts: 1,584
Quote:
Originally Posted by GMike A View Post
Perhaps the logic was that the holes would provide proper aeration.
Or improved drainage if there are additional holes drilled to daylight underneath.....

Charlie Y
__________________
Charlie Y

Don't drill holes, try custom storage you design: https://RVWidgetWorks.com
tractors1 is offline   Reply With Quote
Old 08-15-2014, 09:22 AM   #9
Senior Member
 
Mike Magee's Avatar
 
Name: Mike
Trailer: 93 Burro 17 ft
Oklahoma
Posts: 6,025
The PO wanted to cover it up, make it look good quickly & easily as possible, and sell it right away to some unsuspecting person. There are people like that.
Mike Magee is offline   Reply With Quote
Old 08-15-2014, 10:17 AM   #10
Senior Member
 
sarahspins's Avatar
 
Name: Sarah
Trailer: 1984 13' Scamp named "Ramblin Rose"
Texas
Posts: 158
Registry
Quote:
Originally Posted by Shields View Post
Hi, I have recently had almost the same situation in our newly acquired old boler. I am curious as to your steps to replace the floor? I'm to the point of Lino pulled up and now plan on cutting the rotten section out.
That is pretty much my plan. I don't know if the boler has fiberglass under the floor but the scamp doesn't, the floor is tabbed into the fiberglass shell. I plan on removing the upper layer of fiberglass tabbing (dremel multi-tool will aid in the removal) and then I intend to remove a section of floor about 12" wide across the back of the trailer and fiberglass the replacement floor in place and reinforce it from below so the new section doesn't flex too much.

I have a similar section of rotted floor in the front under the bunk to repair as well, but the "area" the floor covers there is smaller and I plan on replacing the whole front piece on that side.
sarahspins is offline   Reply With Quote
Old 08-15-2014, 10:39 AM   #11
Senior Member
 
sarahspins's Avatar
 
Name: Sarah
Trailer: 1984 13' Scamp named "Ramblin Rose"
Texas
Posts: 158
Registry
Quote:
Originally Posted by Mike Magee View Post
The PO wanted to cover it up, make it look good quickly & easily as possible, and sell it right away to some unsuspecting person. There are people like that.
They fixed it up for themselves and used it for a couple of years.. this wasn't a repair made immediately before the sale.
sarahspins is offline   Reply With Quote
Old 08-21-2014, 11:28 AM   #12
Junior Member
 
Name: Lincoln
Trailer: Scamp
Nh
Posts: 2
I'm in the process of the same thingClick image for larger version

Name:	ImageUploadedByFiberglass RV1408641906.460690.jpg
Views:	64
Size:	131.2 KB
ID:	75236 didn't expect A piece of plywood hiding this, the hardest part was detaching the fiberglass seem to the plywood, I used a feint oil and cut the permitter of the seem, couple of pry bars and the sheet popped out easily! Hardest part B getting the sheet out of the camper to use for template. I'm using 3/4 ac plywood that I will coat with something heavy duty. Do you have any before and after pictures?


Sent from my iPad using Fiberglass RV
Freerider3815 is offline   Reply With Quote
Old 08-21-2014, 12:42 PM   #13
Moderator
 
Name: RogerDat
Trailer: 2010 Scamp 16
Michigan
Posts: 3,744
Have heard from someone in response to my floor rot repair that putting a coat of fiberglass resin on the underside is the best way to provide heavy duty protection to the wood from elements.

In the thread on my ongoing floor repairs I have a link to someone else that has done it, with pictures. Had some good ideas on how to support shell with floor removed.

http://www.fiberglassrv.com/forums/f...val-65985.html

Last year I watched a YouTube video of doing a floor patch rather than replace, one thing that stuck in my mind because I have used it for drywall and some other types of repairs. Make the patch first, trace around it to make the cut in the floor. Get an exact match of hole to patch. The other thing I recall was they supported patch with board under floor across the hole with aluminum foil on it to keep the fiberglass from sticking. Did the top with fiberglass, removed the board then did the bottom too.


I bet I know how you ended up with the peg board under the linoleum. PO was doing a replacement of lino, possibly in advance of using it on a trip (I know I always end up doing that stuff when I'm getting ready to use it. Drives my wife nuts.) Discovers the floor rot. The floor repair is a bigger job than they have time for so.... patch with what will fit without being too thick and get the lino in so they can go camping. Planning to come back later to do a "proper" repair. Which never happened.

If PO would have found a piece of Plexiglas in the garage your repair would have been Plexiglas, if they found some sheet metal.... In short whatever was on hand that would let them finish the linoleum job. That would be my guess, why they did not fix the water leaks? No idea. Maybe they did not know how, or never camped in the rain or... are the sort that considered peg board a permanent repair of the leaking window ;-)
RogerDat is offline   Reply With Quote
Old 08-21-2014, 01:10 PM   #14
Senior Member
 
sarahspins's Avatar
 
Name: Sarah
Trailer: 1984 13' Scamp named "Ramblin Rose"
Texas
Posts: 158
Registry
Roger, I suspect you are right on with how I ended up with the pegboard patch - I'm sure it's just what was handy at the time.

As far as waterproofing repairs, the underside of the original OSB in my camper is definitely coated in fiberglass resin, and it seems to work fine as a waterproofer - personally I suspect part of the reason the damage to my floor is so extensive is that the resin side was very much intact (until I started removing what I could without tools), any time water made it into the camper it just sat there rather than finding a way through and back outside.

I haven't had a chance to really set about removing more of the floor in mine, but I should have more opportunity after the kids are back in school next week.
sarahspins is offline   Reply With Quote
Old 08-21-2014, 01:39 PM   #15
Junior Member
 
Name: Lincoln
Trailer: Scamp
Nh
Posts: 2
Click image for larger version

Name:	ImageUploadedByFiberglass RV1408649906.098744.jpg
Views:	38
Size:	136.6 KB
ID:	75252 my new ac plywood 3/4 subfloor with west systems epoxy first coat! Can't wait to put the shiny hardwood floor in!


Sent from my iPad using Fiberglass RV
Freerider3815 is offline   Reply With Quote
Old 08-21-2014, 02:47 PM   #16
Senior Member
 
Trailer: Scamp 19 ft 5th Wheel
Posts: 1,861
Deleted
Eddie Longest is offline   Reply With Quote
Old 08-21-2014, 05:47 PM   #17
Senior Member
 
Mike Magee's Avatar
 
Name: Mike
Trailer: 93 Burro 17 ft
Oklahoma
Posts: 6,025
Jim Palmer at Eggcamper coats the top of the plywood with resin, but not the bottom. I asked why, and he said that moisture must have a way out and the best way out is down. Almost all damage comes from water sitting on and soaking in from up top, not from occasional road spray.
Mike Magee is offline   Reply With Quote
Reply


Currently Active Users Viewing This Thread: 1 (0 members and 1 guests)
 

Posting Rules
You may not post new threads
You may not post replies
You may not post attachments
You may not edit your posts

BB code is On
Smilies are On
[IMG] code is On
HTML code is Off
Trackbacks are Off
Pingbacks are Off
Refbacks are Off


Similar Threads
Thread Thread Starter Forum Replies Last Post
If you see a bear, please don't do this Gina D. General Chat 17 08-30-2013 04:59 PM
So... you don't need bathroom facilities in your trailer Donna D. General Chat 36 06-23-2013 07:19 PM
PLEASE, don't let the cat outta the bag.... Doug Mager Jokes, Stories & Tall Tales 1 07-18-2010 01:57 AM
Don't let your dogs watch Gina D. General Chat 5 08-07-2008 02:59 PM
Webmaster, please don't read this! Legacy Posts General Chat 13 05-05-2003 10:31 PM

» Upcoming Events
No events scheduled in
the next 465 days.
» Featured Campgrounds

Reviews provided by


All times are GMT -6. The time now is 05:46 AM.


Powered by vBulletin® Version 3.8.11
Copyright ©2000 - 2024, vBulletin Solutions Inc.