 |
|
 02-25-2014, 03:58 PM
|
#201
|
|
Commercial Member
Name: Ian
Trailer: 1974 Boler 1300 - 2014 Escape 19'
Alberta
Posts: 1,380
|
Quote:
Originally Posted by Troutter

Ian, I started to restore my 13 ft, 85 Companion last fall (very similar to the Uhaul). When you jacked up the ceiling and installed the braces around the door did the door fit better? Do you have suggestions for someone like myself who is just getting ready to start this project?
I do what to say one more thing. You have provided inspiration for all of us that are trying to restore our trailers! The pictures and videos are amazing! Just reading this thread makes me want to go out side and shovel the 2 ft of snow away from my trailer and get working!!! Thank you so much for everything you've done for us!!! |
Thank you Jason
Yes jacking the wall back to their original shape fixed my door gap. In mine all aspects of the door were out of whack, the hinges were worn out and out of adjustment and the body had sagged. If you use the door as a guide try to "jack" the roof up (gently) to see if you can get the shape to fit the door.
For an easier read of my build look at www.Proud-Canadian.com
|

|

|
|
03-15-2014, 01:52 PM
|
#202
|
|
Commercial Member
Name: Ian
Trailer: 1974 Boler 1300 - 2014 Escape 19'
Alberta
Posts: 1,380
|
Quote:
Originally Posted by cramar
Can you post either here, on a new thread, or on your blog, detailing exactly your method for polishing aluminum?
|
Finally had the time to film and edit a short video on the method and tools I use to polish the aluminum hinges. The same process is what I use to polish the extruded aluminum (window frames and belly band) although with those items you don't need to grind or sand first, you can go directly to the buffing wheel.
The video is available on YouTube and on
My Blog Polishing Cast Aluminum Boler Door Hinge | Proud Canadian
|
|
|
|
|
03-16-2014, 06:17 AM
|
#203
|
|
Senior Member
Trailer: 1988 16 ft Scamp Deluxe
Posts: 25,709
|
SHINY! It's amazing how nice those hinges turned out... and only in eleven minutes 
__________________
Donna D.
Ten Forward - 2014 Escape 5.0 TA
Double Yolk - 1988 16' Scamp Deluxe
|
|
|
|
|
04-13-2014, 10:55 AM
|
#204
|
|
Commercial Member
Name: Ian
Trailer: 1974 Boler 1300 - 2014 Escape 19'
Alberta
Posts: 1,380
|
I was finally able to bring the Boler home this weekend, was able to time the trip before the rain started (which then turned to SNOW) and got it safely parked in the garage.
Finished up polishing that last few items, every piece of aluminum on the Boler is now polished including the windows, belly band, door hinges

... and even the Emblems
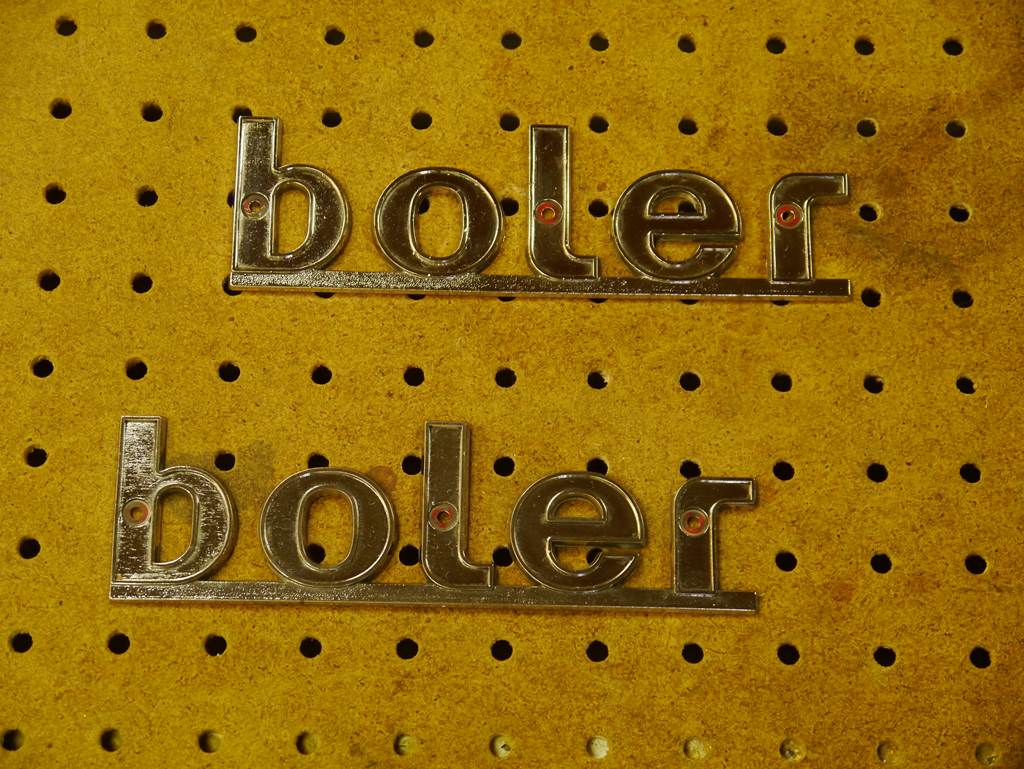
Starting next weekend the reassembly begins 
|
|
|
|
|
04-13-2014, 04:26 PM
|
#205
|
|
Senior Member
Name: Jon
Trailer: Burro
Oregon
Posts: 127
|
Great work and attention to detaill. I really enjoy your thread...it motivates me to get stuff done on mine!
|
|
|
|
|
04-26-2014, 12:18 PM
|
#206
|
|
Commercial Member
Name: Ian
Trailer: 1974 Boler 1300 - 2014 Escape 19'
Alberta
Posts: 1,380
|
Reassembly has started
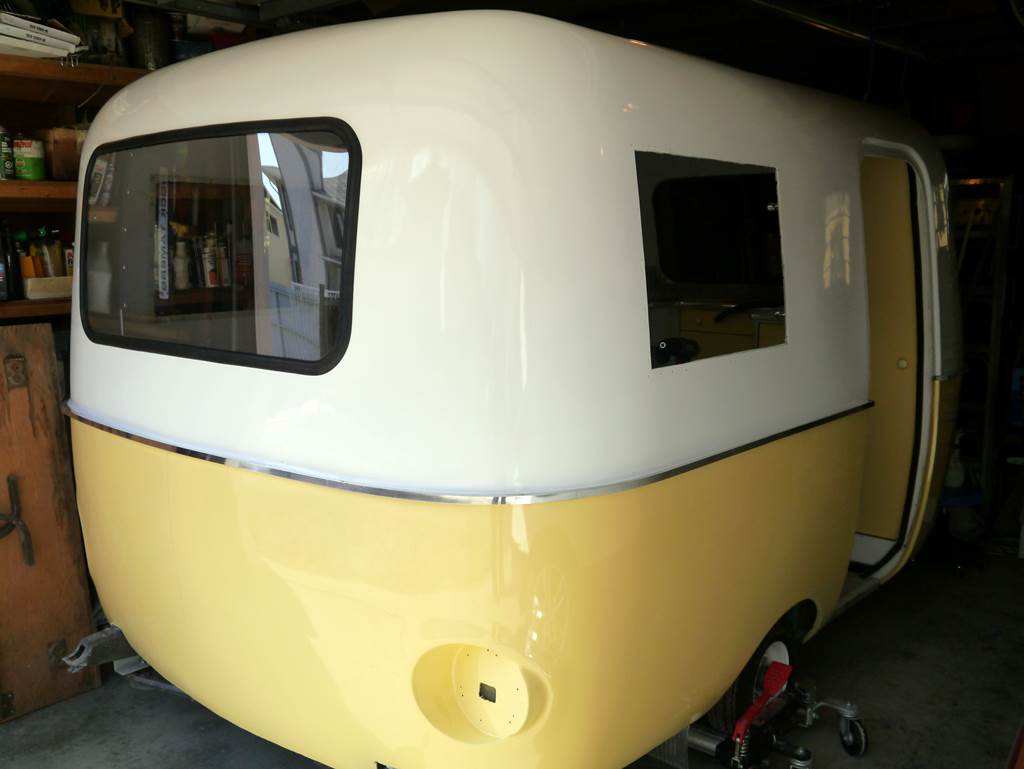
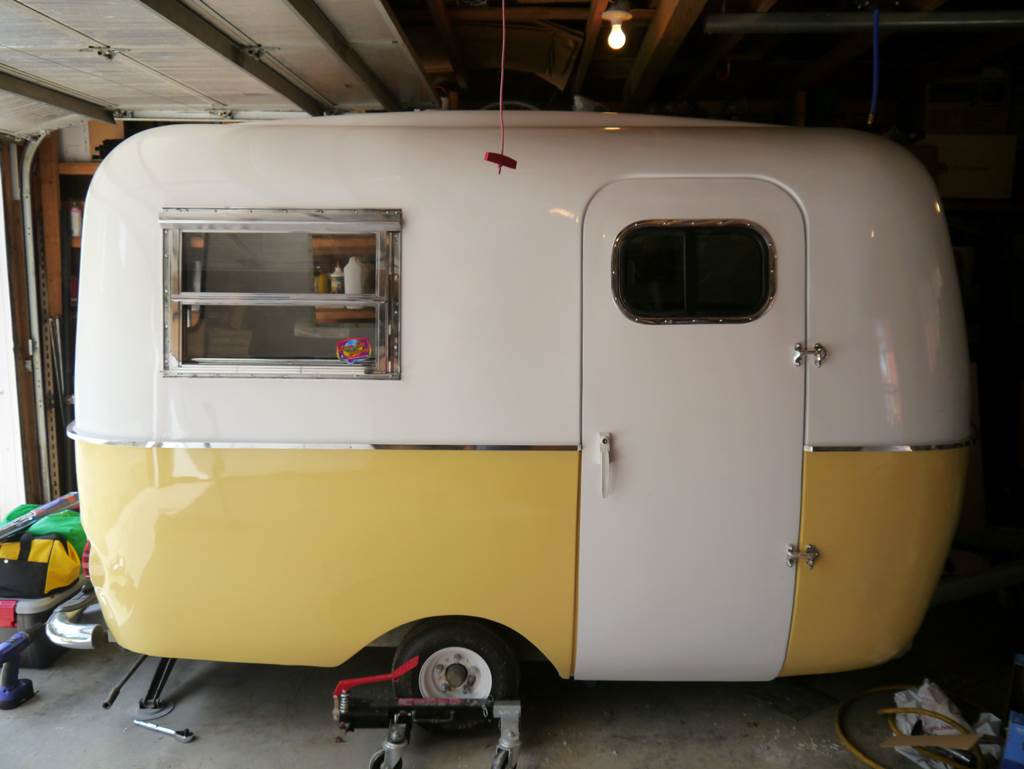
Although we are still having the occasional snow flurry, the weather has cooperated enough that I was able to bring the Boler home and start putting it back together.
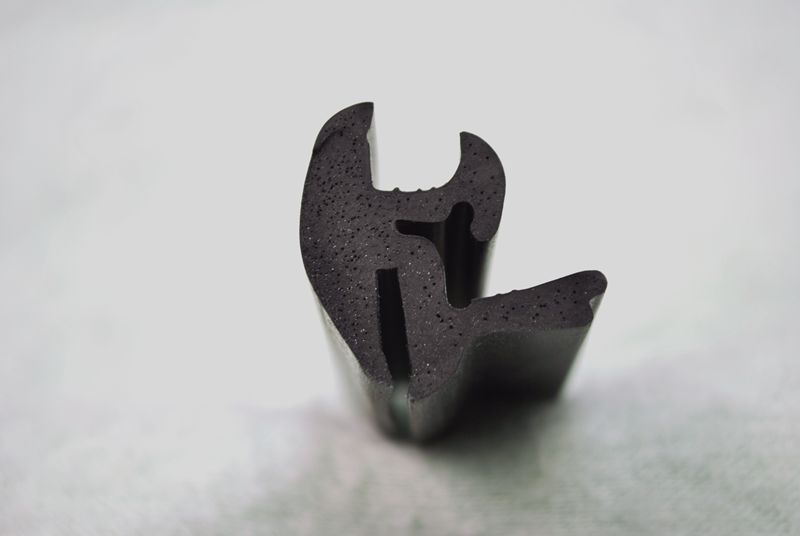
So far I have cut new front and rear windows from Polycarbonate (commonly called Lexan) and got them installed. I used new rubber mouldings that are is single piece design with an integrated lock strip rather than the original 2 piece design, a very clean look
I also got the belly band installed
|
|
|
|
|
04-26-2014, 12:28 PM
|
#207
|
|
Commercial Member
Name: Ian
Trailer: 1974 Boler 1300 - 2014 Escape 19'
Alberta
Posts: 1,380
|
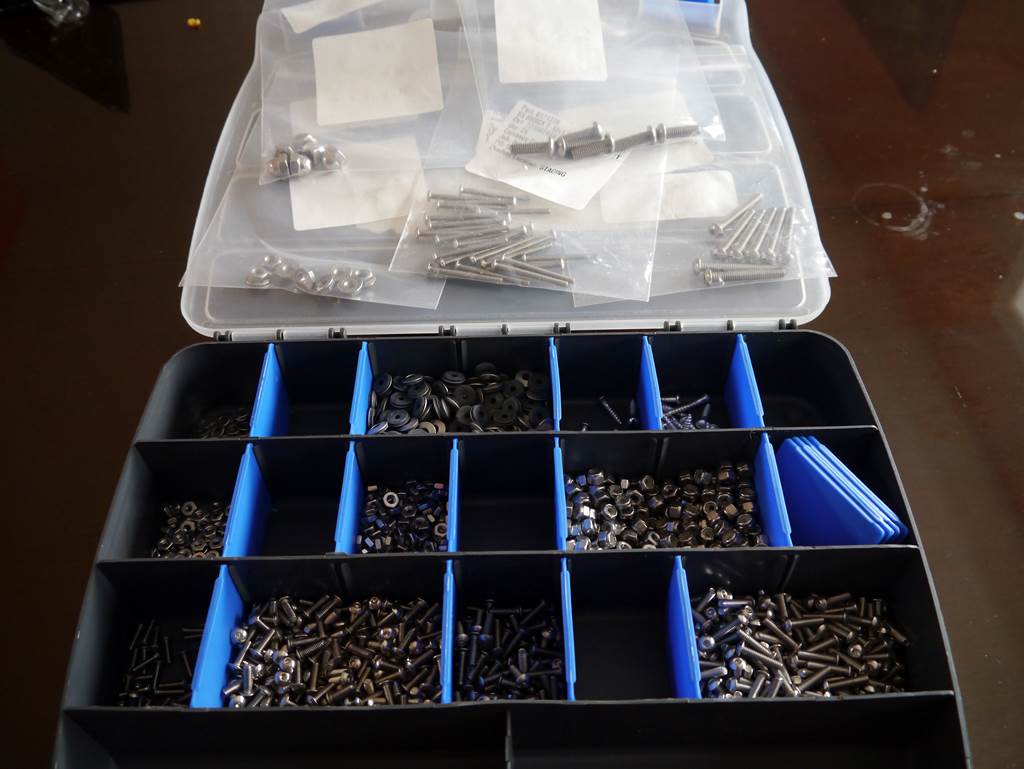
I also ordered in all Stainless Steel fasteners.
Although the way I have rebuilt the Boler there are no rivets remaining, items like the vents and outside fittings will all be connected with #8 Button Head machine screws. These use a small hex or allen drive, have a large low profile head that distributes the load well and looks very cool.
For installing the windows I am using aluminum screws, I am using these to eliminate the chance of galvanic corrosion by using a dissimilar metal fastener. For those that noticed YES I am a strange person ") , the aluminum screws were dull so of course I had to polish them.
The washers shown are bonded washers that have an integrated rubber seal, I am not taking any chances with leaks.
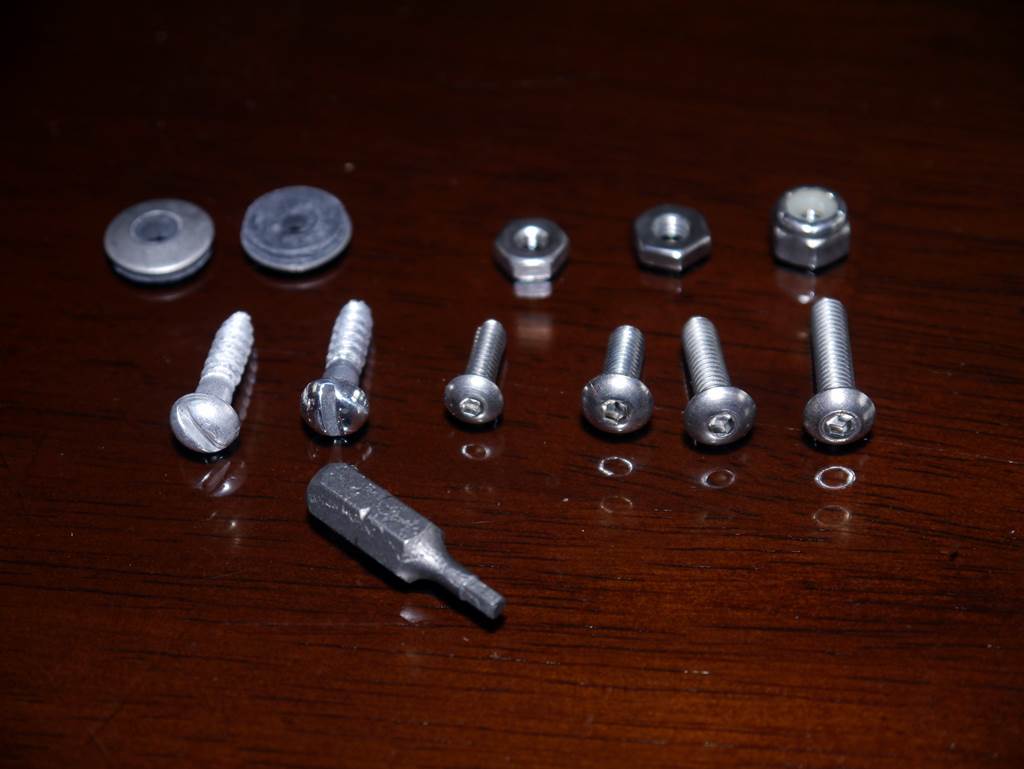
This is what $225 worth of stainless steel machine screws looks like. The bag contains the bolts for mounting the door hinges and other items.
|
|
|
|
|
04-26-2014, 09:30 PM
|
#208
|
|
Senior Member
Trailer: Chalet
Posts: 513
|
Looks like you are having loads of fun with your rebuild,that is a very good thing! Enjoy what you are doing ,do what makes you happy,Share pictures & details with us and  so you too can be out in the world of
HAPPY CAMPING
|
|
|
|
|
04-27-2014, 09:26 AM
|
#209
|
|
Senior Member
Name: Conrad
Trailer: Bigfoot 3000 & Barth "slide-in" truck camper
Connecticut
Posts: 958
|
It Started as a Kitchen Reno- Project Boler
I love your paint color choice. The two tone Boler styling is something I've always admire. Your Boler looks way better than new. Dare I say better than any other a Boler I have seen? Perhaps someone could match you , but not top you.
|
|
|
|
|
04-27-2014, 10:06 AM
|
#210
|
|
Commercial Member
Name: Ian
Trailer: 1974 Boler 1300 - 2014 Escape 19'
Alberta
Posts: 1,380
|
Quote:
Originally Posted by Night Sailor
I love your paint color choice. The two tone Boler styling is something I've always admire. Your Boler looks way better than new. Dare I say better than any other a Boler I have seen? Perhaps someone could match you , but not top you. |
Thank you Conrad, very kind comments and I do appreciate it.
I also love the 2 tone Bolers, they have that real vintage look, by changing the colors slightly to a pure polar white rather than the cream and using a buttercup yellow is does add a modern look to it somewhat.
The yellow did come together nicely, it started because the original was yellow/white and we liked it. I knew I needed to reupholster the inside, Sunbrella had a number of yellows but most were too bright, the buttercup yellow worked perfectly. Then it was matching the interior paint to the fabric ... the outside color matches also.
I am hoping by documenting the build I help others with ideas and inspiration to make their FGRV something special for them.
|
|
|
|
|
06-14-2014, 04:14 PM
|
#211
|
|
Commercial Member
Name: Ian
Trailer: 1974 Boler 1300 - 2014 Escape 19'
Alberta
Posts: 1,380
|
We are home from our 4 week vacation to London, Scotland and the Canadian Grand Prix Formula 1 race in Montreal, now it is time to get the Boler back together for summer fun.
Today I got the one side window installed (except for the screw cover trim strips), the door window and the tail lights. I also installed the door handle and latch.
Just a month until the Oregon Gathering so the pressure is on to get everything finished.

|
|
|
|
|
06-14-2014, 07:31 PM
|
#212
|
|
Commercial Member
Name: Ian
Trailer: 1974 Boler 1300 - 2014 Escape 19'
Alberta
Posts: 1,380
|
The window in the door was originally all black, I didn't like the look of it so I sanded the paint off the frame then ploished the aluminum under it. I think it looks. Great.
|
|
|
|
|
06-14-2014, 07:37 PM
|
#213
|
|
Senior Member
Trailer: 1988 16 ft Scamp Deluxe
Posts: 25,709
|
Quote:
Originally Posted by Ian G.
He window in the door was originally all black, I didn't like the look of it so I sanded the paint off the frame then ploished the aluminum under it. I think it looks. Great.
|
I think so TOO 
__________________
Donna D.
Ten Forward - 2014 Escape 5.0 TA
Double Yolk - 1988 16' Scamp Deluxe
|
|
|
|
|
06-14-2014, 09:55 PM
|
#214
|
|
Senior Member
Trailer: 13 ft Compact II
Posts: 524
|
Shining!
Ian you are the king of gloss! What a fantastic job on all the metal trim, and the body looks great, too.
Thanks for sharing your buffing regimen. My 1974 windows were really in sad condition when I got the trailer, with caulk plastered on quite liberally. That's been removed but it's been so long now I think I used fine steel wool to buff the aluminum, along with the appropriate aluminum cleaner/wax. But your buffing procedure really takes it to another level.
Beautiful!
Fran
Compact II 1974
|
|
|
|
|
06-15-2014, 05:17 AM
|
#215
|
|
Member
Name: Michelle
Trailer: 13' Scamp
Pennsylvania
Posts: 76
|
You've created a real work of art. I loved reading through your posts and seeing the pictures. Perhaps someday I'll get to see it in person!
|
|
|
|
|
06-15-2014, 08:47 AM
|
#216
|
|
Senior Member
Name: Kathy
Trailer: 2017 Escape 19
Washington
Posts: 600
|
Your trailer is looking super sharp! wish I could be at this year's Oregon Gathering to see it in person.
|
|
|
|
|
06-15-2014, 07:42 PM
|
#217
|
|
Commercial Member
Name: Ian
Trailer: 1974 Boler 1300 - 2014 Escape 19'
Alberta
Posts: 1,380
|
Thank you, and yes I hope to meet many of you in the years to come.
Today I made good progress and was able to install the windows on the left side (driver side), upper fridge vents and mark the new locations for the side maker lights. Sorry no pictures as I was able to squeeze in some work between Father's Day visits and phone calls.
|
|
|
|
|
06-29-2014, 06:24 AM
|
#218
|
|
Commercial Member
Name: Ian
Trailer: 1974 Boler 1300 - 2014 Escape 19'
Alberta
Posts: 1,380
|
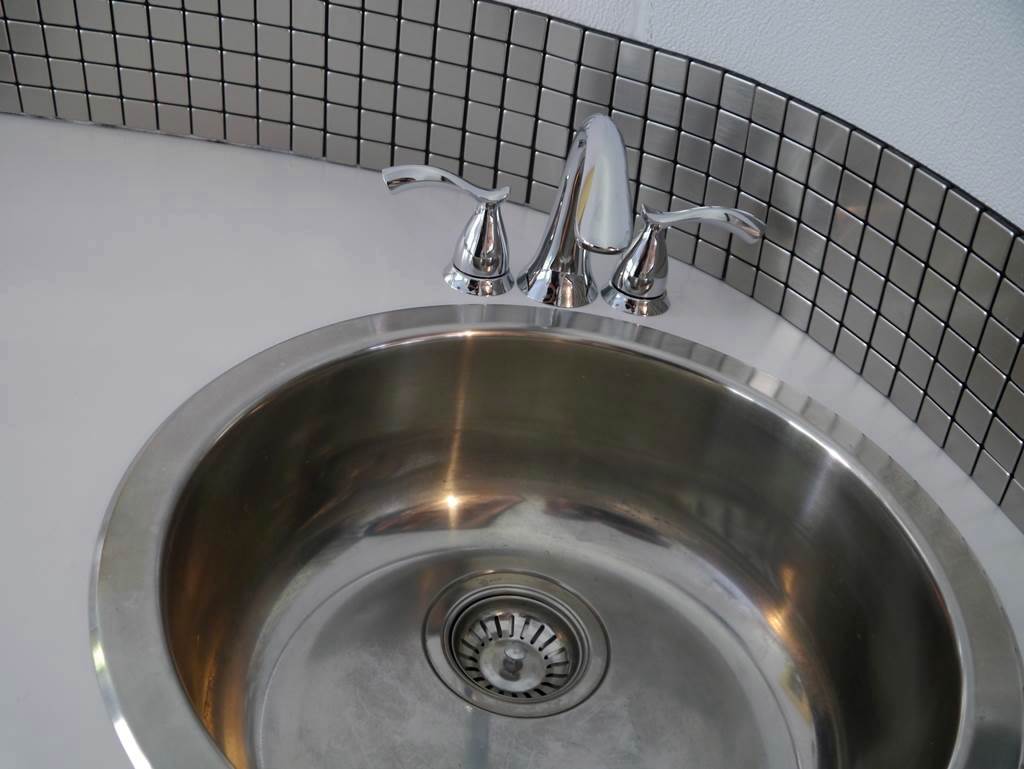
I have been very busy getting the Boler ready for the Oregon Gathering.
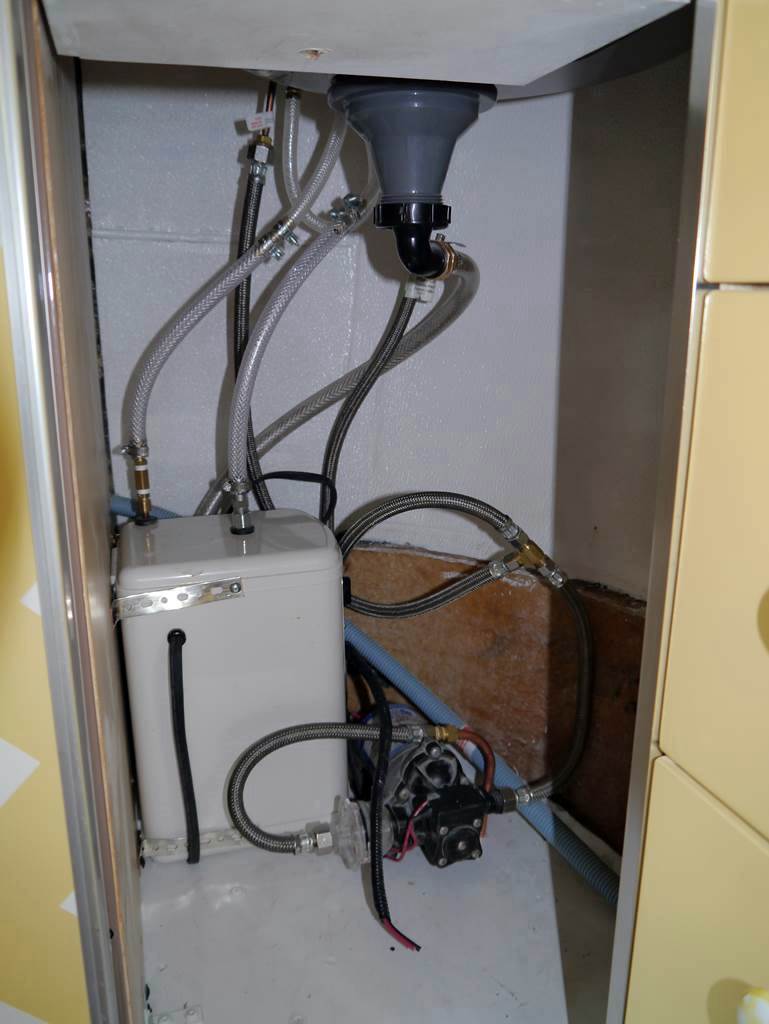
It is almost together, new marker lights installed, windows are all in, rewired most of the electrical (both 12V and 110V) and completely redid the plumbing.
As part of the plumbing update I relocated both the pump and the water inlet locations. I also had a 1 gallon instant hot water heater sitting on my workshop shelf and thought it would be the perfect size for the Boler.
Yes this unit will only work when I am connected to 110V.
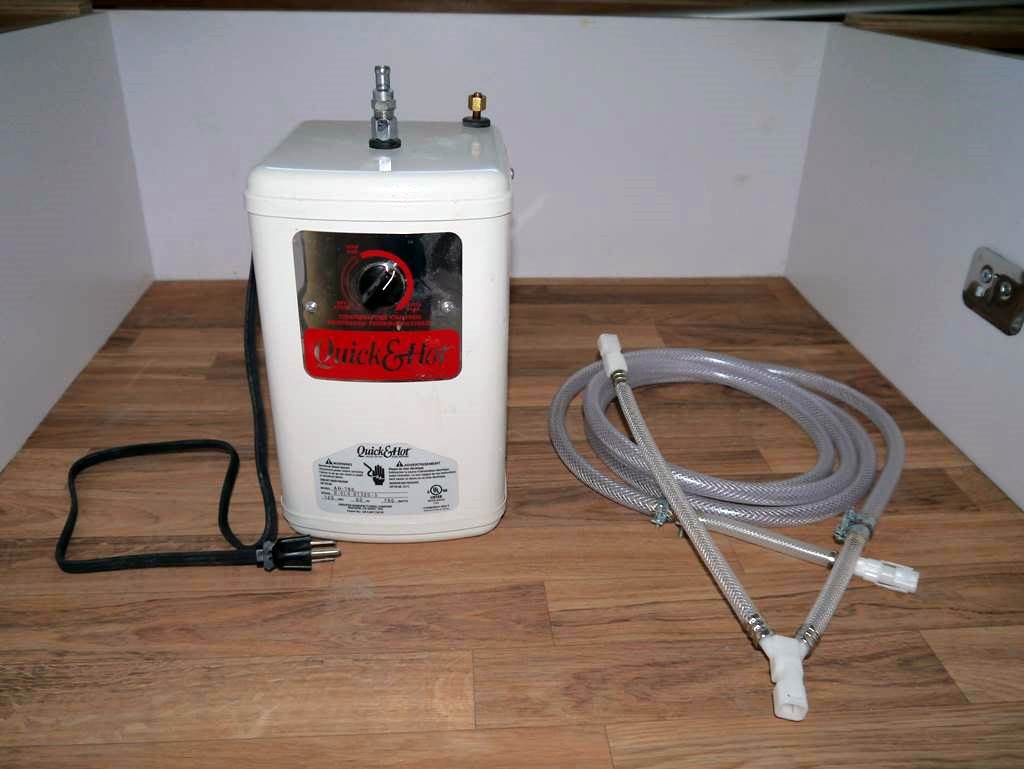
Water tanks like these are not designed to be pressurized. The tap that is included with the kit takes the pressurized water, the valve in the tap when turned on then allows water to flow into the tank and then hot water flows out of the faucet. (does that make sense?).
To replicate this design and ensure the tank would not be pressurized when the pump is running or street water connected I used a "wide mount faucet". This type of faucet has the spout and valves separate, they are connected under the counter with flexible hoses rather than the one piece brass construction usually found in most faucets.
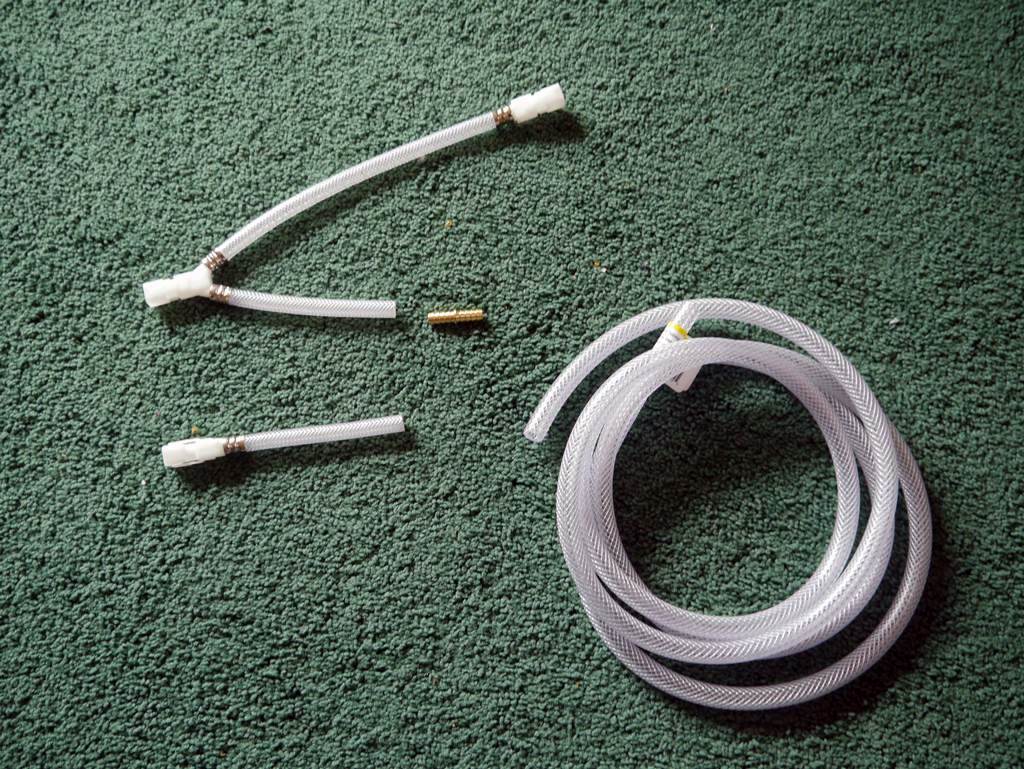
I cut the hose between the valve and the spout and by adding some short lengths of hose installed the hot water tank in series. When you turn on the tap water flows into the hot water tank which pushes the hot water out the tap.
The original "Y" pipe that comes with the faucet, each end is designed to connect to the hot & colt valves, the center connects to the spout.
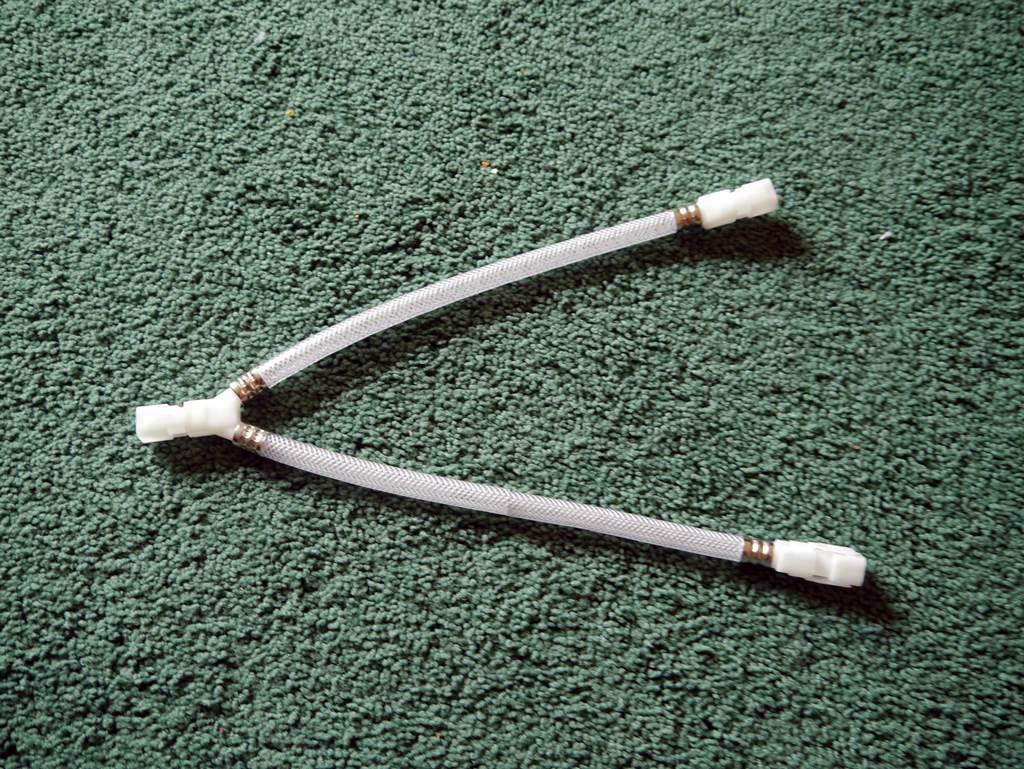
The line going to the hot valve is cut and tubing is spliced onto each side to make them longer.
The final unit installed under the sink
|
|
|
|
|
06-29-2014, 09:16 AM
|
#219
|
|
Senior Member
Name: Darrell
Trailer: Scamp Deluxe 16ft
Alabama
Posts: 328
|
Wow that's a work of art now. I'm sure everyone will be able to see you coming... with that much of a shine. Great job.
|
|
|
|
|
06-30-2014, 06:31 AM
|
#220
|
|
Commercial Member
Name: Ian
Trailer: 1974 Boler 1300 - 2014 Escape 19'
Alberta
Posts: 1,380
|
Quote:
Originally Posted by Darrell in Al
Wow that's a work of art now. I'm sure everyone will be able to see you coming... with that much of a shine. Great job.
|
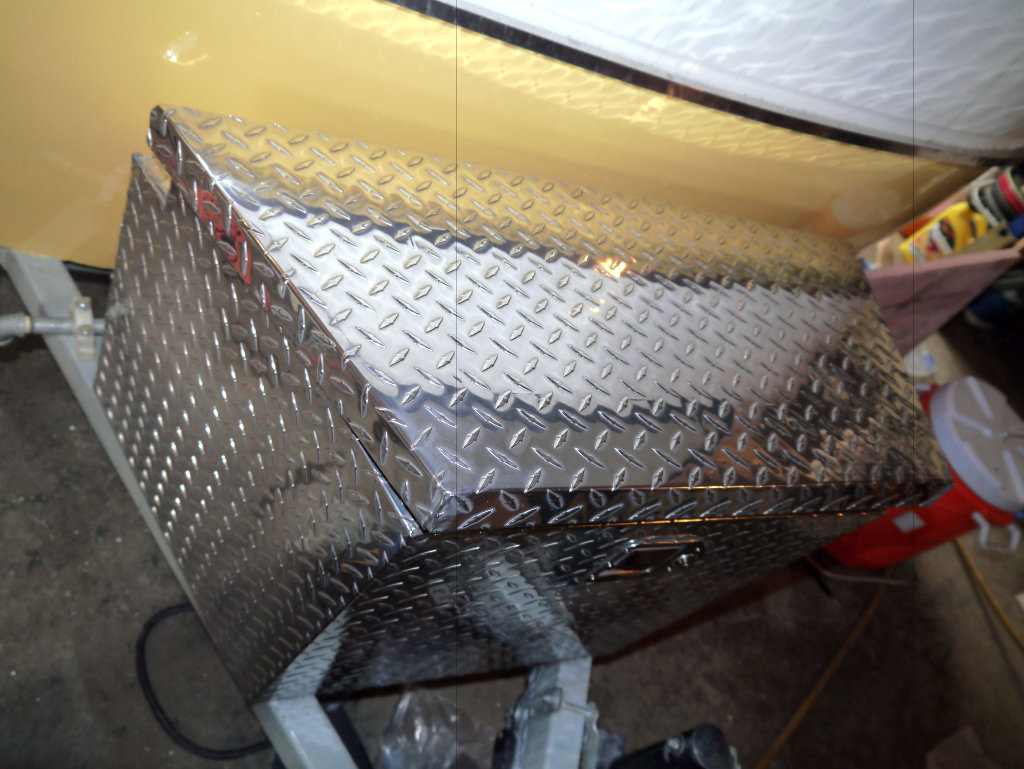
Thanks Darrell, all l that is left now are some minor items and the front and rear blinds. Speaking of shine I finished polishing the last item.
Before:
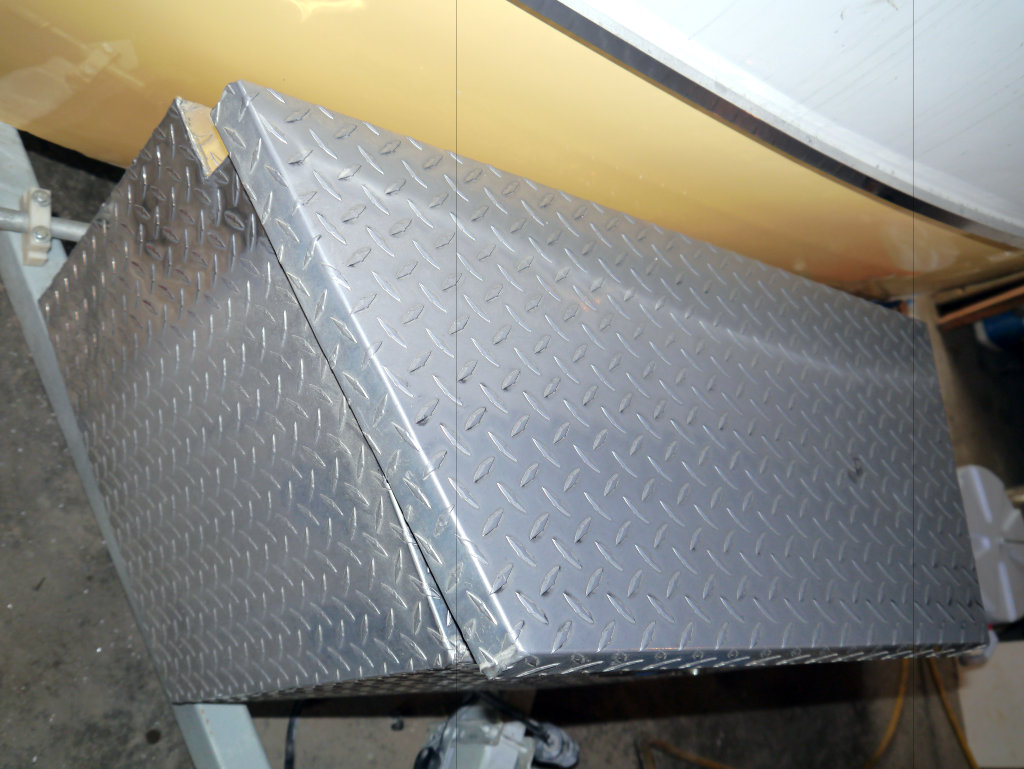
After:
|
|
|
|
|
|
|
Currently Active Users Viewing This Thread: 1 (0 members and 1 guests)
|
|
|
 Posting Rules
|
You may not post new threads
You may not post replies
You may not post attachments
You may not edit your posts
HTML code is Off
|
|
|
|
 » Recent Discussions
 |
|
|
|
|
|
|
|
|
|
|
|
|
|
|
|
|
|
|
|
|
|
|
|
|
|
|
|
|
|
|
|
|
|
» Upcoming Events |
No events scheduled in
the next 465 days.
|
|


 Buttercup
 Casita Vino (SOLD)
 Proud-Canadian Escape


 Compact II
 2017 Escape Escape 19
 Mr. B
Mr. B Linear Mode


