 |
|
 07-02-2014, 10:22 PM
|
#221
|
|
Senior Member
Name: Luis
Trailer: Boler 1300 79'
Alberta
Posts: 115
|
Shine, shine! Great work Ian.
|

|

|
|
07-04-2014, 07:14 AM
|
#222
|
|
Commercial Member
Name: Ian
Trailer: 1974 Boler 1300 - 2014 Escape 19'
Alberta
Posts: 1,380
|
Thank you Luis
Today It comes out of the garage, need to restock all the interior items then it gets a wash and wax ready for our first adventure.
I know I have not posted as many pictures as I should have. During the final assembly I came up with a few ideas and added a few additional items. I think you will find these "fun"
Pictures of our completed project (as if any project is ever completely finished) will follow very soon.
|
|
|
|
|
07-04-2014, 06:03 PM
|
#223
|
|
Senior Member
Name: Diane
Trailer: Casita, previously u-haul ct13
Virginia
Posts: 1,020
|
Great ideas and great work Ian, as I knew it would be from you.
|
|
|
|
|
07-05-2014, 08:46 AM
|
#224
|
|
Commercial Member
Name: Ian
Trailer: 1974 Boler 1300 - 2014 Escape 19'
Alberta
Posts: 1,380
|
|
|
|
|
|
07-05-2014, 09:33 PM
|
#225
|
|
Senior Member
Name: Diane
Trailer: Casita, previously u-haul ct13
Virginia
Posts: 1,020
|
It's so beautiful, Ian.
|
|
|
|
|
07-05-2014, 09:45 PM
|
#226
|
|
Member
Name: Suvi
Trailer: Boler
British Columbia
Posts: 70
|
Oh my gosh! Just came on to post pics of my little reno, and now am second guessing the wisdom of that. I am pretty proud of my little egg, given my knowledge base to start with, but this is GORGEOUS!
Sent from my iPhone using Fiberglass RV
|
|
|
|
|
07-06-2014, 05:59 AM
|
#227
|
|
Commercial Member
Name: Ian
Trailer: 1974 Boler 1300 - 2014 Escape 19'
Alberta
Posts: 1,380
|
Thank you Diane and Suvi
You SHOULD be proud of your egg. each one is unique, different and beautiful.
I looked at what you have done to your Boler Suvi and it is sooo cute 
|
|
|
|
|
07-06-2014, 03:14 PM
|
#228
|
|
Commercial Member
Name: Ian
Trailer: 1974 Boler 1300 - 2014 Escape 19'
Alberta
Posts: 1,380
|
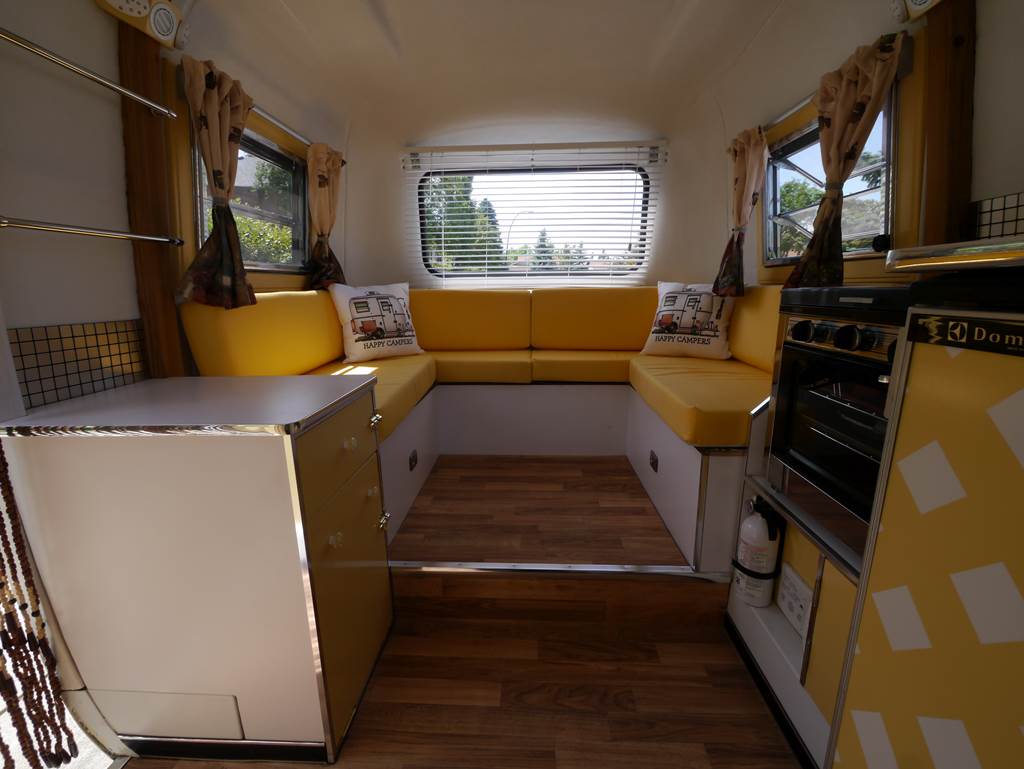
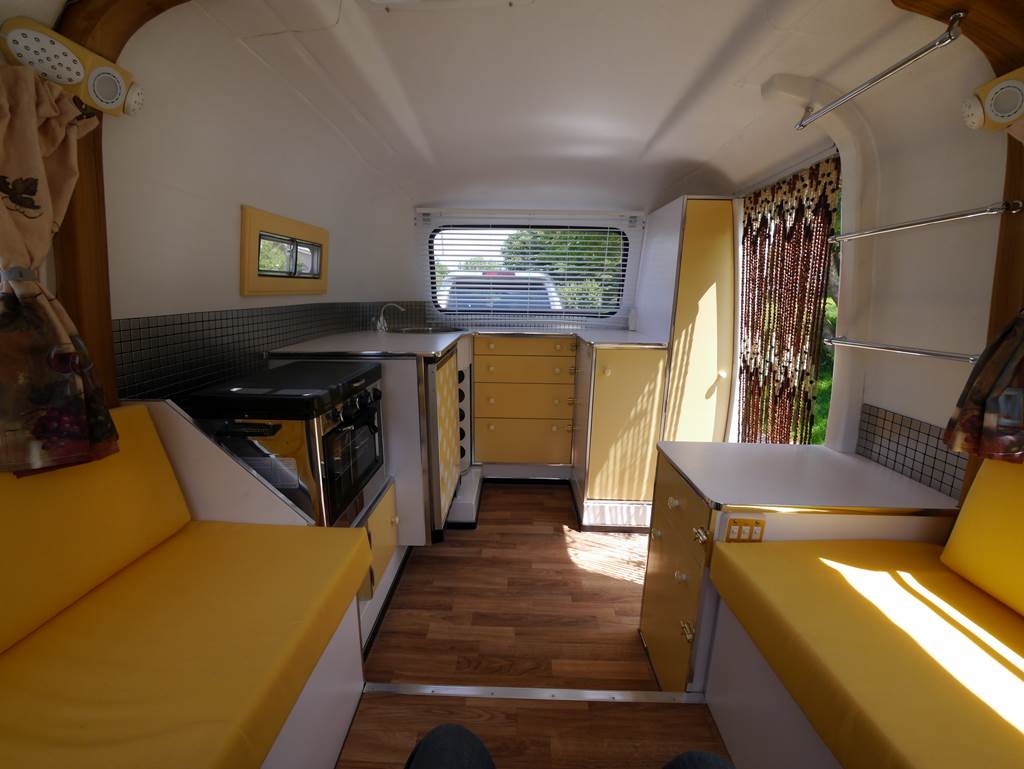
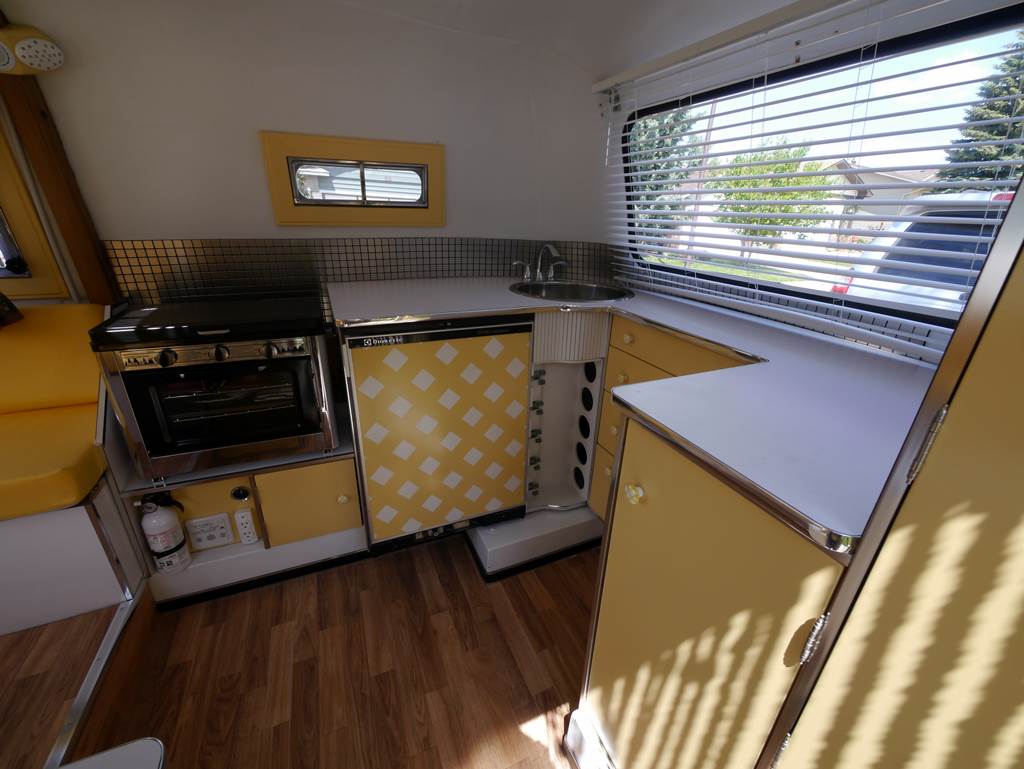
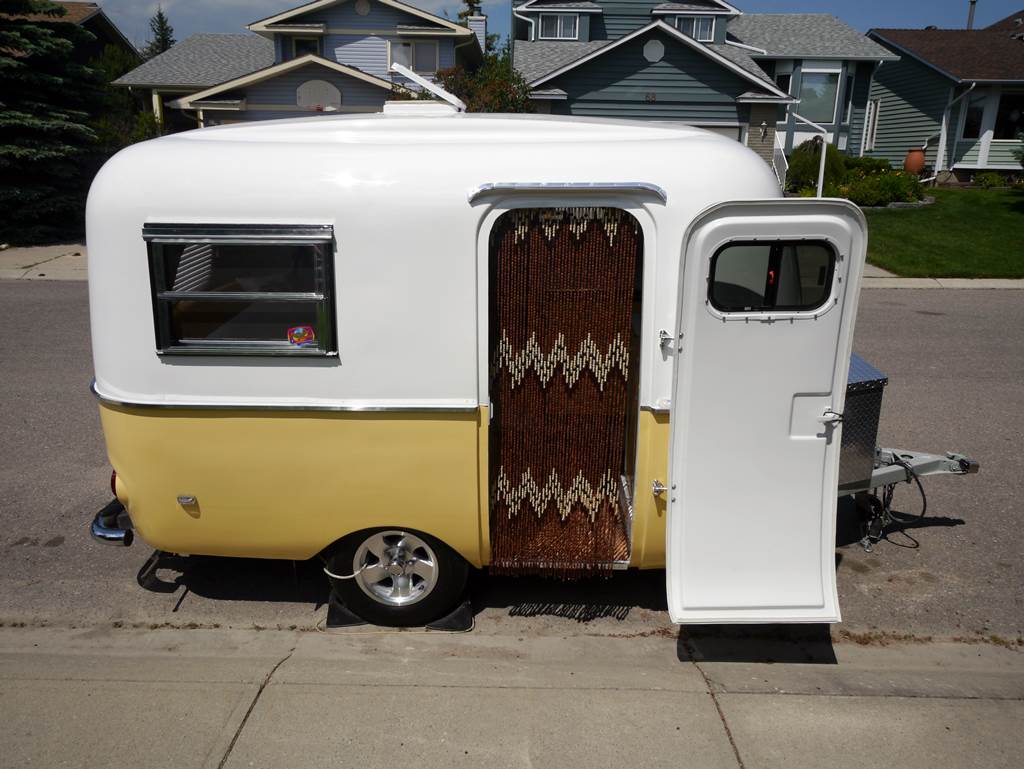
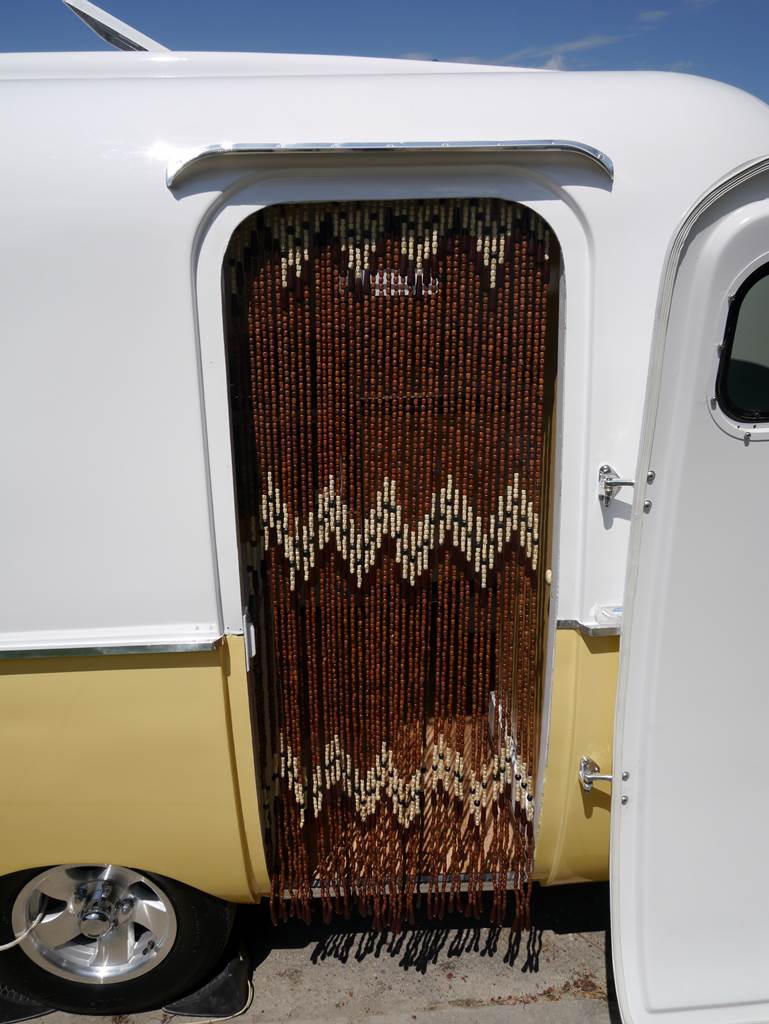
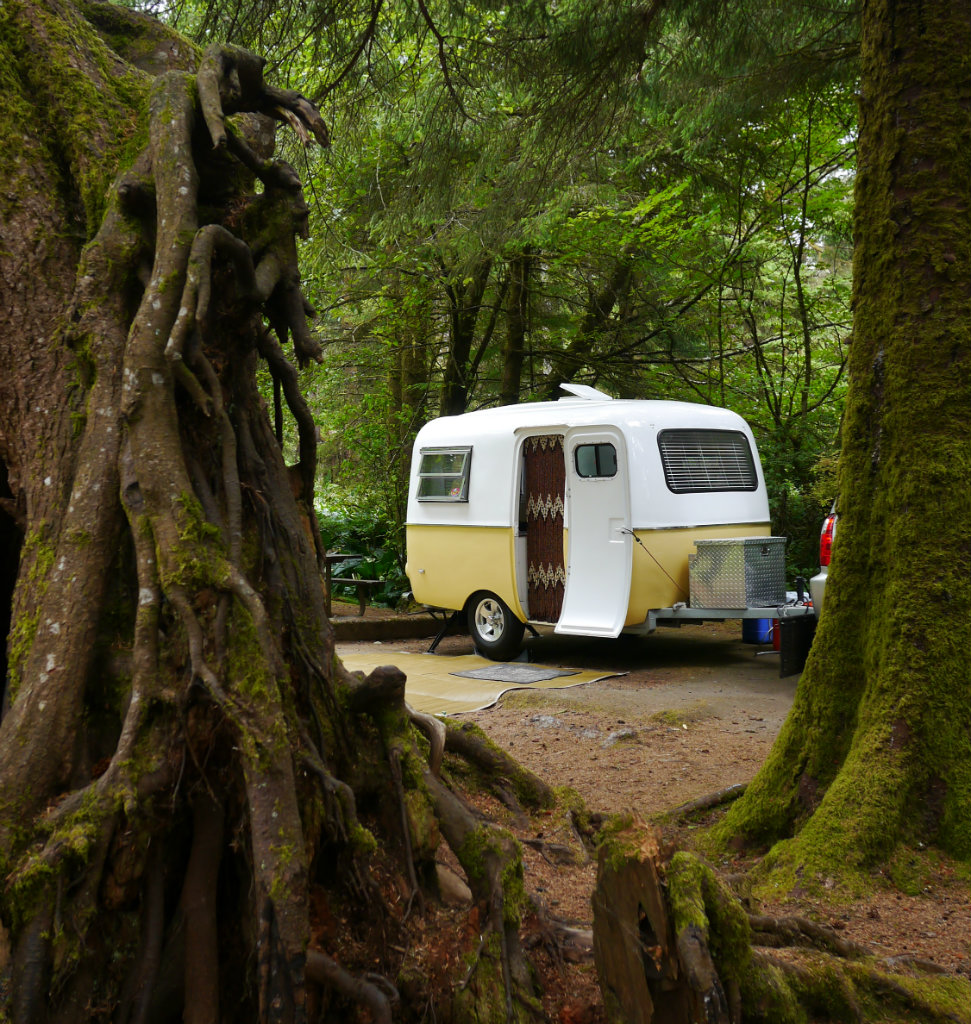
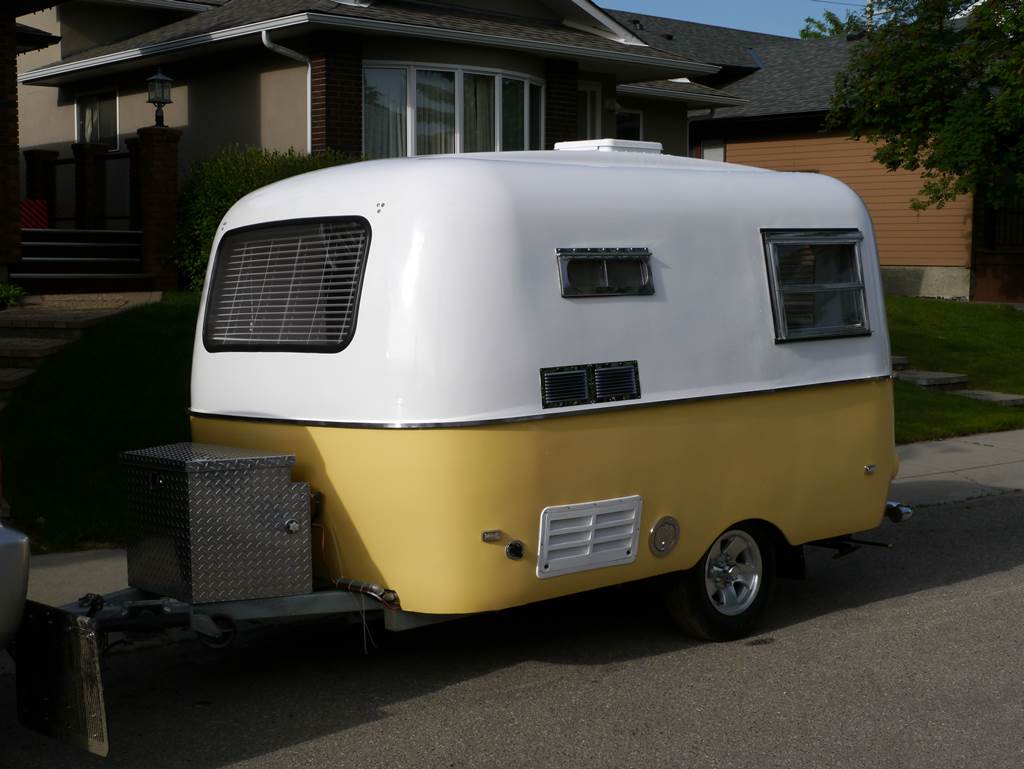
The Finished Project ... (for this year)
I cannot quite say it is finished but all that is left are some very minor finishing touch-ups that were either not completed or areas that took on some wear.
Here are the interior pictures
Dinette with table removed

Dinette towards kitchen (table removed)
From doorway towards kitchen
|
|
|
|
|
07-06-2014, 03:20 PM
|
#229
|
|
Commercial Member
Name: Ian
Trailer: 1974 Boler 1300 - 2014 Escape 19'
Alberta
Posts: 1,380
|
I read somewhere that a beaded curtain will keep bugs out, not sure how true it is but I love the way it looks.
|
|
|
|
|
07-08-2014, 11:48 AM
|
#230
|
|
Senior Member
Name: Slavomir
Trailer: 1978 Boler
Washington
Posts: 275
|
Just a work of art!
Question about the Scamp hinges: are they pretty identical to original Boler ones and can be mounted in the same shell/door location or does the location need adjustment for any reason? Thanks!
__________________
1978 Boler - work in progress...
|
|
|
|
|
07-08-2014, 03:02 PM
|
#231
|
|
Commercial Member
Name: Ian
Trailer: 1974 Boler 1300 - 2014 Escape 19'
Alberta
Posts: 1,380
|
Quote:
Originally Posted by slavandheather

Just a work of art!
Question about the Scamp hinges: are they pretty identical to original Boler ones and can be mounted in the same shell/door location or does the location need adjustment for any reason? Thanks! |
The Scamp hinges line up to the door holes only, the set-back on the body side is considerably more, plus they use 3 bolts on the body side.
I relocated the hinges completely. I placed the upper hinge 1/3 of the way down the door and the lower hinge 2/3 down. With the new hinge location the door fully opens without the edge hitting the belly band, it lays flat against it.
The 2 small rubber bumpers protect the door and molding

|
|
|
|
|
07-08-2014, 06:21 PM
|
#232
|
|
Senior Member
Name: Slavomir
Trailer: 1978 Boler
Washington
Posts: 275
|
Awesome, thanks so much for your help on this!
Slav
__________________
1978 Boler - work in progress...
|
|
|
|
|
07-14-2014, 01:11 AM
|
#233
|
|
Junior Member
Name: Liz
Trailer: Scamp
Alberta
Posts: 22
|
I just read (and watched) the whole thing from start to finish. I have only one question.... how does your wife feel about sister wives?? ")
In seriousness, you really rocked this overhaul; I'm totally impressed!  :
Liz
|
|
|
|
|
07-25-2014, 05:49 PM
|
#234
|
|
Commercial Member
Name: Ian
Trailer: 1974 Boler 1300 - 2014 Escape 19'
Alberta
Posts: 1,380
|
Just arrived home from my first trip in the "completed" Boler, 3300 km.
Had a fantastic time traveling down the Oregon coast to the Oregon Gathering, over 100 fiberglass trailers there, some great units and made lots of new life long friends.
The trailer performed perfectly, everything worked and didn't have any problems. Unfortunately on this trip I traveled solo (Joan couldn't join me) which gave me time to look at lots of trailers, and even more dangerous, gave me time to think.... There are a few new modifications in the works albeit minor. I guess Joan has lost me again for a while 
Next trip, the Manitoba Bolerama 
|
|
|
|
|
07-30-2014, 09:01 PM
|
#235
|
|
Member
Name: Glenn
Trailer: Boler
Manitoba
Posts: 35
|
Quote:
Originally Posted by Ian G.
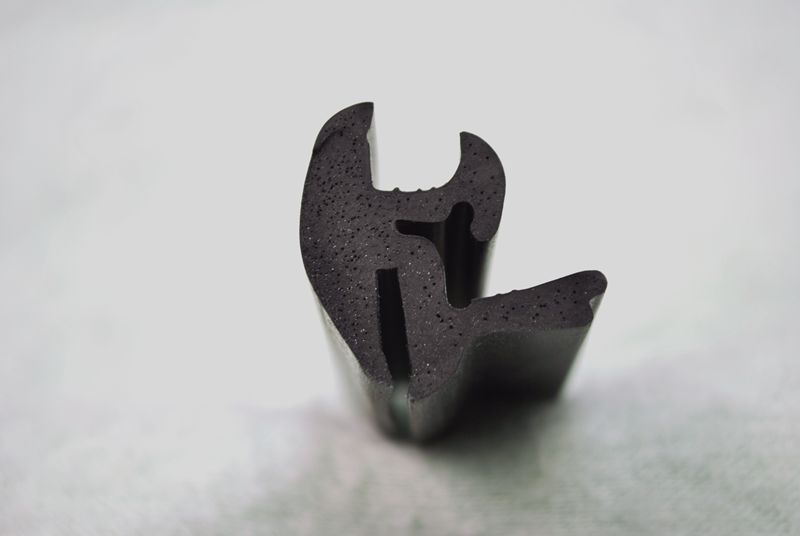
So far I have cut new front and rear windows from Polycarbonate (commonly called Lexan) and got them installed. I used new rubber mouldings that are is single piece design with an integrated lock strip rather than the original 2 piece design, a very clean look
|
Great thread, lots of helpful information. Where did you locate the window moulding, and does this profile have a particular name?
|
|
|
|
|
07-30-2014, 11:14 PM
|
#236
|
|
Senior Member
Name: Dave
Trailer: 1979 Scamp 16 Delux
Oregon
Posts: 102
|
Bandon neighbor
Ian, you were a wonderful addition to the gathering. Your Boler was one of my most sought after goals to witness and I was indeed satisfied. From your seminars to your pleasant demeanor, everyone enjoyed you.
Safe travels.
Your neighbor in A-29
Dave Heffner
Roseburg, OR
|
|
|
|
|
07-31-2014, 06:20 AM
|
#237
|
|
Commercial Member
Name: Ian
Trailer: 1974 Boler 1300 - 2014 Escape 19'
Alberta
Posts: 1,380
|
Quote:
Originally Posted by Humpty
Great thread, lots of helpful information. Where did you locate the window moulding, and does this profile have a particular name?
|
This molding is called "one piece locking window gasket", a main supplier is TrimLoc. You will need a profile that fits 1/8" edge and 3/16"-1/4" glass.
Here is an example" LK987 - One-Piece Locking Gaskets - Trim-Lok "
|
|
|
|
|
07-31-2014, 06:24 AM
|
#238
|
|
Commercial Member
Name: Ian
Trailer: 1974 Boler 1300 - 2014 Escape 19'
Alberta
Posts: 1,380
|
Quote:
Originally Posted by SouthwestOregon201
Ian, you were a wonderful addition to the gathering. Your Boler was one of my most sought after goals to witness and I was indeed satisfied. From your seminars to your pleasant demeanor, everyone enjoyed you.
Safe travels.
Your neighbor in A-29
Dave Heffner
Roseburg, OR
|
Thank you Dave.
Everyone was fantastic, I really enjoyed the drive, the Oregon Gathering and our chats. I was also impressed with the work you had done on your Compact 1 ... now I want to see your Compact II.
Happy Camping
|
|
|
|
|
07-31-2014, 04:54 PM
|
#239
|
|
Senior Member
Name: Luis
Trailer: Boler 1300 79'
Alberta
Posts: 115
|
Quote:
Originally Posted by Ian G.
|
Hello Ian, great show off in Oregon I hear!
Question for you on this locking gasket for the fixed front and back windows:
How did you terminate the inside of the trim, if this spec is for 1/8" I assume, did you install the seal "over" your insulation layer and your liner? or how!?
do you have some pictures to show?
I am concerned this is a very Finished spot and the solution needs to be neat...
Much appreciated,
Luis
|
|
|
|
|
07-31-2014, 06:13 PM
|
#240
|
|
Commercial Member
Name: Ian
Trailer: 1974 Boler 1300 - 2014 Escape 19'
Alberta
Posts: 1,380
|
Quote:
Originally Posted by Luis
Hello Ian, great show off in Oregon I hear!
Question for you on this locking gasket for the fixed front and back windows:
How did you terminate the inside of the trim, if this spec is for 1/8" I assume, did you install the seal "over" your insulation layer and your liner? or how!?
do you have some pictures to show?
I am concerned this is a very Finished spot and the solution needs to be neat...
Much appreciated,
Luis |
This molding is a replacement option for the original 2 piece locking gasket used for the front and rear acrylic widows. The fiberglass around the window is about 1/8" thick, you install this molding right over the ensulite insulation attached to the shell, yes this has a total thickness over 1/8" but there are 2 factors to consider; 1) the insulation will compress to almost nothing; 2) the actual window thickness is 3/16" so the wider body thickness is compensated in the thinner window section. With the seal over the insulation the look is excellent and the seal is water tight.
I can take picture tomorrow and post them.
|
|
|
|
|
|
|
Currently Active Users Viewing This Thread: 1 (0 members and 1 guests)
|
|
|
 Posting Rules
|
You may not post new threads
You may not post replies
You may not post attachments
You may not edit your posts
HTML code is Off
|
|
|
|
 » Recent Discussions
 |
|
|
|
|
|
|
|
|
|
|
|
|
|
|
|
|
|
|
|
|
|
|
|
|
|
|
|
|
|
|
|
|
|
» Upcoming Events |
No events scheduled in
the next 465 days.
|
|


 THE boler
 Buttercup
 Casita Vino (SOLD)
 Proud-Canadian Escape
 1975 Hunter I Compact II
 1979 Scamp 16 Delux
 Linear Mode


