 |
|
 06-14-2016, 07:29 AM
|
#41
|
|
Senior Member
Trailer: Trails West Campster 1970
Posts: 3,366
|
Ironically, I have screens. But the windows aren't opening (again). When I have time I'll clean them out again and now that I store the trailer inside they'll probably stay cleaner. No handles on my sliding glass, though. I was just pushing them from the outside. I just don't need them to open often up here in Washington. But if anyone needs screen pattern or pictures let me know.
|

|

|
|
06-14-2016, 08:22 AM
|
#42
|
|
Senior Member
Name: Kelly
Trailer: Trails West
Oregon
Posts: 3,046
|
Quote:
Originally Posted by Bobbie Mayer

Ironically, I have screens. But the windows aren't opening (again). When I have time I'll clean them out again and now that I store the trailer inside they'll probably stay cleaner. No handles on my sliding glass, though. I was just pushing them from the outside. I just don't need them to open often up here in Washington. But if anyone needs screen pattern or pictures let me know. |
I will get my handles made sometime in the next few weeks. If I have enough material I will make some extra pairs. They will be very easy to install, just clean the glass, peel of the backing paper on the adhesive strip. Press the handle to the glass, then wait 72 hours before pulling on the handles.
|
|
|
|
|
06-14-2016, 09:02 AM
|
#43
|
|
Senior Member
Trailer: Trails West Campster 1970
Posts: 3,366
|
I was going to do that with a wooden handle and epoxy but never did.
|
|
|
|
|
06-14-2016, 01:47 PM
|
#44
|
|
Senior Member
Name: Roger
Trailer: Trails West Campster andTeardrop American
California
Posts: 123
|
I would be interested in a window pull to replace the one that's missing. Duh, Guess that's pretty obvious.
|
|
|
|
|
06-14-2016, 02:31 PM
|
#45
|
|
Senior Member
Name: Kelly
Trailer: Trails West
Oregon
Posts: 3,046
|
I am at the stage in a major renovation when the emotional high of getting all the old pieces torn out has worn off.
Now I have entered the emotional stage when there are so many small things as well as big things to be done "biting" at me that it feels like I have walked into a mosquito infested swamp where I am going insane. 
Lots of holes and cracks to be filled..... so I had better get to it. Today I took out the old electrical input which left a big hole and I was filling that in using some of the fiberglass material I saved from the old kitchen surround. I will post some photos of that process when it is completed. I started that project because when I work on the doorway I will be using fiberglass cloth and resin and it will save time to put cloth and resin on the interior of electrical hole patch while I am working on the doorway as the areas are very close to each other. Mix and cleanup once instead of twice. Kill two of those mosquitos with a single swat ")
|
|
|
|
|
06-14-2016, 09:28 PM
|
#46
|
|
Member
Name: Elizabeth
Trailer: TrailsWest
Washington
Posts: 59
|
Screen pattern
Quote:
Originally Posted by Bobbie Mayer
Ironically, I have screens. But the windows aren't opening (again). When I have time I'll clean them out again and now that I store the trailer inside they'll probably stay cleaner. No handles on my sliding glass, though. I was just pushing them from the outside. I just don't need them to open often up here in Washington. But if anyone needs screen pattern or pictures let me know. |
I'm definitely interested in a screen pattern and/or pictures... And since I'm on the east side of the cascades, I expect that I'll need the windows to open in the summer...
__________________
Elizabeth in Eastern WA
|
|
|
|
|
06-14-2016, 10:12 PM
|
#47
|
|
Senior Member
Trailer: Trails West Campster 1970
Posts: 3,366
|
I took a quick glance at them tonight. (I'm leak-testing the new top by having the trailer sit out in the rain and wind- it passed!) The screen appears to be just set into the window frame. It's not a separate screen. I'll get some pictures tomorrow of how it is done.
|
|
|
|
|
06-15-2016, 09:26 AM
|
#48
|
|
Senior Member
Name: Kelly
Trailer: Trails West
Oregon
Posts: 3,046
|
Quote:
Originally Posted by Bobbie Mayer
I took a quick glance at them tonight. (I'm leak-testing the new top by having the trailer sit out in the rain and wind- it passed!) The screen appears to be just set into the window frame. It's not a separate screen. I'll get some pictures tomorrow of how it is done.
|
Congratulations on passing the leak test!
I am looking forward to seeing how the screen was originally done. It will be fun to see the photos on the thread for your Campster. I had noticed that on my Campster the interior center, upright, division bar looks to have been made to have a screen spline inserted in it.
|
|
|
|
|
06-15-2016, 10:53 AM
|
#49
|
|
Senior Member
Name: Kelly
Trailer: Trails West
Oregon
Posts: 3,046
|
Quote:
Originally Posted by Elizabeth EWA
Passenger side window from the inside. The handle/latch is missing from the other side so I'm interested in what you come up with to replace it. It appears to be held on by glue or some such (no rivets or screws in sight)
There is a spring clip that latches into a grove in the vertical bar. The window is NOT latched in these pictures but you can see the grove where the latch fits...
I figure that a piece of wood or some such in the track should be a good enough latch so I'm not obsessing about the latching part. Besides, right now the windows are hard enough to open without messing with the latch.
I'm also really interested about the screens. I tested a piece from one of the build-it-yourself screen kits in the grove outside the sliding part of the windows and its a good fit. Actually maybe a bit tight. I think I'm going to use some old bits from that kit to rig up something temporary if the bugs get bad when I go camping in a couple weeks. Not a big trip but the first time I'll actually get to sleep in my trailer.
|
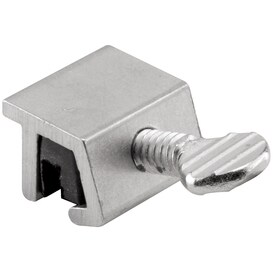
Your window framing appears to be somewhat different than mine. I won't be doing anything elaborate in the way of window pulls or locks. The pull will be a piece of aluminum angle attached directly to the glass with VHB tape. For a latch I use a very easy to find item. You just set it over the metal edge of the bottom track and tighten a thumb screw. I like it because you can position it for having the window open just an inch or so for fresh air but it is still secured from a person trying to slide it open from the outside. Cost for two windows, under $4.00. Most hardware stores carry a variation of this product so if you have lost the lock for your window you can get one while running errands today and then install it in less than 3 seconds. It is called a sliding window lock. Even if you still have the original latching window handle it is a nice item to have for extra security.
|
|
|
|
|
06-15-2016, 01:07 PM
|
#50
|
|
Senior Member
Trailer: Trails West Campster 1970
Posts: 3,366
|
Here are what I believe are the original screen. Screen doesn't move- it is fixed in the frame.
|
|
|
|
|
06-15-2016, 02:50 PM
|
#51
|
|
Senior Member
Name: Kelly
Trailer: Trails West
Oregon
Posts: 3,046
|
Quote:
Originally Posted by Bobbie Mayer
Here are what I believe are the original screen. Screen doesn't move- it is fixed in the frame.
|
It has gotten warm again here, too hot to work without an open window. As I can't slide my windows open because of all the dirt, moss and deterioration in the felt I am going to pull at least one of my side windows out today to replace the glass run felt. We will see how they made that screen installation work
But I will still make removable screens so I can use a window air conditioner in the open window if I want to do so by realizing they will have to remove the clamp ring.
Thanks for posting the photos it did help us understand how the screening was done. Now others can replace theirs if they want screening. Knowing that it takes removing the clamp ring is valuable information to solving the mystery.
|
|
|
|
|
06-15-2016, 03:32 PM
|
#52
|
|
Senior Member
Trailer: Trails West Campster 1970
Posts: 3,366
|
I need to get mine opening again- I should do that but I'm chicken to take the windows out.
But it stays pretty cool if the top is up and the back screen is up- though I know actually working in it is different than sitting there. Does your door have a working screen?
|
|
|
|
|
06-15-2016, 04:08 PM
|
#53
|
|
Senior Member
Name: Kelly
Trailer: Trails West
Oregon
Posts: 3,046
|
Quote:
Originally Posted by Bobbie Mayer
I need to get mine opening again- I should do that but I'm chicken to take the windows out.
But it stays pretty cool if the top is up and the back screen is up- though I know actually working in it is different than sitting there. Does your door have a working screen?
|
My door is still screened, not removable other than by taking out the spline. That sure makes it difficult to clean the glass 
|
|
|
|
|
06-15-2016, 04:16 PM
|
#54
|
|
Senior Member
Name: Kelly
Trailer: Trails West
Oregon
Posts: 3,046
|
Campster original window screen
From the evidence gathered with the help of fellow Campster owners we now know how they installed the screens in the factory and what it takes to replace a missing or damaged screen. You will have to remove the inside window clamp ring to do the job.
See photo below showing the clamp ring removed where the hidden spline groove has been revealed. You will need to use individual segments of spline in between the screw locations that hold the clamp ring in place. That big screw head at the lower edge is possibly a previous owner fix.

|
|
|
|
|
06-15-2016, 05:02 PM
|
#55
|
|
Senior Member
Name: Kelly
Trailer: Trails West
Oregon
Posts: 3,046
|
Campster window removal single handed
No helper for me today so I had to devise a belt and suspender removal plan for taking out the windows. This is how I did it.
First step I used a small tool make for removing O-rings to pull out the putty tape all along the lower edge. It works great for hooking out the putty. This is a very inexpensive item available at auto parts stores and hardware stores. Photo below shows this small tool.

Photo below is of my beautiful assistant that volunteered to hold the window in place so it could not fall while I continued to work on removing it.

Take some clamps and a piece of plywood around a foot or so high and clamp onto the belly band where the upper and lower halves are joined. Because it is hollow underneath you can get a clamps in there and over the edge of the wood. I added a soft foam block that was from packaging material between the wood and glass and put barely any pressure on the window. It is just a gap filler. A rolled up towel would also have worked just fine.
Next step is easy too. Go inside and remove the clamp ring. Remove any excess putty tape that might have squeezed out to the inside.
Next go back outside an pull out the rest of the putty tape. I don't have the arm strength to just yank the window out and I did not want to pry it out so I took my time and used the O-ring tool and pulled out the putty. Work from the bottom edge up towards the top center on each side and there will be no danger of the window falling out. I needed a step stool to stand on so I could reach the top edge so if you are vertically challenged have one handy.
Now if you feel you need to you can hold one hand against the window and remove the clamps with your other hand letting the plywood drop out of the way. Otherwise just use both hands and take the clamps off, the window likely is going no where since it is on an inward slant and will most likely have some pull on it from the small amounts of remaining putty tape.
Just pull on the upper edge of the frame and it will begin to come away from the shell. You can change hand position downwards as you work if needed. Hooray, you are done without needing a helper or a lot of physical strength 
Every day try to do something you were afraid to do. That is pretty much the attitude it takes to face working on vintage trailer items such as windows. It is perfectly normal to worry about messing up so don't let it hold you back from getting your project done.
|
|
|
|
|
06-15-2016, 06:15 PM
|
#56
|
|
Senior Member
Trailer: Trails West Campster 1970
Posts: 3,366
|
My philosophy is not to do anything that renders the trailer useless if I can't finish it. At least, not in June. But it is good to see how to do it. I may tackle it in the fall.
|
|
|
|
|
06-15-2016, 06:25 PM
|
#57
|
|
Senior Member
Name: Kelly
Trailer: Trails West
Oregon
Posts: 3,046
|
Quote:
Originally Posted by Bobbie Mayer
My philosophy is not to do anything that renders the trailer useless if I can't finish it. At least, not in June. But it is good to see how to do it. I may tackle it in the fall. |
My Campster has most likely not been useable in a very long time other than as a damp, leaky storage unit. Maybe a racoon would have liked it as a camper.
|
|
|
|
|
06-15-2016, 08:44 PM
|
#58
|
|
Senior Member
Name: Kelly
Trailer: Trails West
Oregon
Posts: 3,046
|
Window pane pain..
The windows were easy enough to take out, now the issue of replacing the felt in the track is in progress and I am sad to announce that it is not going smoothly.


Look at those photos of what I have to deal with. That old style felt is made with knitted steel wire with flocked fabric over it. The years have had their way with it, all rusted, and in the lower channel there is no metal left, that section is just rust and rotted fabric. That is not dirt in the photo that is powdered rust, all that was left of the metal in the lower half of the track. I could not even budge the glass to move it at all. Fortunately I was smart not to have even tried very hard at sliding the glass pane open. The loose pieces shown pulled out of the channel are from the half of the window the sliding pane moves into.
So that means my only choice to repair the window was to take the rivets out of the frame joint and then try to remove the glass by spreading the frame apart. You have to be careful not to damage the frame when you pry the frame open at the joint but a pair of 24" spreader clamps can help you do that successfully.
So I got the rivets out, spread the frame gently apart to release the glass and then only one side of the glass, the upper part, would come out of the felt channel. The lower area has a firm grip on the glass and it won't budge. Running a knife along did not work. Gentle tugs did not work, etc. So time for a chemical weapon attack! I have sprayed some rust busting solution used to loosen bolts into the lower channel and let that sit for a while, now I am letting it soak overnight with some shower cleaner & soap scum remover that will also dissolve hard water spots. It might be helping!!! Morning will tell. 
Fellow Campster owners, be forewarned if you are having trouble opening your windows, this really is a pane pain in the...neck. I was not expecting the felt replacement to be this much trouble....oh well one just has to keep moving forward to get to the end of it. But just remember this is only one of the two sliding side windows so I still have another one to go.
|
|
|
|
|
06-16-2016, 07:47 AM
|
#59
|
|
Senior Member
Trailer: Trails West Campster 1970
Posts: 3,366
|
That probably explains why, although I had mine sliding fairly easily, after a winter outside near the water they froze up again. I haven't tried very hard to free them since then but I'll bet that they rusted up.
|
|
|
|
|
06-16-2016, 08:40 AM
|
#60
|
|
Senior Member
Name: Kelly
Trailer: Trails West
Oregon
Posts: 3,046
|
Hooray, the soaking with the shower cleaner overnight worked its magic. The window glass was freed up this morning and slid slickly along the felt.
If you need to try it the product I used is "Method Daily Shower Cleaner" I think it is likely fairly easy to find in grocery stores, or in stores such as Target, etc. I have seen the "Method" line of cleaning products in quite a few stores. It did occur to me that rusted iron plus years of rain equaled an extreme case of "hard water spots" along of course with your basic grime from being outside for all those years.
I am going out to spray the shower cleaner in the lower half of the other window that I have not yet removed to see if it will help free up that sliding window before I start working on it. It certainly is not going to hurt anything in an already dysfunctional window located in a trailer with a non existent interior ") Just remember the cleaner is not a fix for the felt, it will need to be replaced with a modern material upgrade that has no steel in it to get rusted.
This is one of those situations where if you knew all the steps needed and had the tools and supplies on hand it would take less than a day to remove both of the sliding windows put in new felts and seals and then reinstall the windows. A pro could likely do the job in under 3 hours. Of course I am just fumbling along as I don't have an exact road map to follow for this project, only bits and pieces of knowledge gathered here and there plus some experimentation for things such as using shower cleaner to free the glass up so it moves.
The most useful tip I gathered was to use spreader bar clamps to safely open the window frame wide enough to remove the glass pane that slides without distorting the aluminum frame. I got a pair of 24 inch bar clamps that can have the ends reversed to either pull in or push out. This is the pair I purchased. https://www.doitbest.com/products/do-it-clamp-spreader It is easy to turn the clamps around to make them spread things open. Just turn the knob on the small head to take it off. Then slide off the larger head that has the hand sqeeze function, reverse the heads and slide them back onto the bar. I will need to reverse the heads back the other way to hold the frame together while I install new rivets in the end of the frame. They were very affordable as far as bar clamps go. The Do-It-Best chain of hardware stores is my all time favorite of the name brand stores.
I have other bar clamps around but they were not suitable for reversing the heads on.
|
|
|
|
|
|
|
Currently Active Users Viewing This Thread: 1 (0 members and 1 guests)
|
|
|
 Posting Rules
|
You may not post new threads
You may not post replies
You may not post attachments
You may not edit your posts
HTML code is Off
|
|
|
|
 » Recent Discussions
 |
|
|
|
|
|
|
|
|
|
|
|
|
|
|
|
|
|
|
|
|
|
|
|
|
|
|
|
|
|
|
|
|
|
» Upcoming Events |
No events scheduled in
the next 465 days.
|
|


 1970 Trails West Campster
 2011 Escape 15A
 1971 Trails West Campster
 Outbacker
 Linear Mode


