 |
|
 03-25-2018, 11:06 AM
|
#141
|
|
Senior Member
Name: Michael
Trailer: Casita 16ft.
California
Posts: 338
|
An early spring dusting of snow has made my work area slushy for a short period of time.

The boughs of trees will be dropping chunks of snow until the sun melts it into the stream that flows through my yard. The weatherman tells of a huge high pressure air mass in the Pacific that will likely end our rainy season for 2017-18. Temps into the mid to high 70's are forecast by middle next week. My eldest daughters wedding is now behind us ( she got married last Sunday, 3/18) so I expect progress on my Casita will quicken. So here are a few pics of my work done over the last few days.

Because of the ribs that I added in to straighten deformation around the former refrigerator vents, it was necessary to add a false wall to cover those ribs. I paneled that wall area with scrap pieces of 1/4" Masonite that I had laying around. The original interior wall carpet will be glued back in place over this paneling This area is now the dining booth so we will be spending a lot of time sitting here. Since I had a small void of dead air space, I figured adding some spray-in foam insulation into the void would add to comfort while seated in the boot and that the foam would help glue the whole false wall menagerie to the fiberglass. There is nothing to attach the paneling to the fiberglass along the top 3" of the panel so I added a kicker brace to hold the panel to the wall until the foam had completely expanded.
The pic also shows the wooden box beam, column, wire chase, thingy that will carry the dining table. I paneled and insulated the opposite side of the column similarly. It is partially hidden by the carpeting which is not yet glued in place. With the upcoming warming, the time will be right for gluing all of the carpet back into the boot so that I can do the final assembly of the dining booth

This pic shows the wall side of seat framing which is a major attachment point for the rear side of the booth. Because the seat framing is also screwed to the bulkhead behind the seat, it doubles as a substantial attachment for the bulkhead as well. The rectangular hole in the bulkhead will be an opening to a little behind-the-seat cubby that can be accessed while lying in bed. It will be handy for holding a water bottle, medicines, glasses, flashlights, etc.
|

|

|
|
04-02-2018, 05:30 PM
|
#142
|
|
Senior Member
Name: Michael
Trailer: Casita 16ft.
California
Posts: 338
|
Civility has started to return to the interior of the trailer. The carpet went back up today. I can now commence to completing the booth before turning back to the kitchen counter area. The carpet isn't perfect. It has some unfaded areas where closets once covered then from UV light, faded areas that were exposed to UV and some water stains where old pop rivets through the side leaked. But that is OK with us. This trailer won't be a paved parking RV park queen by any means. It will see a lot of dirt roads and boondocks camping. I am already contemplating a suspension rebuild next year that will include added ground clearance for that purpose.

I started on the dining table too.

|
|
|
|
|
04-02-2018, 07:43 PM
|
#143
|
|
Senior Member
Name: Eric
Trailer: 1987 Casita 16
Illinois
Posts: 503
|
Looks great! You do nice wood work. I think you will enjoy the changes you have made. Thinking solar? I just got a controller and panel, now have to figure it all out.
When you lift the axle next year, how much you thinking? The guy that put mine in talked me into leaving it the place it was, and I don't think I will be doing a lot of rough roads where I will need high clearance, especially since the extra gray tank is a little low, and the Town and Country has very little clearance. Maybe when I get a truck.
|
|
|
|
|
04-02-2018, 07:55 PM
|
#144
|
|
Senior Member
Name: Michael
Trailer: Casita 16ft.
California
Posts: 338
|
Yes solar is in my plans but probably not this year.
Part of my reason for raising the trailer is to free up more clearance to allow bigger tanks on the underside.
|
|
|
|
|
04-02-2018, 09:13 PM
|
#145
|
|
Senior Member
Name: Michael
Trailer: Casita 16ft.
California
Posts: 338
|
Quote:
Originally Posted by EricAllyn

When you lift the axle next year, how much you thinking? |
Sorry Eric, I missed this question. The short answer is how much us yet to be determined. Probably more than the rotation of a stock dexter axle will allow so it might mean some chassis mods. I would like to add some body mounting tabs like you did and I want to plate over a pair of ill conceived holes drilled through the chassis at the front of the body near where it curves in for the tongue. One of the PO's did it. That means a frame off so the axle question will be addressed then.
|
|
|
|
|
04-03-2018, 11:41 AM
|
#146
|
|
Senior Member
Name: Eric
Trailer: 1987 Casita 16
Illinois
Posts: 503
|
I may talk to the guys at the axle shop and see about raising mine -- the tank is really a little close to the ground for me, and I need to think that through with them. They have a lot of ideas, have been doing nothing but trailers for the last 25 years, so have seen about everything.
|
|
|
|
|
04-03-2018, 11:42 AM
|
#147
|
|
Senior Member
Name: Eric
Trailer: 1987 Casita 16
Illinois
Posts: 503
|
What are you going to do for finish on the table top and also on the seats and sides?
|
|
|
|
|
04-03-2018, 01:53 PM
|
#148
|
|
Senior Member
Name: Michael
Trailer: Casita 16ft.
California
Posts: 338
|
Quote:
Originally Posted by EricAllyn
What are you going to do for finish on the table top and also on the seats and sides?
|
The table top and countertop are made of lumber store bought slabs of 4/4 laminated pine. I glued a 2" strip of pine around the bottom edges before I routed the corners round to give them a broader/ softer edge. I plan to use epoxy to finish those. Everything else will get satin Varathane.
Today I am working on the counter benches. I am closing in the inner face of the booth. Then I will start finishing the seats bottoms and backs. I already have a set of cushions that I bought a couple of months ago that will finish off the seats.
|
|
|
|
|
04-05-2018, 11:31 AM
|
#149
|
|
Senior Member
Name: Michael
Trailer: Casita 16ft.
California
Posts: 338
|
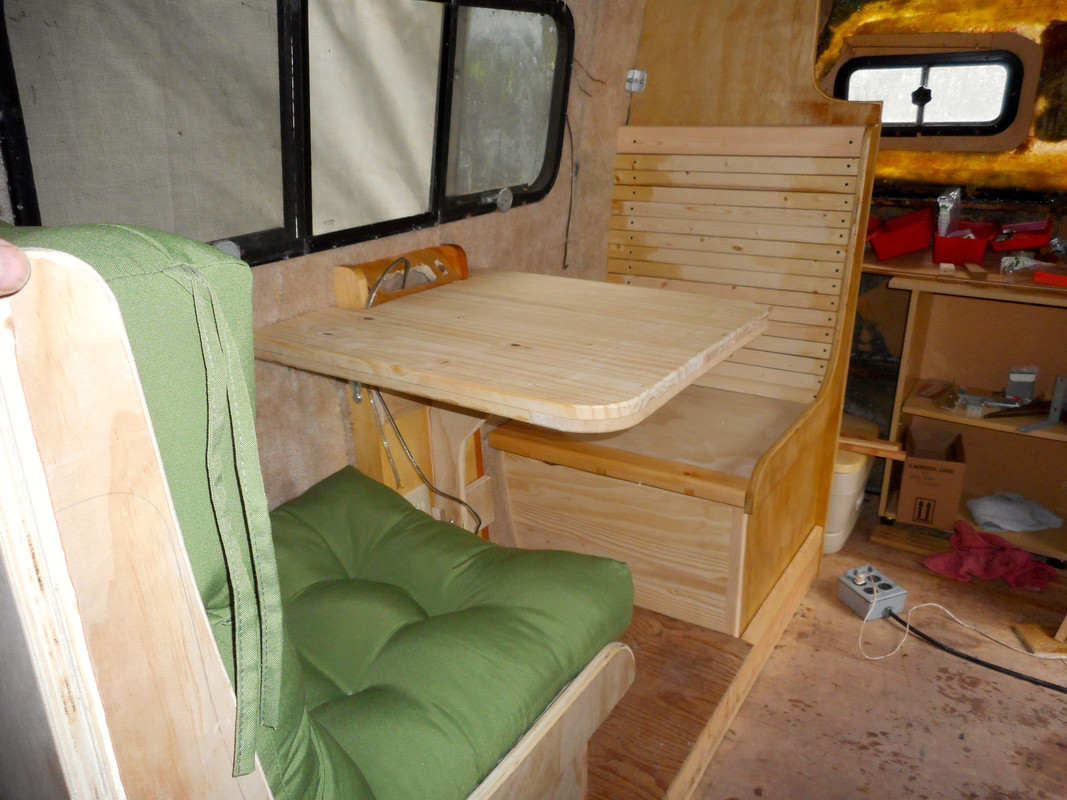
Thanks to a nice break in the weather, my progress continues. I am trying to finish up the new dining booth. There are lot of steps in the process from details in the support for the raised booth floor, plumbing and wiring that has to happen simultaneously.
The booth seating is shaping up nicely. I am installing the finished seat backs. There will be a routed finishing cap at the top when all is complete. This is not high end cabinetry. Most of the cutting was done with a skill saw and jig saw with the corners finished by a router and orbital sander. My goal is simple, cheap, lightweight & easy to maintain.


The material for the backs are 5/8" X 1 1/2" firing strips The stuff is the right color to match, strong enough, lightweight and the narrow strips allows them to follow the contour of the seat back which was laid to conform to a pair of seat cushions.That we had purchased a couple of months ago.

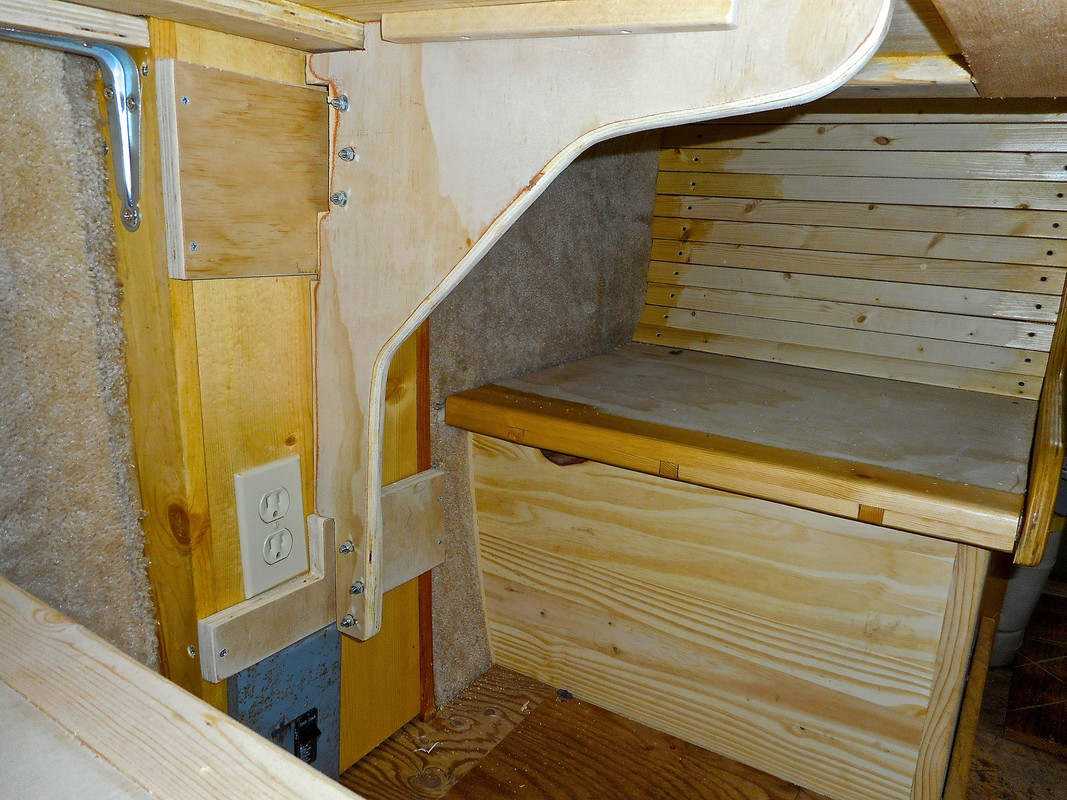
Another part of this project was to attach the bulkhead securely to the trailer as the seat is dependent on the bulkhead as part of its support. It was screwed to the floor with wood screws and angle brackets into the plywood floor. I added a single aluminum angle iron bracket that I fabricated. I used a single 1/4" stainless steel stove bolt through the wall to attach it to the cab plus another 1/4 " bolt through the bulkhead to great a very secure attachment.


To install the stainless stove bolt through the hull, I first drilled a 1/4 inch hole through the fiberglass. I then used a utility knife to square the corners of the hole to allow the shank of the bolt to insert into the hole for a firm, no spin bolt installation. I used a dab of high end RV caulking around the inside head of the bolt to seal it. I don't plan to use the plethora of the little screws and pop rivits with plastic finish caps as is typical of these fiberglass trailers on my project. I would rather use select few larger stainless bolts to hold the four 3/4" Plywood bulkheads in place. Those few bolts will be installed in places where they can be easily monitored for leaks. All other interior pieces will be attached to those bulkheads and the plywood floor.
|
|
|
|
|
04-05-2018, 06:37 PM
|
#150
|
|
Senior Member
Name: Eric
Trailer: 1987 Casita 16
Illinois
Posts: 503
|
I like the seat backs, they really look contoured to fit the back. With the cushions you have it should be really comfortable. How is the kitchen coming?
|
|
|
|
|
04-05-2018, 08:30 PM
|
#151
|
|
Senior Member
Name: Michael
Trailer: Casita 16ft.
California
Posts: 338
|
Quote:
Originally Posted by EricAllyn
I like the seat backs, they really look contoured to fit the back. With the cushions you have it should be really comfortable. How is the kitchen coming?
|
laid out the seat backs to specifically fit the cushions. I think these seats should be pretty comfortable.
As for the kitchen The box that houses the fridge is complete. The laminated pine countertop is cut out. It fits between the two bulkheads on the other side. I had it loosely assembled awhile back but put it aside to work on the fiberglass mods and the dinette. I didn't take pictures at the time so can't show you I'll probably be back over to that side in a week or two.
|
|
|
|
|
04-06-2018, 04:47 PM
|
#152
|
|
Senior Member
Name: Michael
Trailer: Casita 16ft.
California
Posts: 338
|
It's raining cats and dogs here in Nor Cal as can be attested by the rain soaked creek in our yard.

Eric asked about the kitchen so I took this photo today.

The countertop is the same type of 3/4 laminated pine slab that I made the dining table from. It has another 3/4" strip of pine glued to the underside of the face with the edge routed round. I actually built this eight years ago for my daughter as a built in computer desk in her apartment. A few months ago decided that she didn't want it anymore so I drug it home figuring that I would find something else to do with it. Then along came this trailer project. I am not yet sure How I will treat the RH corner nearest the bed. I might knock a 45 degree haunch off to soften the in and out access into the bed or I might round it off. I will figure it out when I install the sink. The sink will dictate how much room I have to do those things.
I also buttoned up the wiring in the 110v. panel. This allowed me to make good headway on the raised booth sub flooring

|
|
|
|
|
04-06-2018, 06:09 PM
|
#153
|
|
Senior Member
Name: bob
Trailer: Was A-Liner now 13f Scamp
Missouri
Posts: 3,209
|
great stuff
I like it don't let the crick wash away your rig!!
bob
|
|
|
|
|
04-06-2018, 06:22 PM
|
#154
|
|
Senior Member
Name: Steve
Trailer: 1979 Boler1700
Maple Ridge, B.C.
Posts: 383
|
If it were mine I'd round off the corner of the counter. You have a rounded roof, rounded window corners and rounded holes in your divider.
|
|
|
|
|
04-06-2018, 08:22 PM
|
#155
|
|
Senior Member
Name: Michael
Trailer: Casita 16ft.
California
Posts: 338
|
Quote:
Originally Posted by ststefan
If it were mine I'd round off the corner of the counter. You have a rounded roof, rounded window corners and rounded holes in your divider.
|
I agree. Whatever shape the top takes the cabinet underneath must follow. That is doable but it will all be dictated by the sink that will be let in the top on that side of the counter. I plan to use the sink that was installed in the original fiberglass counter.
|
|
|
|
|
04-09-2018, 03:33 PM
|
#156
|
|
Senior Member
Name: Michael
Trailer: Casita 16ft.
California
Posts: 338
|
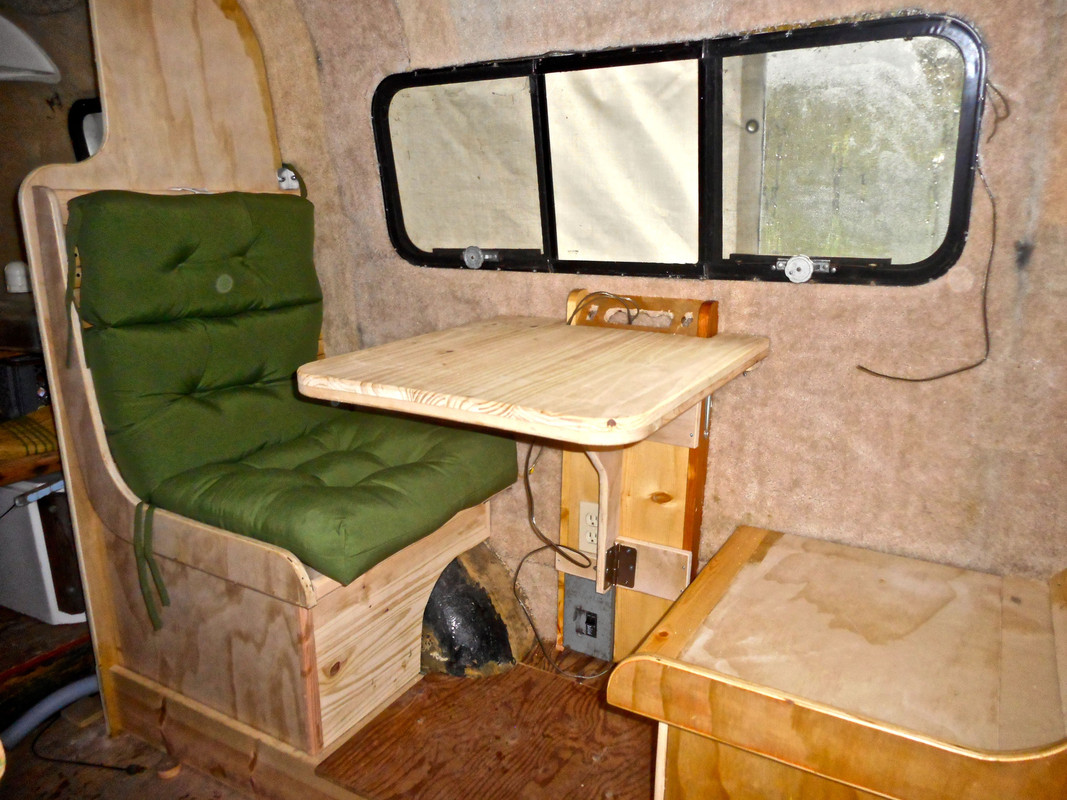
Weather in the mid 70's today. It's been pretty changable around here the last month.

Things are moving along This side of the booth is finished. Finished enough that I decided to try the cushion out for size. It looks pretty good I think. The other side is mostly complete too. I painted Varathane on the ends of the slats that make the back yesterday. I am waiting for them to get good and dry before I install them. I'll probably start mounting the table this afternoon. I'm moving kind of slow today. This morning I woke up stiff in the neck & shoulders and the tendinitis in my right arm is acting up too.
|
|
|
|
|
04-11-2018, 04:00 PM
|
#157
|
|
Senior Member
Name: Michael
Trailer: Casita 16ft.
California
Posts: 338
|
I haven't been able to access my postimage.org account today. I got a message that they had been dropped by their web hosting company or something like that. They gave an alternate web address that let me get in but warned that the web links to my pictures will have to be updated. That means the links to all of the previous picturess I have posted here are broken. If you use posteimage.org, be warned.
But anyway, I was able to get in on the new link provided. Here are a couple of my latest pics taken this morning.
This is the bed side of the bulkhead backing the rear dinette seat. With the finished seat back in place, my little cubby to stash things in takes shape,Think of it as a night stand.

The construction part of the dinette booth is essentially done. The table is mounted. The table still has to be sealed in by epoxy.
I still have to trim back the booth subfloor and put a finished wood wooden edge to cap it off. After these pics were taken, I brushed on a coat of Varethane to the parts of the seats that were not yet sealed. I have now turned to the other side of the trailer. I started of by rerouting the copper gas line to the new kitchen location on the curb side. This meant creating a pathway under the
aluminum threshold plate inside the doorway.
|
|
|
|
|
04-11-2018, 05:48 PM
|
#158
|
|
Senior Member
Name: Eric
Trailer: 1987 Casita 16
Illinois
Posts: 503
|
Nice work, you have motivated me to start again! Also got a day in the 60's which helped a lot!
|
|
|
|
|
04-11-2018, 07:01 PM
|
#159
|
|
Senior Member
Name: Michael
Trailer: Casita 16ft.
California
Posts: 338
|
Quote:
Originally Posted by EricAllyn
Nice work, you have motivated me to start again! Also got a day in the 60's which helped a lot!
|
Again? No! No! Not twice! 
For my work, I am going by the 6ft rule on this project. If it looks OK from 6ft away it's good'nuf. My primary tools are skill saw, jig saw, orbital sander and router. They are not cabinet quality tools by any means.
A major decision today, I have decided to not put the original Dometic 2 way fridge back in. The downer for me is the long cool down time on startup which necessitates running the burner while driving down the road. Instead, we will use an ice chest this year while saving up for one of the new fangled high efficiency 12v truck fridges. That means I will only install the range top and the sink for now in countertop with some kind of simple and probably very temporary shelving below. The 12vdc only fridge means that I will also have to save for sufficient battery storage and a solar charging system to go with it.
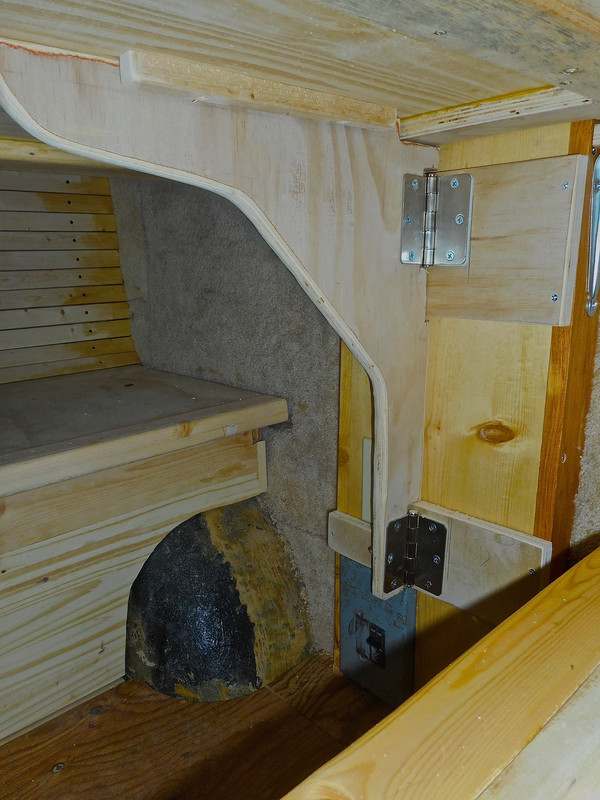
Here is another pick of the under table support. It is hinged so that It will fold aside if I choose to take the table out. There are 1/4" studs that screw into the underside of the table. Those go through angle brackets protruding out the side of my utility column. Wing nuts on the underside fasten the table to those brackets. I am happy with the system's rigidity / stability. I think it is as stable as the original column in aluminum base that these trailers come equipped with.
The seat is very comfortable by the way. The cushions were a really good deal on Houzz.com. I actually have twice what I need. I mistakenly ordered two pair when I thought they were sold as individuals.
|
|
|
|
|
04-12-2018, 12:36 PM
|
#160
|
|
Senior Member
Name: Buggeee
Trailer: Playpac
OH
Posts: 327
|
Its really coming together now Mike. Hard to imagine what you started with here. Seeing the cushion on the seat has to put a smile on your face! It did mine.
|
|
|
|
|
|
|
Currently Active Users Viewing This Thread: 1 (0 members and 1 guests)
|
|
|
 Posting Rules
|
You may not post new threads
You may not post replies
You may not post attachments
You may not edit your posts
HTML code is Off
|
|
|
|
 » Recent Discussions
 |
|
|
|
|
|
|
|
|
|
|
|
|
|
|
|
|
|
|
|
|
|
|
|
|
|
|
|
|
|
|
|
|
|
» Upcoming Events |
No events scheduled in
the next 465 days.
|
|


 Boler 1700
")
 Linear Mode


