 |
 05-02-2013, 05:01 PM
|
#1
|
|
Member
Name: Angela
Trailer: Boler
nova scotia
Posts: 51
|
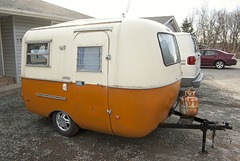
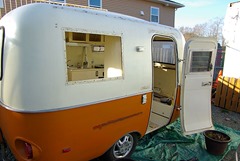
Not sure what made me think I could buy a Boler and become a handyman...but here goes
I am beyond excited to announce I purchased a camper. The fact that it's a 1976 Boler is the most exciting part! I've always loved these little 'eggs', as they are lovingly nicknamed, and can hardly believe I own one.
  Despite my excitement now, it wasn't an easy decision. My original plan in acquiring a camper was to try and find one for under a grand and fix it up with my father. After doing research and reading about other people's ventures I realized I may end up getting in over my head. Many old trailers have problems with rust and/or leaking not to mention the weight of them would require me to get a truck to pull it. So, when a friend texted me about a Boler she saw for sale up the road from me I jumped in the van and off I drove to see it.
After a couple sleepless nights and some math I decided to nab it. I don't actually have a car to pull it yet and have no idea how I will pay for one but I have faith once again things will come together if I just keep trudging along.
I’m a girl who likes to get down to business right away so as soon as the trailer was in my possession I began to tear it down. There are a lot of things I need to do to it but I love envisioning something and then working to make it happen. Luckily I have family members who have the tools and the know-how to help me along. I want to do the whole thing myself and my brother-in-law is happy to guide me and teach me, while letting me go at ‘er. Thank heavens for family and friends!
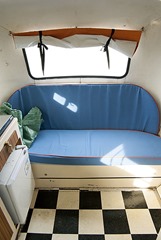
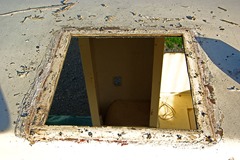
I will be scrubbing, painting, making new cupboards, curtains, and deciding how to configure the closet. Eventually the outside will get sanded and repainted as well; color to be decided. Here is the first look at what I’ve done.
|

|

|
|
05-02-2013, 05:08 PM
|
#2
|
|
Member
Name: Angela
Trailer: Boler
nova scotia
Posts: 51
|
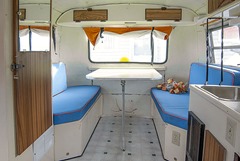
A list, a lot of time and some elbow grease.
I’m so fortunate to be able to keep the Boler at my sisters place while I work on it. I am near the camper every day and able to pick away at it. Turns out this is both good and bad. The good being that John has every tool under the sun for me to use and connections with people in the know about fiberglass and such. The bad is I get to know all the nooks and crannies of it therefore finding all the little problems; ie leaks, missing rivets and broken window cranks. In the end it’s actually a good thing since I want to fix it up as best I can anyways. I might as well know all of it so I can do it up properly.
The first two days I had it in my possession I scrubbed the inside walls and ceiling with an RV cleaner bought at the local hardware store. I used a hard brush and all the muscles I have over 8+ hours to get all the mildew out. After scrubbing it I don’t think I need to tear it out (thanks heavens). A previous owner filled the seams with some kind of putty and it was a mess so I pulled that all out in preparation for sealing. I have a connection with someone who works in the marine industry and is hooking me up with some industrial, paintable, flexible caulking. Hopefully this will do the trick.
Before I start caulking the inside however, I have to focus on the outside. Next I will locate the leaks by laying a garden hose on the roof and watching for water inside. When I have found them I have to drill out the rivets holding in the curtain rod brackets and take out the windows that need repairing. Then the sanding will begin.
I would say lots of what I want to fix can be done cheaply if I do it myself. Luckily the internet is filled with resources for renovating vintage fiberglass trailers. I’ve also been introduced to someone through my brother-in-law who is not only willing, but actually WANTS to help me restore the trailer.
It will be a big learning curve but I have time on my side, especially since I still don’t have a vehicle to tow it and have no idea when I will. One thing at a time.
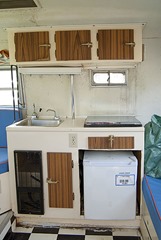
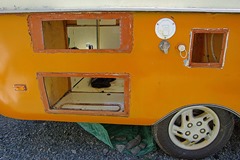
So, Here’s a picture list of bits that need to be fixed.

Board for attaching bunk bed is soaked from leaking window.

Plexiglass window leaks and is VERY scratched.

Door is sagging
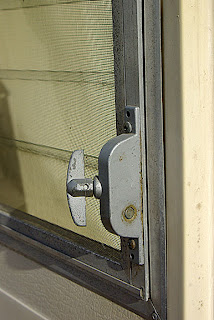 Door window crank is broken
 Window #2 goes up but not down.  window #1 won't stay shut
 Match floors. Seems a bit overwhelming right now but I KNOW it's going to be an awesome home/studio when it's done!! Stay tuned......
|
|
|
|
|
05-02-2013, 05:16 PM
|
#3
|
|
Member
Name: Angela
Trailer: Boler
nova scotia
Posts: 51
|
My nemisis, the floor.
*It would seem I don't know how to keep posting in my thread without doing it as a reply.....
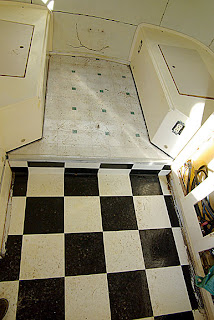
While waiting for mother nature to help find the leaks (by raining for 3 days) I tackled the floor. The two linoleum floors didn't match so I wanted to redo them. I was originally going to leave the black and white checkers down, laid by the previous owner, but once I got the first old floor up I decided to rip that out too. I figured it's easier to replace both at the same time rather than trying to find the exact match. Wow, was I in for a lot of work!
I used a heat gun and scraper to lift off the linoleum. The upper, older floor came up pretty easily even though at the time I thought it was a disaster. The newer checkered floor however proved to be the real pain as it left all the paper backing behind. I boiled water and soaked the paper, repeatedly, scraping it off with a putty knife. It took a lot of water, a couple of days, and intense scraping to get it all off.
Then I was left with two layers of glue; the old, hard yellow stuff and the newer, gooey glue. It was off to the hardware store to find out what to use to remove it. I bought some water-soluble floor glue remover which I applied liberally over and over again. Although it doesn't say it in the directions I used water and a scrubbing brush, the same one I used to clean the interior walls and ceiling, to work the gooey glue into a lather. The foaming glue remover basically liquefied the top glue but the older yellow glue wouldn't budge. It didn't even soften up.

I would guess you're wondering why I would bother trying t get the old glue off when I'm just going to lay down more vinyl flooring? The answer is I'm a bit of a perfectionist. The yellow glue seemed to stain its way through the white squares of the lino leaving a yellow marbled effect. I'm hoping to put down more black and white checkers but I don't want the yellow to come through again. After all the work put into laying the floor I would be really annoyed if I saw the yellow seeping through again.
I'd like to repaint the whole interior so I may see if painting the floor would seal in that glue while being suitable to apply new glue over. My concern is that the paint in between the fiberglass floor and the glue for the lino would prevent the floor from adhering properly. Again, I have a lot to research and learn but I know this is going to be one sweet little camper when I'm done!
|
|
|
|
|
05-02-2013, 05:19 PM
|
#4
|
|
Member
Name: Angela
Trailer: Boler
nova scotia
Posts: 51
|
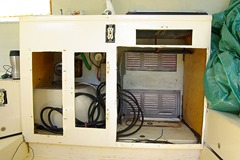
The Boler Rollercoaster
These past couple of days I've been excited, overwhelmed, furious and about ready to throw in the towel on my Boler renovations. I'm not entirely sure what made me think I could buy an old camper and renovate it; I don't even know my way around the tool shed. Working with a drill, to remove rivets, almost drove me over the edge. I thought I could just pick one up and start using it like a pro, not so. However, with some perseverance I became a rivet-drilling fiend and am now comfortable with the drill. Phew.
  l 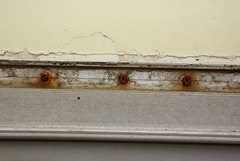
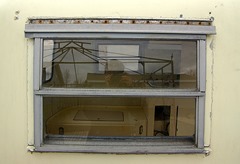
Three of the windows need to be removed to fix the cranks and leaks. I started taking the first one out with much trepidation. The first photo above is the window without the rivet coverings removed. Silly me thought there were only four rivets to drill out, until I removed those plastic covers. Once off I was faced with 30+ rivets for each window. Having to remove that many rivets was bound to either make me give up or turn me into a pro. Thank heavens I managed to get a hang of the drill.
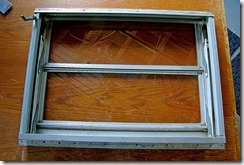 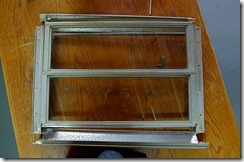
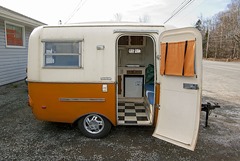
Once I managed to get the window out I had the task of taking it apart. The screws holding the frame together were so old and and rusty I ended up breaking the heads off two, leaving the shank stuck way down in the canal, making it impossible to use those canals to put the window back together. But, that’s another problem for another time. I still have the rest of the window and accessories to remove from the shell before it gets painted. Here’s what I’ve done to the outside thus far.
Window, awning rail, table rail and rain guard over door removed.
|
|
|
|
|
05-02-2013, 05:26 PM
|
#5
|
|
Senior Member
Name: Ryan
Trailer: 1979 Scamp 16- side bath
Virginia
Posts: 182
|
Congratulations!
I bought my Scamp 16' last June and am still working on it, haven't camped in yet- but getting close. It's exciting.
I used a belt sander on the floors to help remove the old hardened glue. Made easy, but messy work it.
I might be mistaken but I thought the "floor" of Bolers was wood like the Scamps as opposed to fiberglass.
Do you plan on adding a propane fridge and ditching the AC form fridge?
|
|
|
|
|
05-02-2013, 05:47 PM
|
#6
|
|
Member
Name: Angela
Trailer: Boler
nova scotia
Posts: 51
|
The floor in mine is actually fiberglass although I have a feeling it might be rare. Other people have commented on how they have wood floors in theirs. Unfortunately both the propane fridge and stove were removed from the previous owner 
|
|
|
|
|
05-02-2013, 06:59 PM
|
#7
|
|
Senior Member
Name: Cricket
Trailer: 2005 Scamp 13'
Minnesota
Posts: 403
|
I have always wanted to buy one to renovate, but bought one that is camp ready for now....plenty of time to get another! You can do it!
|
|
|
|
|
05-02-2013, 07:23 PM
|
#8
|
|
Junior Member
Name: Ralph
Trailer: 75 Boler
Ontario
Posts: 18
|
Careful, renovating can become addictive.
I love the windows you have in your door, mine are much smaller in my 75. Do you know where your boler was built?
|
|
|
|
|
05-02-2013, 08:04 PM
|
#9
|
|
Senior Member
Trailer: 1988 16 ft Scamp Deluxe
Posts: 25,709
|
You're learning how things work as you go along Angela. Sweat equity at it's finest. When you're done, you'll have a rollin' home that you KNOW is perfect for you. Cool beans! 
__________________
Donna D.
Ten Forward - 2014 Escape 5.0 TA
Double Yolk - 1988 16' Scamp Deluxe
|

|
|
|
05-02-2013, 10:27 PM
|
#10
|
|
Senior Member
Trailer: 1975 Boler
Posts: 108
|
Awesome! It'll be a lot of work, but it's worth it! We got ours in similar condition (many layers of paint inside and out, ugly flooring, missing fridge and furnace). After a lot of work we have a Boler we are proud of and camp comfortably!
Ours also has a fiberglass floor too! Our lower half was orange though. Yours looks like it was cream-ish originally. I think fiberglass floored Bolers are relatively rare, but usually no one mentions their floor unless they are replacing it (rotten wood).
Whenever we would hit the 'wall' and get frustrated with reno'ing or second guess our decision we would sweep out the dust and sleep in it. Didn't take much to 're-motivate'.Keep up the good work, and get in that thing and get camping as soon as you can!
|
|
|
|
|
05-02-2013, 11:21 PM
|
#11
|
|
Senior Member
Name: Lora
Trailer: 89 Bigfoot 17G & 73 Compact II
Northern Neck, VA
Posts: 352
|
Angela, Love your indomitable spirit! You will end up with something you enjoy. Relax, take a deep breath and visualize. It will all come together and everyone here is rooting for you.
  You go gurl!!
|
|
|
|
|
05-03-2013, 07:01 AM
|
#12
|
|
Member
Name: Angela
Trailer: Boler
nova scotia
Posts: 51
|
Quote:
Originally Posted by Ralphsegg

Careful, renovating can become addictive.
I love the windows you have in your door, mine are much smaller in my 75. Do you know where your boler was built?
|
I believe it was built in Ontario but I could be mistaken. I don't have the info in front of me, but I do have all the original pamphlets and maintenance stuff that came with it when it was made...pretty cool to have.
|
|
|
|
|
05-20-2013, 07:00 PM
|
#13
|
|
Member
Name: Angela
Trailer: Boler
nova scotia
Posts: 51
|
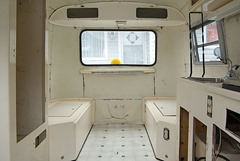
The renos continue....
It seems I do nothing these days but work on the Boler, which consequently I am perfectly happy doing.
The question now is when do I stop ripping it apart? These trailers can be stripped down to nothing and then rebuilt again. The more I take out the more I want to take out. One thing leads to another and then another
.and so on. I have to say, I am enjoying feeling like a handyman, even though things are usually much harder than they first appear to be. Theres barely a screw or rivet that comes out without a fight. Most need to be drilled, ground or pounded out to be removed, but I guess thats what happens when you buy a trailer thats as old as you are! Here are some photos of the progress:

Pre clean-up and vent removal
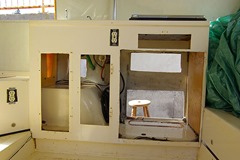
Post clean-up


Even the Boler sign has layers of paint on it.
Roof vent removed

AND CURTAINS!!! (because I'm nowhere near ready to put curtains up)
|
|
|
|
|
05-21-2013, 05:02 PM
|
#14
|
|
Junior Member
Name: Ralph
Trailer: 75 Boler
Ontario
Posts: 18
|
Nice work. I'm working overtime on mine to get it ready for a test run this weekend. I found my info for where it was made on the inside of the cupboard doors( one door french, one English) but by looking at the amount of paint on yours, I guess yours is long gone.
|
|
|
|
|
|
Currently Active Users Viewing This Thread: 1 (0 members and 1 guests)
|
|
|
 Posting Rules
|
You may not post new threads
You may not post replies
You may not post attachments
You may not edit your posts
HTML code is Off
|
|
|
|
 » Recent Discussions
 |
|
|
|
|
|
|
|
|
|
|
|
|
|
|
|
|
|
|
|
|
|
|
|
|
|
|
|
|
|
|
|
|
|
» Upcoming Events |
No events scheduled in
the next 465 days.
|
|


 Boley
Boley Big Ei
 Light House


 Linear Mode


