 |
|
 04-27-2013, 07:53 AM
|
#1
|
|
Senior Member
Name: Chris
Trailer: Boler
Alberta
Posts: 291
|
OurBoler.com 74 Boler rebuild
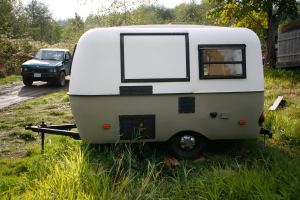
I bought this trailer in Nov of 2011. With no idea what I was doing and no room to work on it progress was slow.
The trailer waiting to be picked up

A large opening was cut out of the fiberglass
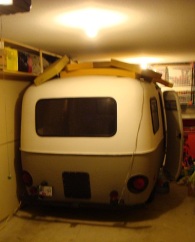
Waiting in the ferry line to bring the trailer home.

The trailer in the garage, not much room to work.
I quickly started to empty it out and dry it out.
|

|

|
|
04-27-2013, 08:02 AM
|
#2
|
|
Senior Member
Trailer: Trillium
Posts: 270
|
Welcome to FGRV, Chris. Looks like you started a big job on that cute little Boler. 
I hope you have more pics and story to tell us. We love to watch a little camper get a new lease on life. 
|
|
|
|
|
04-27-2013, 08:05 AM
|
#3
|
|
Senior Member
Name: Chris
Trailer: Boler
Alberta
Posts: 291
|
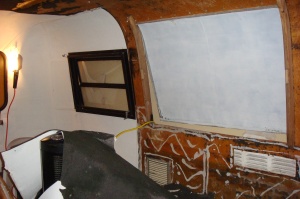
All the aluminum had been painted black, but was all missing some paint. water had gotten behind the ensolite in a couple spots and was left there and yoga mat had been glued over the fridge and furnace vents without first closing them (the vents were all bent as well). So I started ripping out everything that was moldy or damaged.
And of course the door saged (it was full of water)

Once I had finished stripping the trailer a friend offered his shop for the project, what an amazing offer, so the stripped trailer made the trip to his shop.

We lifted the trailer onto his work bench and another friend took the frame away to weld it up, it needed to be straightened and reinforced.

It came with 2 broken windows and one that didn't open for the 2 side windows, all different sizes, so I ordered some new windows from sunview industries.

An I was sanding the paint off, and sanding, and sanding. That has to be the least favorite part of the project.
While I was sanding my friends shop compressor caught on fire, adding to the excitement, I put it out, then we on a hunt for the fire extinguisher, just in case it happened again.

|
|
|
|
|
04-27-2013, 08:06 AM
|
#4
|
|
Senior Member
Name: Chris
Trailer: Boler
Alberta
Posts: 291
|
Thanks Noreen, lots coming.
|
|
|
|
|
04-27-2013, 08:16 AM
|
#5
|
|
Senior Member
Name: Chris
Trailer: Boler
Alberta
Posts: 291
|
With lots of holes to patch I turned to a youtube eduction on fiberglass. Then a friend came to help, he had never fiberglassed before, but with my description jumped in. The start was all I needed and I quickly learned how to fiberglass.


The front of the trailer looks like it hit something, and had been taped up, so it got formed up on the inside and fiberglassed.

The other holes formed and a hard working friend

I order the new windows bigger as they have rounded corners, so we had to cut out larger openings to make them fit.

Previously they had planned to use this trailer for a coffee stand, so I prepped the coffee hatch to be fiber-glassed in again.

more details at OurBoler, Family Outdoor Adventures
|
|
|
|
|
04-27-2013, 08:23 AM
|
#6
|
|
Senior Member
Name: Chris
Trailer: Boler
Alberta
Posts: 291
|
At this time I we expectantly made the choice to move provinces, so the trailer needed to be road worthy.
Frame getting straightened

I had spent alot of time cleaning it up, so I wanted to under coat it before towing it. This also helped seal off all the holes I sealed in the floor.

Since the paint was out I gave the frame a quick paint job.

To remove the saftey chains I simply gave them a little tug and the bolt holding them on broke. I then installed new ones.

The trailer was finally ready to be loaded and moved to it's new home.
|
|
|
|
|
04-27-2013, 08:53 AM
|
#7
|
|
Senior Member
Name: Chris
Trailer: Boler
Alberta
Posts: 291
|
With no key for the lock and it seized I cut it off the door and ordered a replacement from Scamp

I then started insulating

I covered the trailer with blankets and towels and used a small heater to keep the temperature warm enough. Moving from the west coast where winter is a couple days of snow every year, working on the trailer at -15 to -25 was an adjustment.
Then it was time to start building, the really fun part. First I measured the trailer, although with no flat sides all measurements are rough.

Then I started on the cabinets.


The plan is to extend the counter to the front of the trailer, I have a stove but am leaving it out to get more counter space. I picked up a sink from Ikea, smallest one the had for $30, will leave the faucet out for now, see if we want it later. I also bout a 3 way cooler for $209. This works great on 120 or propane, and 12 volt should be ok when towing.
The front bunk will flip down into a couch, and also be made into a counter top to give us more flexibility.

The dinette will also be our bed, and a bike rack when traveling.

I bought this leg from Ikea for $10, the hardware makes it easy to screw on and off for a solid and simple removable table leg.
http://www.ourboler.com/wp-content/u...rt-500x257.jpg
It is fun. There is more information and picture on my site OurBoler.com. It is looking like the trailer will be usable (not done) for camping this summer ")
|
|
|
|
|
04-27-2013, 09:09 AM
|
#8
|
|
Senior Member
Name: Cricket
Trailer: 2005 Scamp 13'
Minnesota
Posts: 403
|
Looks awesome! I especially like that the top bunk connects to more counter space and being able to haul bikes inside. We are trying to figure out how to do this, but our Scamp is in perfect condition, so I am hesitant to modify anything permenently at this point!
|
|
|
|
|
04-27-2013, 12:34 PM
|
#9
|
|
Senior Member
Name: Diane
Trailer: Casita, previously u-haul ct13
Virginia
Posts: 1,020
|
We are so proud of you! Thanks for the pictorial progress. You are doing a fine job and you will feel really good when it's done, knowing you did it! Enjoy your camping adventures.
|
|
|
|
|
04-27-2013, 01:56 PM
|
#10
|
|
Senior Member
Trailer: No Trailer Yet
Posts: 5,112
|
Nice work.
Sunview doesn't list any prices on their web page. Can you give us a sample pricing for the windows that you bought?
|
|
|
|
|
04-27-2013, 03:41 PM
|
#11
|
|
Senior Member
Name: Chris
Trailer: Boler
Alberta
Posts: 291
|
Thanks Cricket. There was nothing in this trailer that didn't need something, so no problem modifying it. I look forward to sharing you problem
Thanks D Davis. I am very happy with it so far, everything is better when you build it yourself.
Tomas, the windows were just under $180 for the side windows, would be less if not made so big. $75 for the window for the door. Shipping was around $40, but within the same province. That was with screens in the sliders.
Need to get back to the garage and see what else I can get done
|
|
|
|
|
04-29-2013, 06:09 PM
|
#12
|
|
Senior Member
Name: Chris
Trailer: Boler
Alberta
Posts: 291
|
Built some more parts. First cut out the part of the top bunk that will swing down to make the couch.

My youngest son loves spending time working in the trailer, he claims he is building a truck.
Made all the storage covers.

Made the extension that will support the table when fully extended. This is a picture of the bottom of the table.

Installed the sink plumbing, doesn't get any simpler than this, a hose into a bucket.

|
|
|
|
|
04-29-2013, 06:26 PM
|
#13
|
|
Senior Member
Name: Kathy
Trailer: 2017 Escape 19
Washington
Posts: 600
|
This is a great documentation of all the work you've done on this trailer. You're an inspiration!
|
|
|
|
|
04-29-2013, 06:33 PM
|
#14
|
|
Senior Member
Name: Kathy
Trailer: 2017 Escape 19
Washington
Posts: 600
|
Also wanted to say thanks for the link to your blog. Those little three dimensional paper trailers and RVs are awesome. Are those all your designs? You could sell those as kits to trailer enthusiasts!
|
|
|
|
|
04-30-2013, 06:47 PM
|
#16
|
|
Senior Member
Name: Kathy
Trailer: 2017 Escape 19
Washington
Posts: 600
|
Not yet! I didn't catch on to the fact that you had the templates there for anyone to use. All I can say is that you are extremely talented and creative. I really think I will try to carve out some time to try one of these - maybe the Winnabago because it's so funny and I have a soft spot for those old motorhomes. If I get one done I'll post pictures. Keep us informed on the progress on your Boler.
|
|
|
|
|
05-02-2013, 08:47 AM
|
#17
|
|
Senior Member
Name: Chris
Trailer: Boler
Alberta
Posts: 291
|
Closet and Cabinat Doors
First I tackled the closet door. I bought a pine plank and a mirror for ikea. Watched a YouTube video on how to cut glass and another on how to make a cabinet door, then out to the garage.

Glass cuter to cut glass and a knife to cut the plastic at the back.

I then repeated the process with hardboard to keep the weight down on the other doors. The centre will be painted and the pine will be finished to look natural.

They weather is warming up so I will be able to paint soon and really get things moving!!!
|
|
|
|
|
05-11-2013, 09:16 PM
|
#18
|
|
Senior Member
Name: Chris
Trailer: Boler
Alberta
Posts: 291
|
Progress update.
Cut out the shelves for the closet.

The bottom shelf I cut out so we could store things in the space beneath it.

With the warmer weather I can paint and glue, So I emptied the trailer and started finishing the inside of the trailer as well as the furniture.

|
|
|
|
|
05-12-2013, 01:02 PM
|
#19
|
|
Senior Member
Name: Kathy
Trailer: 2017 Escape 19
Washington
Posts: 600
|
Keep the reports coming. I'm impressed with what you're doing. Looks like it's going to have a nice clean look to it when you're all done.
|
|
|
|
|
05-13-2013, 10:09 PM
|
#20
|
|
Senior Member
Name: Chris
Trailer: Boler
Alberta
Posts: 291
|
Thanks Kathy I like clean, simple and strong. It will be fun to see how the vision comes together.
|
|
|
|
|
|
|
Currently Active Users Viewing This Thread: 1 (0 members and 1 guests)
|
|
|
 Posting Rules
|
You may not post new threads
You may not post replies
You may not post attachments
You may not edit your posts
HTML code is Off
|
|
|
|
 » Recent Discussions
 |
|
|
|
|
|
|
|
|
|
|
|
|
|
|
|
|
|
|
|
|
|
|
|
|
|
|
|
|
|
|
|
|
|
» Upcoming Events |
No events scheduled in
the next 465 days.
|
|


 Shunpiker
 2017 Escape Escape 19
 Mr. B
Mr. B

 Linear Mode


