 |
|
 04-25-2012, 08:06 PM
|
#21
|
|
Moderator
Name: RogerDat
Trailer: 2010 Scamp 16
Michigan
Posts: 3,744
|
I have a problem. Anyone know how this furnace part comes off? Wonder if I can just cut the butyl tape behind this part and pull it out the side. Trying to get it off so stripe can be re-done Friday but don't want to break the seal until I know I can get it off. "Looks" like it just slips over the next section of chimney so it's just putty and rust holding it on but would appreciate any info from anyone that has been there and done that.

|

|

|
|
04-25-2012, 08:11 PM
|
#22
|
|
Senior Member
Name: Jimbo
Trailer: 1971 Trails West Campster/1980 Scamp 13
California
Posts: 325
|
It pulled right off of my 1971 campster. Maybe just gently work it with a plastic putty knife and wiggle a little. Mine came
Out pretty easy ...
|
|
|
|
|
04-25-2012, 08:41 PM
|
#23
|
|
Moderator
Name: RogerDat
Trailer: 2010 Scamp 16
Michigan
Posts: 3,744
|
Quote:
Originally Posted by AlanKilian

Yes, I drilled out all the rivets and the window almost FELL out.
It had been waterproofed with something soft like "Plumber's putty".
I used silicone caulking and riveted the window back in using aluminum rivet rings on the inside. Simple.
|
What is aluminum "rivet ring"?
That plumbers putty should be butyl putty tape, you can purchase at scamp store, or some hardware stores. Almost every part on the outside is sealed with it. It's stiff enough to rivet against but compresses to seal as you rivet. Pretty decent to work with as long as it's not too cold or hot. Gets stiff or soft depending on temp.
Silicone can be a beast to clean off, soaks into gel coat and leaves a "stain" that won't let anything else stick. Like polish, future caulk, paint, gel coat or fiberglass repairs.
|
|
|
|
|
04-25-2012, 08:46 PM
|
#24
|
|
Moderator
Name: RogerDat
Trailer: 2010 Scamp 16
Michigan
Posts: 3,744
|
Quote:
Originally Posted by Thee Jimbo
It pulled right off of my 1971 campster. Maybe just gently work it with a plastic putty knife and wiggle a little. Mine came
Out pretty easy ... |
Thanks a bunch for the quick reply, that is what I needed to know. Did NOT want to break the seal then find out I was not getting the vent off without more disassembly than I could get done before Fri. morning.
Soooo looking forward to getting all the decals and stipes on so I can scrub and wax with RedMaxx after I wait a few weeks.
|
|
|
|
|
04-29-2012, 10:37 PM
|
#25
|
|
Moderator
Name: RogerDat
Trailer: 2010 Scamp 16
Michigan
Posts: 3,744
|
This was a productive weekend. Got the decals, logo and pin stipes replaced. Great job by Sign Design of Howell Mi.
Replaced the water tank fill that was missing it's top, and the cord port with the broken door. All that crud shown in the picture of the fridge vent is cleaned off since I had that and the furnace vent off for the pin stripe work.
Cleaning out old silicon caulk on belly band and polishing the alum. Silicon caulk on belly band coming off OK But.... Under it are patches of some much harder caulk that I'm having no luck scraping off. I can now see why there was a 1/2 wide silicon bead, it was to cover this old crud up.
I plan to put down a small bead of non-silicon caulk to fill gap between trailer and belly band but need to get the brownish patches of old hard caulk off first or they will show big time.
Any suggestions on caulk softeners?
|
|
|
|
|
04-30-2012, 07:33 AM
|
#26
|
|
Senior Member
Name: Ron
Trailer: Trillium 13 ft (green grape)
Ontario
Posts: 442
|
Hi Robt
If it's old silicone then there is a product by DAP called "SILICONE BE GONE". Home Depot & Rona carry it here in Canada. Don't know if this product would work if it's not silicone . I sure you'll get some more info on here soon. Good Luck !
Ron
|
|
|
|
|
04-30-2012, 04:20 PM
|
#27
|
|
Senior Member
Trailer: 1988 16 ft Scamp Deluxe
Posts: 25,707
|
RogerDat, here's a recent topic for you! Silicone Remover
__________________
Donna D.
Ten Forward - 2014 Escape 5.0 TA
Double Yolk - 1988 16' Scamp Deluxe
|

|
|
|
05-02-2012, 02:40 PM
|
#28
|
|
Moderator
Name: RogerDat
Trailer: 2010 Scamp 16
Michigan
Posts: 3,744
|
Thanks for the link Donna.
Can not find the Dap Silicon be gone, so have tried Motsenbocker's Lift Off with decent results on the silicon but not doing much for the brown stuff under it except where it is really thin. I swear that brown stuff looks like liquid nails, or maybe epoxy. Goof Off adhesive/latex remover did nothing to it. No joy using the heat of a blow dryer either.
Right now I'm wearing it down a little at a time. Steady licks whip the devil as my grandma used to say.
|
|
|
|
|
05-02-2012, 05:46 PM
|
#29
|
|
Senior Member
Name: Michael
Trailer: 1985 16 ft Scamp
Ohio
Posts: 107
|
Quote:
Originally Posted by RogerDat
Dirt is one thing but this elephant hide was filthy and sticky! Some of that "tape" is just dirt. Took this to remind me what overlaps what. It's all clean after this week end and I have a dehumidifier running to get it good and dry before retape. Used AWSOME found at $$$ store.
 |
Here is a picture of the inside of my 85 Scamp with the seams filled with latex caulk, smoothed and then painted with 123 Primer and Behr High Gloss latex paint. I'm not sure why folks are taping the seams...
|
|
|
|
|
05-03-2012, 08:48 AM
|
#30
|
|
Moderator
Name: RogerDat
Trailer: 2010 Scamp 16
Michigan
Posts: 3,744
|
Cost and time effective is my reason. Caulking + painting + trimming windows would not get done in time for spring camping. I have the tape from Scamp but based on what others have said about problems with tape coming off I'm debating use of additional adhesive vs additional work getting it off if I go the route you did.
Your scamp looks sweet. Thanks for sharing the idea, materials and results.
|
|
|
|
|
05-06-2012, 11:50 AM
|
#31
|
|
Moderator
Name: RogerDat
Trailer: 2010 Scamp 16
Michigan
Posts: 3,744
|
How does one replace the alum. rain shield above the door on a scamp? Looking for someone who has been there done that. Caulk tape is shot, shield is more of a guide for rain than a guard. I see a river flowing out from under the middle when it rains.... right at my door.
Attached by rivets but the ends must be buried under the ensolite. Going to be hard to knock them out after drilling.
|
|
|
|
|
05-06-2012, 01:52 PM
|
#32
|
|
Senior Member
Name: Michael
Trailer: 1985 16 ft Scamp
Ohio
Posts: 107
|
Quote:
Originally Posted by RogerDat
How does one replace the alum. rain shield above the door on a scamp? Looking for someone who has been there done that. Caulk tape is shot, shield is more of a guide for rain than a guard. I see a river flowing out from under the middle when it rains.... right at my door.
Attached by rivets but the ends must be buried under the ensolite. Going to be hard to knock them out after drilling.
|
I slid a putty knife under the ensolite after removing the push-on trim piece around the door. You can then access the back of the rivets. You can then glue the ensolite back down. I used rubber contact cement but there are dozens of adhesives that will work.
Work gently with that old ensolite as it does become a bit brittle over time.
|
|
|
|
|
05-06-2012, 02:22 PM
|
#33
|
|
Senior Member
Name: Jimbo
Trailer: 1971 Trails West Campster/1980 Scamp 13
California
Posts: 325
|
Quote:
|
Originally Posted by BigMike
I slid a putty knife under the ensolite after removing the push-on trim piece around the door. You can then access the back of the rivets. You can then glue the ensolite back down. I used rubber contact cement but there are dozens of adhesives that will work.
Work gently with that old ensolite as it does become a bit brittle over time.
|
I read somewhere else un this forum that they just let the old rivet heads be. They don't cause any damage and they didn't rattle. Maybe if they duded start to rattle then gently peel back the old ensolite and then deal with the rivets.
That's what I plan to do either way.
And don't forget the butyl tape
Good luck and let us know how it turned out
|
|
|
|
|
05-06-2012, 07:14 PM
|
#34
|
|
Moderator
Name: RogerDat
Trailer: 2010 Scamp 16
Michigan
Posts: 3,744
|
Thanks BigMike and Jimbo. I'm going to try the "let em be" if I can but worth knowing that removing door trim and peeling back ensolite is an option.
I have enough butyl tape left from one roll after redoing the fridge vent, furnace vent, cord port and water fill to do the rain shield. Will have to get more when I get around to windows.
|
|
|
|
|
05-06-2012, 10:48 PM
|
#35
|
|
Moderator
Name: RogerDat
Trailer: 2010 Scamp 16
Michigan
Posts: 3,744
|
Removed the boa constrictor sized bead of silicon caulk from the belly band this weekend. Got a two-fer out of it. Scamp looks much better and the small seep of water that I could not track down became a readily apparent flow. 
Looks like I will be drilling out the rivets and removing the belly band. I recall reading on the forum that 3M 5200 that would be good for sealing the seam between the two halves. Or Lexel clear caulk has also been mentioned.
Figure caulk the seam, epoxy the old rivet holes and replace belly band and re-rivet. Since the rivets don't go through not sure how I will seal those. If anyone has any suggestions on the best caulk or tips learned the hard way feel free to share.
|
|
|
|
|
05-10-2012, 10:16 PM
|
#36
|
|
Moderator
Name: RogerDat
Trailer: 2010 Scamp 16
Michigan
Posts: 3,744
|
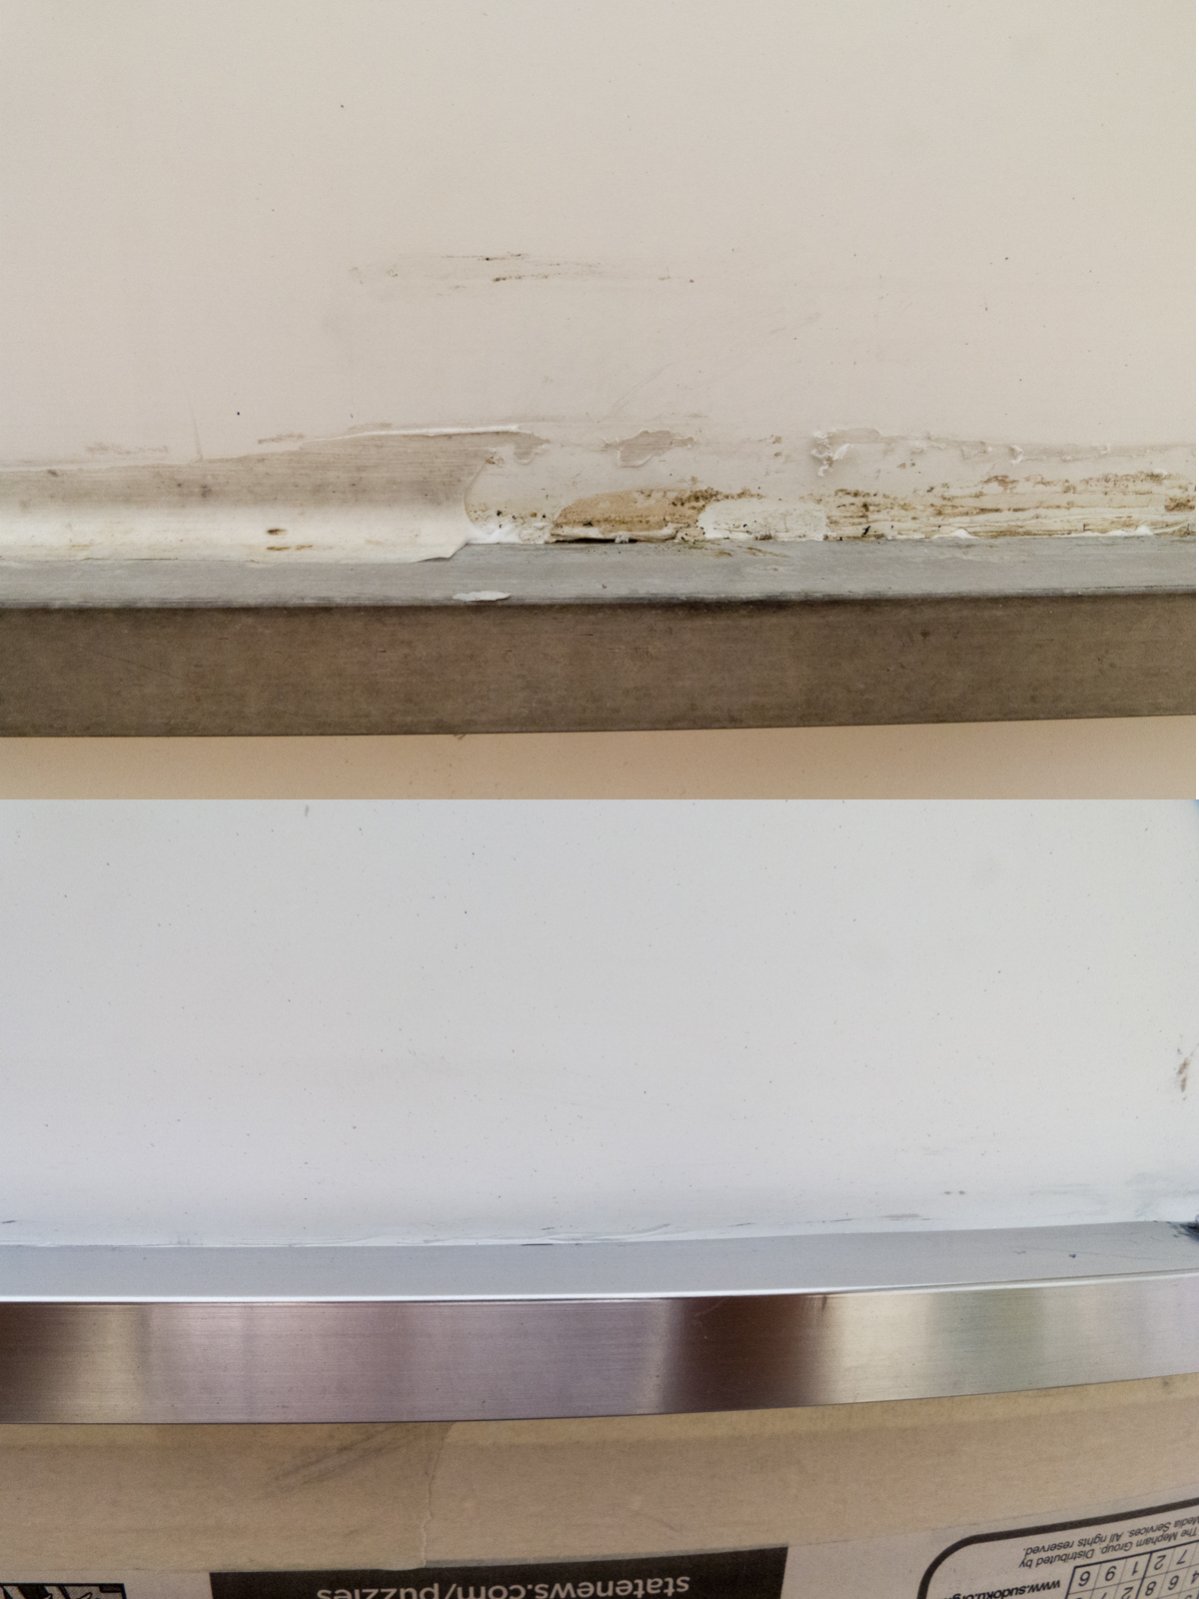
Confirmed belly band leak using a watering can so off it came. The suggestion of using Nevr Dull was a good one. Posted this picture of before and after. At least you will know why I called it a silicon snake and how well that polish, along with some elbow grease worked.
|
|
|
|
|
05-10-2012, 10:31 PM
|
#37
|
|
Moderator
Name: RogerDat
Trailer: 2010 Scamp 16
Michigan
Posts: 3,744
|
About that Butyl Tape
We all talk about butyl tape caulk but I have not seen any pictures of it in use. So here are some for those who wonder what it is like and how it is used.
One showing the caulk tape being applied to back of the furnace vent. With the backing paper peeled up at the corners so I can press each piece of caulk tape into the other. Still one piece to go in the foreground. The paper is all peeled off before installing.

This is the fridge vent after being riveted on. You can see the butyl tape is squished out the edges. I will then take a plastic putty knife and slowly trim the excess off flush with the edges of the vent.

All I can say is I spent days cleaning silicon off of belly band, a few minutes cleaning old butyl tape off of these two vents.
|
|
|
|
|
05-16-2012, 12:57 PM
|
#38
|
|
Moderator
Name: RogerDat
Trailer: 2010 Scamp 16
Michigan
Posts: 3,744
|
Working on the belly band leak
I was sure I had tracked down the leak to the belly band seam using a watering can. Removed the belly band and caulked fiberglass with 3M 5200 I would have sworn that seam was all but air tight. Had a big rain last night and towel left at low point under couch was wet by where I saw water coming down seam of ensolite after removing belly band caulk 
Will re-test with watering can, probably in small sections with plastic garbage bags taped over everything below band. Test belly seam a little at a time, if no leak found at belly seam then expose section below by removing garbage bags one section at a time.
Suppose I could have more than one leak source since trailer is angled down at the front and toward one corner a bit. Which put the towel and the ensolite seam where I saw the leak at a low point BUT on a raised portion of floor. So water has to be flowing down from side wall or front wall.
|
|
|
|
|
05-16-2012, 03:24 PM
|
#39
|
|
Senior Member
Name: Michael
Trailer: 1985 16 ft Scamp
Ohio
Posts: 107
|
Quote:
Originally Posted by RogerDat
I was sure I had tracked down the leak to the belly band seam using a watering can. Removed the belly band and caulked fiberglass with 3M 5200 I would have sworn that seam was all but air tight. Had a big rain last night and towel left at low point under couch was wet by where I saw water coming down seam of ensolite after removing belly band caulk
Will re-test with watering can, probably in small sections with plastic garbage bags taped over everything below band. Test belly seam a little at a time, if no leak found at belly seam then expose section below by removing garbage bags one section at a time.
Suppose I could have more than one leak source since trailer is angled down at the front and toward one corner a bit. Which put the towel and the ensolite seam where I saw the leak at a low point BUT on a raised portion of floor. So water has to be flowing down from side wall or front wall. |
Hey Rogerdat
Not to challenge your post but are you sure it's the belly band? The reason I am casting doubts and dispersions on this is b/c I thought the same thing about my 85 Scamp. What I discovered is after I thoroughly sealed my windows, and replaced my roof vent, I had no more leak. Bear in mind, I did one window twice and caulkled the corners of the rubber window gaskets before I tore the belly band off.
Thank goodness I found the "leaker before I ripped the belly band off.
Another leak that I repaired that I didn't even consider was the roof vent/escape hatch. It was leaking in around that and the water was running down the INSIDE of the elephant (ensolite) hyde. Water leaks can be most elusive little creatures. I was told by Scamp that the belly band is fiberglassed over on the inside. It was at that point that I began to seriously look for other routes that the water was traveling.
FYI New roof vents are available from Scamp parts. You may need to enlarge the opening on top though. (5 jig saw blades later) If they offer you a choice, opt for the aluminum framed model over the plastic one. Much more substantial and less likely to give you problems down the road. IMO
The way I found all my leaks is we had what I think was the rainiest May and June last year on record here. At least it seemed that way to me...
Best of luck &
Keep us posted.
Mike
|
|
|
|
|
05-16-2012, 04:07 PM
|
#40
|
|
Moderator
Name: RogerDat
Trailer: 2010 Scamp 16
Michigan
Posts: 3,744
|
BigMike,
The reason I post here is to gain from the experience of others. I removed caulk from top of alum. belly band then it rained and water streamed down a seam. Where before I had only been able to spot a damp spot never a flowing source.
I then used a watering can to pour water at the belly band and saw the same stream. So I'm pretty sure the mid line seam was leaking (could have been a vent below that) but now I'm sure if it was leaking it's not the only leak.
Anything from the street side front corner up is a candidate to drain toward this spot so that includes the roof vent, street side dining window all the kitchen rivets which appear to pre-date snap caps but I dabbed a little white liquid electrical tape on those to seal.
Front or back window might even be the source. Would be logical for water from above to follow that fiberglass mid seam and then flow down when it hit the gap in the ensolite.
For now I'm just going to try different spots with a watering can to see if I can rule anything in or out and focus my repair work.
I figure I have to refurbish windows and reset roof vent into caulk tape that is not old enough to vote at some point. At least you give me hope, you got yours sealed up eventually. 
|
|
|
|
|
|
|
Currently Active Users Viewing This Thread: 1 (0 members and 1 guests)
|
|
|
| Thread Tools |
Search this Thread |
|
|
|
| Display Modes |
 Linear Mode Linear Mode
|
 Posting Rules
|
You may not post new threads
You may not post replies
You may not post attachments
You may not edit your posts
HTML code is Off
|
|
|
|
 » Recent Discussions
 |
|
|
|
|
|
|
|
|
|
|
|
|
|
|
|
|
|
|
|
|
|
|
|
|
|
|
|
|
|
|
|
|
|
» Upcoming Events |
No events scheduled in
the next 465 days.
|
|


 Campster
 Humpty Dumpty was Pushed


