 |
|
 11-24-2012, 09:23 AM
|
#1
|
|
Senior Member
Name: Derek
Trailer: 1973 boler 13', Earlton On
Ontario
Posts: 396
|
06' Forester - The wires go WHERE?
I'm working on trailer wiring for my 2006 Forester.
I have purchased a T-one wiring kit. I found where it plugs in, and I have connected it. The T-one is a 4-wire connector. I need 7 wire plus wiring from the brake controller. I have a connector to do this. Now all I have to do is figure out is a couple remaining wiring puzzles. I have figured out where to run the wires inside the cabin. It looks like it will go under the trim easily enough.
Question 1:
The connector requires a wire run from the battery positive and a second wire from the battery negative. What is the best way to run these wires through/around the firewall? I would prefer not to drill. I would also prefer not to run wiring under the vehicle. Suggestions?
Question 2:
The brake controller requires one wire from the brake switch. This switch looks quite different then a standard on-off switch (as was seen on my previous car). Will I be able to splice in here without problems? Thoughts?
|

|

|
|
11-24-2012, 09:54 AM
|
#2
|
|
Senior Member
Trailer: 1988 16 ft Scamp Deluxe
Posts: 25,710
|
Derek, maybe you'll find some info in this thread that will help: http://www.fiberglassrv.com/forums/f...hed-52650.html
__________________
Donna D.
Ten Forward - 2014 Escape 5.0 TA
Double Yolk - 1988 16' Scamp Deluxe
|
|
|
|
|
11-24-2012, 09:55 AM
|
#3
|
|
Senior Member
Trailer: 2002 19 ft Scamp 19 ft 5th Wheel
Posts: 3,640
|
The Neg wire is in your flat connector. It is the one that is all by itself.
The 1st wire is the power wire to your 12Vdc connection in the camper.
Your 2nd wire is the brake wire from the controller.
Be sure to put a 30amp reset-able circuit breaker on the battery wire. Do it at the battery.
You also have 1 additional wire for the 7 pin connector and that is the back up lights and you really don't need to connect it unless you want to.
|
|
|
|
|
11-24-2012, 10:42 AM
|
#4
|
|
Senior Member
Trailer: No Trailer Yet
Posts: 5,112
|
Quote:
Originally Posted by glamourpets

Question 1:
The connector requires a wire run from the battery positive and a second wire from the battery negative. What is the best way to run these wires through/around the firewall? I would prefer not to drill. I would also prefer not to run wiring under the vehicle. Suggestions?
|
Sometimes there are large rubber grommets for wire bundles coming through the dash panel in the brake area. You may be able to cut a small X in the rubber and push the extra wires through, then seal with butyl putty or similar.
If you are willing to drill, these type of grommets make a very tidy pass through.

I've had good luck running wires underneath inside a protective flexible shield like this: 1/4" x 14 Ft. Protective Wire Wrap. I secure it with plastic zip ties.
|
|
|
|
|
11-24-2012, 11:17 AM
|
#5
|
|
Senior Member
Name: Derek
Trailer: 1973 boler 13', Earlton On
Ontario
Posts: 396
|
Quote:
Originally Posted by Darwin Maring
The Neg wire is in your flat connector. It is the one that is all by itself.
The 1st wire is the power wire to your 12Vdc connection in the camper.
Your 2nd wire is the brake wire from the controller.
Be sure to put a 30amp reset-able circuit breaker on the battery wire. Do it at the battery.
You also have 1 additional wire for the 7 pin connector and that is the back up lights and you really don't need to connect it unless you want to. |
Ok, so I have a power wire, and a brake wire, and an optional backup wire. One wire remains unaccounted for. lack, Yellow, White, and Blue. Which am I missing.
Also, the t-one connector was very light weight wire. I didn't think it a good plan to count on this as a ground. Am I missing something here?
Derek
PS. Donna. Thanks for the link for the old site. They did a really nice installation. There were some good ideas.
|
|
|
|
|
11-24-2012, 11:20 AM
|
#6
|
|
Senior Member
Name: Derek
Trailer: 1973 boler 13', Earlton On
Ontario
Posts: 396
|
Quote:
Originally Posted by Thomas G.
Sometimes there are large rubber grommets for wire bundles coming through the dash panel in the brake area. You may be able to cut a small X in the rubber and push the extra wires through, then seal with butyl putty or similar.
If you are willing to drill, these type of grommets make a very tidy pass through.
I've had good luck running wires underneath inside a protective flexible shield like this: 1/4" x 14 Ft. Protective Wire Wrap. I secure it with plastic zip ties. |
My issue with drilling is that it can be a start point for rust. I tend to keep cars for a long time. Any thoughts on drilling in a rust-free sort of way?
Derek
|
|
|
|
|
11-24-2012, 11:36 AM
|
#7
|
|
Senior Member
Trailer: No Trailer Yet
Posts: 5,112
|
Quote:
Originally Posted by glamourpets
Ok, so I have a power wire, and a brake wire, and an optional backup wire. One wire remains unaccounted for. Black, Yellow, White, and Blue. Which am I missing.
|
You are missing brown for running lights. Trailer Wiring Diagrams | etrailer.com
Quote:
Also, the t-one connector was very light weight wire. I didn't think it a good plan to count on this as a ground. Am I missing something here?
Derek
|
I'd run a separate ground wire, especially if you plan to charge your battery off the black wire. In fact, I'd use 10 gauge or thicker wire.
Quote:
Originally Posted by glamourpets
My issue with drilling is that it can be a start point for rust. I tend to keep cars for a long time. Any thoughts on drilling in a rust-free sort of way?
Derek
|
I understand, living the rust belt. You could prime the exposed edge with an artist's brush and primer, then seal it thoroughly on each side with a generous glob of butyl rope caulk. Future archeologists will find it unrusted. 
|
|
|
|
|
11-24-2012, 11:47 AM
|
#8
|
|
Senior Member
Trailer: Class A Motorhome
Posts: 7,912
|
The ground wire in the 4 wire connector was only intended as a ground for the lights. You will need a much heavier wire for a ground connection to carry the charging line current. It might be easier to run a second seperate wire from a good ground on the TV frame to the ground side of the Boler's battery, with a disconnect plug of appropriate size, just for this ground, near the existing 7 pin plug.
Basic RV'ing Rule #327: You can never have to much ground connection between TV and Trailer
|
|
|
|
|
11-24-2012, 12:21 PM
|
#9
|
|
Senior Member
Trailer: No Trailer Yet
Posts: 5,112
|
Quote:
Originally Posted by Bob Miller
Basic RV'ing Rule #327: You can never have to much ground connection between TV and Trailer
|

|
|
|
|
|
11-24-2012, 12:32 PM
|
#10
|
|
Senior Member
Trailer: 2002 19 ft Scamp 19 ft 5th Wheel
Posts: 3,640
|
Basic RV'ing Rule #327: You can never have to much ground connection between TV and Trailer
I agree too however this seams to make for a big debate on this forum.
Also: If your tow vehicle has separate turn and brake signals, you may need a converter to make the lights work on your camper.
|
|
|
|
|
11-24-2012, 01:08 PM
|
#11
|
|
Senior Member
Trailer: No Trailer Yet
Posts: 5,112
|
Quote:
Originally Posted by Darwin Maring
Also: If your tow vehicle has separate turn and brake signals, you may need a converter to make the lights work on your camper.
|
Looks like it does. OP will need an adapter unless it is built into the T adapter.

|
|
|
|
|
11-24-2012, 03:53 PM
|
#12
|
|
Senior Member
Name: Francesca Knowles
Trailer: '78 Trillium 4500
Jefferson County, Washington State, U.S.A.
Posts: 4,669
|
Yellow wire is "extra"- usually for backup lights....though most older trailers don't have them, you might consider wiring it up anyway, for possible future use.
Here's a link to a very helpful E-trailer step-by-step installation from 4-way through 7-way:
Brake Controller 7- and 4-Way Installation Kit (ETBC7) | etrailer.com
Francesca
__________________
...............  ..................
Propane Facts vs. Fiction:. Click here
Tow Limit Calculator: Click here
|
|
|
|
|
11-24-2012, 04:03 PM
|
#13
|
|
Senior Member
Trailer: No Trailer Yet
Posts: 5,112
|
Quote:
Originally Posted by Francesca Knowles
Yellow wire is "extra"- usually for backup lights..............
Francesca
|
I thought yellow was universally left brake and turn. Purple is back up.
|
|
|
|
|
11-24-2012, 04:19 PM
|
#14
|
|
Senior Member
Name: Francesca Knowles
Trailer: '78 Trillium 4500
Jefferson County, Washington State, U.S.A.
Posts: 4,669
|
Quote:
Originally Posted by Thomas G.
I thought yellow was universally left brake and turn. Purple is back up.
|
Hmmm...I think I'm a little confused- the O.P.'s trailer is a '73, so I'm presuming he's trying to match THAT wiring.....at that time, yellow was extra, and it's still that way with the traditional Bargman connector, which it sounds like he has on the trailer.
It's true that on newer trailers yellow is left stop/turn...but unless the OP's trailer has been rewired to reflect the pattern below, his Boler probably isn't wired that way...
NEWER TRAILER WIRING:
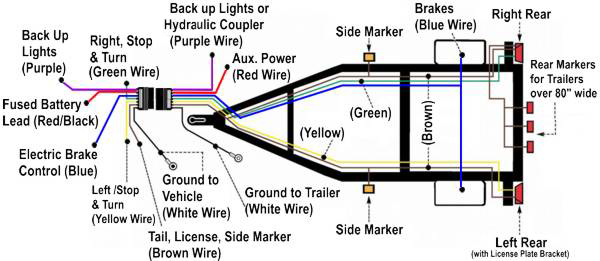
Above image source: http://www.etrailer.com/faq-wiring.aspx
OLD/ORIGINAL TRAILER WIRING, BARGMAN 7-WAY BLADE CONNECTION: :


Images Source: http://www.vintagetrailersupply.com/..._p/vts-364.htm
Francesca
__________________
............... ..................
Propane Facts vs. Fiction:. Click here
Tow Limit Calculator: Click here
|
|
|
|
|
11-24-2012, 05:43 PM
|
#15
|
|
Senior Member
Trailer: 2002 19 ft Scamp 19 ft 5th Wheel
Posts: 3,640
|
Ground: The ground on tow vehicles is usually the frame. Just attach your white ground wire to the frame instead of running a new wire all the way from the battery.
|
|
|
|
|
11-24-2012, 08:40 PM
|
#16
|
|
Senior Member
Name: Derek
Trailer: 1973 boler 13', Earlton On
Ontario
Posts: 396
|
Today I made a good start on the wiring project. I now have a 7 way connector at the hitch. The wire runs through a grommet under the spare tire, and goes along the drivers side (hidden under trim) and up to the dash. I still have to figure out how to connect/route these wires from here, but I have made a good start.
A couple of conversation topics came up in this discussion here. I address them here:
Quote:
Originally Posted by Darwin Maring
The Neg wire is in your flat connector. It is the one that is all by itself.
The 1st wire is the power wire to your 12Vdc connection in the camper.
Your 2nd wire is the brake wire from the controller.
|
I took apart my 7 way adapter to discover that the white wire in the flat connector is not actually connected to anything. They ran it a few inches into the loom where it dead ended. This wire was really light weight, and this was probably smart design. Anybody putting significant amps through it would burn it up.
You are possibly wondering why I took apart the adapter. Initially I took it apart to replace the white wire and black wire with 10 gauge. I ended up splicing the wires from the flat 4 to make them a little longer. The longer flat 4 wires made for a cleaner installation.
Quote:
Originally Posted by Thomas G.
I thought yellow was universally left brake and turn. Purple is back up.
|
In my case, the adapter had two yellow wires. This is how it came from the manufacturer. One yellow wire connected to the flat 4 connector, and is for left turn. The other was the center pin in the 7 wire. The center pin should have been purple, but after taking the connector apart it was easy enough to figure out what was going on.
Quote:
Originally Posted by Francesca Knowles
Hmmm...I think I'm a little confused- the O.P.'s trailer is a '73, so I'm presuming he's trying to match THAT wiring.....at that time, yellow was extra, and it's still that way with the traditional Bargman connector, which it sounds like he has on the trailer.
|
The trailer is going to be rewired from scratch. The original wiring was a mess. It was hacked and spliced and taped and whatever else. Rewiring allows me to update to a modern electrical system. My intention is to go with standard wiring colours.
Quote:
Originally Posted by Darwin Maring
Ground: The ground on tow vehicles is usually the frame. Just attach your white ground wire to the frame instead of running a new wire all the way from the battery.
|
I had an old car where every electrical ground was run to the nearest piece of sheet metal and connected with a screw. I was forever chasing electrical bugs in this car. Whenever a circuit failed, it was usually rust at the point where the ground screw was found. The solution was to take the screw out, create a clean connection, and put the screw back. This car has gone to the bone yard, but it did teach me some valuable lessons.
Running a wire to a better connecting point may be a little extra work, but its worth it. All of the wire is inside a single piece of loom anyway.
Derek
|
|
|
|
|
11-25-2012, 07:06 AM
|
#17
|
|
Senior Member
Trailer: Trillium 2010
Posts: 5,185
|
Hi Derek. The post Donna referenced was my 2012 which is the next generation to your '06. If you have an automatic, you should find a diamond shaped plug on the fire wall near the steering wheel entry point. That's where the clutch master cylinder would be on a manual and can be used for an entry point. Remember to seal it if you use it. Since mine is a manual I had to find an alternate route. I went with a plug way up on the drivers side wall. I am not sure if it is in the same place on the older version. Look for a large wire bundle going through the wall. In my case I removed the wheel well plastic (couple of push pins), and snaked the wires through a new hole I made in the plug and up the inner fender into the engine compartment. Finally, if you have a manual you may want to research disconnecting the hill holder clutch. On your generation Forester it's connected through the brake master cylinder. Raz
|
|
|
|
|
11-25-2012, 09:11 AM
|
#18
|
|
Senior Member
Trailer: No Trailer Yet
Posts: 5,112
|
Quote:
Originally Posted by glamourpets
.............
I had an old car where every electrical ground was run to the nearest piece of sheet metal and connected with a screw. I was forever chasing electrical bugs in this car. Whenever a circuit failed, it was usually rust at the point where the ground screw was found. The solution was to take the screw out, create a clean connection, and put the screw back. This car has gone to the bone yard, but it did teach me some valuable lessons.
Running a wire to a better connecting point may be a little extra work, but its worth it. All of the wire is inside a single piece of loom anyway.
Derek
|
Music to my ears, 'cause this is SO true. 
|
|
|
|
|
11-26-2012, 08:53 PM
|
#19
|
|
Senior Member
Name: Derek
Trailer: 1973 boler 13', Earlton On
Ontario
Posts: 396
|
Quote:
Originally Posted by P. Raz
Hi Derek. The post Donna referenced was my 2012 which is the next generation to your '06. If you have an automatic, you should find a diamond shaped plug on the fire wall near the steering wheel entry point. That's where the clutch master cylinder would be on a manual and can be used for an entry point. Remember to seal it if you use it. Since mine is a manual I had to find an alternate route. I went with a plug way up on the drivers side wall. I am not sure if it is in the same place on the older version. Look for a large wire bundle going through the wall. In my case I removed the wheel well plastic (couple of push pins), and snaked the wires through a new hole I made in the plug and up the inner fender into the engine compartment. Finally, if you have a manual you may want to research disconnecting the hill holder clutch. On your generation Forester it's connected through the brake master cylinder. Raz
|
Thanks Raz. Your older posting provided a lot of valuable suggestion for my wiring project. Mine Subaru might be a previous generation, but it shares lots of common traits. The clutch master cylinder plug idea is a good one. I will have to see what I can do with it.
Derek
|
|
|
|
|
12-04-2012, 04:49 PM
|
#20
|
|
Senior Member
Name: Derek
Trailer: 1973 boler 13', Earlton On
Ontario
Posts: 396
|
My wiring project is almost there. Three questions:
Raz made the suggestion to use the rubber plug where the clutch would go on a stick shuift. This turned out to be an excellent way to run the wiring through the fire wall. The plug itself is about 2" across. I put a hole in the rubber plug and put the wiring through the hole. The question now: what is the best way to seal things up? Because of the added weight, the plug tends to come out of the hole. Also, there is a hole in the plug itself which probably could/should be sealed up. Suggestions?
I have yet to decide how to run my backup wiring. I have run a fused wire from the battery back to the trailer connector. The wire is 12 gauge and fused at the battery. I am considering adding a relay in paralel with the backup lights to turn the trailer backup light line. Thoughts?
I connected the black power line for the controller directly to the battery. It seems this will potentially drain the battery out when parked. Or will the controller go into sleep mode when the vehicle is not running? Or is the draw on a parked vehicle so low as to be insignificant?
|
|
|
|
|
|
|
Currently Active Users Viewing This Thread: 1 (0 members and 1 guests)
|
|
|
 Posting Rules
|
You may not post new threads
You may not post replies
You may not post attachments
You may not edit your posts
HTML code is Off
|
|
|
|
 » Recent Discussions
 |
|
|
|
|
|
|
|
|
|
|
|
|
|
|
|
|
|
|
|
|
|
|
|
|
|
|
|
|
|
|
|
|
|
» Upcoming Events |
No events scheduled in
the next 465 days.
|
|


 boler
boler
 Waltzin' Matrillda
 Linear Mode


