 |
 08-03-2015, 12:02 PM
|
#1
|
|
Junior Member
Name: Erik
Trailer: love bug
Delaware
Posts: 15
|
welcome , to my nightmare
glad I found this site. I am the new owner of a love bug, year unknown. I got a deal $ wise but got dealt condition wise. The front door frame is not secured by the support Ive seen in other pictures on this site . after the sale the po remembered he had some parts.....so I have a template. The floors were good from the underneath but after getting home and pulling the stinky carpet there was mold and rot from the top on all wood. The roof a/c seems to be sinking on one side and the front fiberglass is hitting the frame. the frame seems good so far. have not gotten to the electric brakes.
Questions, is there an order to start in for best results? videos? I have pulled the carpet and am pulling the insulation and rat fur now. source for rectangular tail lights?
|

|

|
|
08-03-2015, 01:51 PM
|
#2
|
|
Senior Member
Name: Myron
Trailer: Escape
New Mexico
Posts: 987
|
Take plenty of pictures of the problem areas, because we can't help if we can't see. No detail is too small. Start a separate file on your computer. You'll also be glad to then be able to compare the before and after pictures.
Where to start? If it isn't under cover, find the leaks, fix them first. All rivets are a potential leak. If the window caulking looks suspicious remove the unit and re-bed the windows with butyl tape. The best approach is the anal one, so be anal and the repair likely will not come back and bite you again. Of course all floor rot and frame rust must go.
|
|
|
|
|
08-03-2015, 04:24 PM
|
#3
|
|
Senior Member
Trailer: Scamp 19 ft 5th Wheel
Posts: 1,861
|
Erik
Welcome. The good news is you are in Delaware. Eastern Marine has about any running gear and electrial trailer parts you need at a fair price and as you know no sales tax.
Cat futrell in JAX Fl. did an extensive rebuild on a Love Bug and did a lot of good posts on the rebuild. I think she is bringing the trailer to Cheorkee this fall.
Like Myron said if don't have a covered area fix the leaks first. If you have a shop I usually take out the front and rear windows for ventilation. The start at the bottom and work up. If it has a floor like a Scamp I do floor repairs a section at a time.
Good Luck
Eddie
|
|
|
|
|
08-03-2015, 04:33 PM
|
#4
|
|
Senior Member
Trailer: Scamp
Posts: 7,056
|
I'm pretty sure the roof of a Love Bug was never built to handle the weight of Air Conditioner.
__________________
Byron & Anne enjoying the everyday Saturday thing.
|
|
|
|
|
08-04-2015, 11:38 AM
|
#5
|
|
Senior Member
Name: Patrick
Trailer: Shopping for new RV
North Carolina
Posts: 702
|
Air conditioners can be a source of water (condensation) leakage. Water will travel to the lowest point and settle there. Is that spot in the flooring a low spot. Use a level and check. Run A/C on a humid day and see where the condensation goes....it might be the source....eliminate that and move on.
Water sources in an RV....rain water leaks....plumbing leaks....A/C condensation leaks...your dog or cat (yellow stain).
Good Luck!
|
|
|
|
|
08-07-2015, 12:32 PM
|
#6
|
|
Junior Member
Name: Erik
Trailer: love bug
Delaware
Posts: 15
|
pics and questions
ok, here are some bad pics and questions
in the first pic you see the body collapsing on the frame. I assume rot. can the floors be made from 3/4 inch plywood? Is shaping needed to fit the shell at point of contact? (as in a channel for the wood to fit square or rounded to take off sharp shoulders, I saw someone routering the plywood)
second pic is the front right corner, are those self tapping screws what hold the shell to the frame? the floors have been replaced poorly in some or all of the camper. I have seen some talk of 3 layers of floor, glass,wood, glass. Is that just around the outside edge? how far are you to fiberglass in from the joint of the shell and wood?
third pic is right rear. I thing I have solved the leak problems. front and rear of the trailer had clearance lights that you can see the water tracks from the mounting holes that were elongated and wiring holes that were not sealed. The po also had a 14 foot rv awning that weighed a ton hanging on the side and had punched 3 large holes in the top at the mounting brackets and then had a fist size lump of caulking catching and directing the rain inside.
thanks for your comments
Erik
|
|
|
|
|
08-07-2015, 12:36 PM
|
#7
|
|
Senior Member
Name: John
Trailer: '71 Boler, '87 Play-Mor II
Deep South
Posts: 1,261
|
I see a frame off restoration in your future,  . Welcome to the Egg world!
|
|
|
|
|
08-07-2015, 01:00 PM
|
#8
|
|
Junior Member
Name: Erik
Trailer: love bug
Delaware
Posts: 15
|
I am already pulling the body. I am just making sure to do it right. the first time. with my SO looking over my shoulder; )
what do owners do to add support to the roof for the ac unit (a medical must have)
and is the center floor attached to the body just at the center by the door?
|
|
|
|
|
08-07-2015, 01:02 PM
|
#9
|
|
Junior Member
Name: Erik
Trailer: love bug
Delaware
Posts: 15
|
forgot to add this unit has the bathroom and electric brakes. how is the raised floor done? and were electric brakes an option?
|
|
|
|
|
08-07-2015, 01:09 PM
|
#10
|
|
Moderator
Name: RogerDat
Trailer: 2010 Scamp 16
Michigan
Posts: 3,744
|
That second picture (with daylight coming through missing floor) shows what looks like the same attachment process as Scamp. Floor screwed to frame, fiberglass shell attached with FG tabbing to floor. Like taped on all around the edges with fiberglass and resin.
Before things move or shift too much you might want to make some cardboard or luan wood templates of each floor section. At least some of that is going to need replacing. If you don't have one of those oscillating tools with some good saw blades... well you will want them soon. Leave some of the tabbing as a guide for the new floor and to help hold new FG resin (peanut butter) or epoxy in place when you slip the new floor back into place.
You know what they say. "Other than that Mrs. Lincoln how did you like the play?"
|
|
|
|
|
08-07-2015, 01:10 PM
|
#11
|
|
Commercial Member
Name: Charlie Y
Trailer: Escape 21 - Felicity
Oregon
Posts: 1,584
|
Quote:
Originally Posted by relics-ink

I am already pulling the body. I am just making sure to do it right. the first time. with my SO looking over my shoulder; )
what do owners do to add support to the roof for the ac unit (a medical must have)
and is the center floor attached to the body just at the center by the door?
|
If I was going to try to add an AC to the roof, I definitely would add a wooden frame as broad as possible to the roof to distribute the load, and glass those members in place. Any boat repair pair shop could do it.
Remember you're not only supporting the dead weight of the AC on a fiberglass shell, you also have to contend with the live load of that baby when bouncing up and down over rough roads, RR crossings, and speed bumps!
If you don't provide sufficient support, eventually the fiberglass will dish downwards with the AC being the low point - which means drainage will become a problem with no place for the condensate to run. It will settle against the seals between the roof unit and inside faceplate and eventually become a major source of leaks.
That's my thoughts as a retired mechanical engineer..........
|
|
|
|
|
08-07-2015, 01:13 PM
|
#12
|
|
Senior Member
Name: Myron
Trailer: Escape
New Mexico
Posts: 987
|
Been there. Once the rotted floor is cleared out from where it meets the shell get some cardboard and make yourself a template you can use to transfer the shapes to new plywood flooring. Floor sections you make should be as large as possible, governed of course by being able to fit them into place. I'd use 3/4 plywood but what is the original thickness? I would bed the plywood in a layer of Bondo where it contacts the shell. Got to work fast. Once it's all in and secured to the frame (drill holes, self tapping screws) seal all butted seams with fiberglass matt bedded into fiberglass, brush underside with fiberglass coat (real ugly work.) . I think it is a good idea to lay a thin sheet of plywood on top of the 3/4 to make for a smooth interior floor base.
|
|
|
|
|
08-07-2015, 04:48 PM
|
#13
|
|
Junior Member
Name: Erik
Trailer: love bug
Delaware
Posts: 15
|
floor
thanks guys
not knowing the original floor thickness, I guess I just cut the tabbing off the bottom flush with the side wall so I can get my 3/4 in ply all the way to the outer skin, because the person that put the second floor in used poorly cut pieces of plywood and really crappy fitting and edge work
|
|
|
|
|
08-07-2015, 05:34 PM
|
#14
|
|
Moderator
Name: RogerDat
Trailer: 2010 Scamp 16
Michigan
Posts: 3,744
|
I would leave some of that tabbing, bottom more than top because:
A - Lets you know the wall is at the same height. Indexed off the bottom of the wood does not matter how thick the floor is.
B - Anything you use as an adhesive for the butt joint of floor and wall will want to run down. Leaving the bottom tabbing provides a lip underneath so your: Epoxy, Bondo, or Fiberglass peanut butter does not run down the side when are setting your new floor in. Just cut it back a bit so you have a lip but will also have some surface contact for the new bottom tabbing.
Don't forget you will want a nice fat line of construction adhesive on top of the frame between it and the floor. Both as a cushion and water seal where the edge of floor/frame is directly into the living space. The raised "dance floor" sections.
One tip someone gave me - best way to get those rusted screws out is just grind the heads off, pop the wood out, then grind the screw flush with the frame.
I would definitely do the brushing of fiberglass on the bottom (and maybe top) before installation when I could do it on saw horses. No way I'm laying under a trailer brushing FG on, bad enough having to run the bottom tabbing, one drip can ruin your whole mustache, whole surface wanting to drip. Ay caramba!
|
|
|
|
|
08-28-2015, 11:46 AM
|
#15
|
|
Junior Member
Name: Erik
Trailer: love bug
Delaware
Posts: 15
|
ok I got the body off, and found the reason for problems is one of the po's took all the tabbing off the did a crappy job of putting thin plywood with one quick slather of resin to hold things. It did not hold anything, not even the wall. This leaves me with no tabbing on most of the wall.
I am looking at taking a measure from the belly band down to the frame cutouts to set my floor tabbing.
Is the bottom side of the floor and the bottom of the frame cutout more or less flush minus some butyl tape or foam between the frame and floor?
I have the shell sitting on 2x4s on saw horses and almost had a collapse. how are you keeping the body shape while off frame?
|
|
|
|
|
08-19-2016, 08:56 AM
|
#16
|
|
Senior Member
Name: John
Trailer: '71 Boler, '87 Play-Mor II
Deep South
Posts: 1,261
|
How is this project going?
|
|
|
|
|
08-19-2016, 09:59 AM
|
#17
|
|
Senior Member
Name: Mitzi
Trailer: LilSnoozy 12/01/16, Tug 2012 Dodge Citadel
Florida
Posts: 573
|
Way too technical for me but good luck on your rehab
__________________
That's my job. I read...and I know things
|
|
|
|
|
08-19-2016, 10:12 AM
|
#18
|
|
Senior Member
Name: Jon
Trailer: 2008 Scamp 13 S1
Arizona
Posts: 11,960
|
Quote:
Originally Posted by relics-ink
...what do owners do to add support to the roof for the ac unit (a medical must have)...
|
Quote:
Originally Posted by tractors1
If I was going to try to add an AC to the roof, I definitely would add a wooden frame as broad as possible to the roof to distribute the load, and glass those members in place. Any boat repair pair shop could do it…
|
On new builds Scamp adds a couple of extra layers of fiberglass mat in a large area around the AC hole. That's all, no wood.
I've also seen factory retrofits where Scamp added two wood "rafters" running horizontally between the risers for the trolley roof, one in front the AC unit and one behind, no glass. They weren't too deep, about the same as the AC unit projection (and decoratively carved).
If you want to overbuild, you could do both, and glass in the braces. You don't want to compromise headroom too much.
|
|
|
|
|
08-19-2016, 10:50 AM
|
#19
|
|
Senior Member
Name: Kelly
Trailer: Trails West
Oregon
Posts: 3,046
|
Quote:
Originally Posted by relics-ink
ok I got the body off, and found the reason for problems is one of the po's took all the tabbing off the did a crappy job of putting thin plywood with one quick slather of resin to hold things. It did not hold anything, not even the wall. This leaves me with no tabbing on most of the wall.
I am looking at taking a measure from the belly band down to the frame cutouts to set my floor tabbing.
Is the bottom side of the floor and the bottom of the frame cutout more or less flush minus some butyl tape or foam between the frame and floor?
I have the shell sitting on 2x4s on saw horses and almost had a collapse. how are you keeping the body shape while off frame?
|
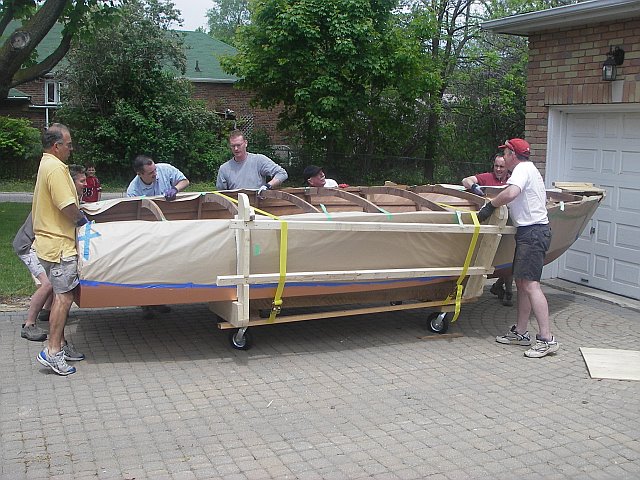
To maintain the shell shape take a pagefrom the boat builders workbooks and build a cradle support from up off of the 2x4s to support the shape of the sides at the lower edge. You do it with with sections of plywood that have been jig sawed to the contour needed. Those plywood pieces attach to the 2x4s. It does not have to be elaborate but it does need to be fairly accurate because once you put i the fiberglass along the lower edge it would be a major rework to correct the size and shape.
Here is a photo example from a boat building site of that type of cradle. I have linked to the image from a forum on boat building. They have kept their cradle jig very basic and used webbing straps. Take note that there are lengthwise strong backs underneath as well as crosswise supports. At least it is also portable which makes it easy to move around if needed. Yours won't be identical of course but it does give you a concept to work with. You can possibly salvage some wood from pallets to help control the cost of building a cradle.
|
|
|
|
|
08-19-2016, 12:18 PM
|
#20
|
|
Junior Member
Name: Erik
Trailer: love bug
Delaware
Posts: 15
|
Thank you for the replies from Johnny M, Mitzi Agnew-Giles, Jon in AZ, and k corbin. Interesting that I got all 4 within minutes today since my post from august.
The progress has been slow because of fore mentioned medical issues . But the frame has been cleaned repaired and painted,new floors installed, the complete interior stripped and cleaned, remounted on the frame, and the top half painted.
I found the reason for the roof mount ac problem. the roof was strengthened with 3/8in Masonite glassed in but whoever did it only did three sides and did the forth side with corrugated cardboard and improperly sealed it, which means the cardboard got wet and rotten, giving no support on the one side and stinking to high heavens.
I changed my mind on the roof a/c and am putting a closet mounted 8k window unit in, and a fantastic fan in the roof, after feeling the draft in my neighbors 15 pod trailer.
We decided to remove the bathroom for now as we are mostly using parks. I am keeping the hardware for reinstall. I am building in a space in the freed up space for a cassette toilet for boondocking.
I am now ready for mocking up new counter and closet wood work, and redoing the water and elec ports on the body, including an outside shower fixture for the beach trips.
thanks for asking
Erik
|
|
|
|
|
|
Currently Active Users Viewing This Thread: 1 (0 members and 1 guests)
|
|
|
 Posting Rules
|
You may not post new threads
You may not post replies
You may not post attachments
You may not edit your posts
HTML code is Off
|
|
|
|
 » Recent Discussions
 |
|
|
|
|
|
|
|
|
|
|
|
|
|
|
|
|
|
|
|
|
|
|
|
|
|
|
|
|
|
|
|
|
|
» Upcoming Events |
No events scheduled in
the next 465 days.
|
|


 ET-19
ET-19 The Mountain Egg AKA 2006 13' Scamp
 Scampy
 Linear Mode


