 |
 07-25-2013, 06:45 PM
|
#1
|
|
Junior Member
Name: B
Trailer: 1982 Casita 13'
Virginia
Posts: 27
|
Prepping for a moderate renovation of my Casita - have questions
Last weekend I picked up a new to me 1982 Casita 13' trailer. As expected with a trailer of this vintage there are a few issues that need worked out. My initial plan of attack is to
1) Pull the frame and have it professionally inspected / repaired. Worse case build new frame.
2) Fix any structural issues with the cabin. It has a few wonky sections of shell.
3) Reseal any shell penetrations. Fiberglass and butyl tape time. Includes pulling all windows and vents for a reseal.
4) Paint exterior while all the windows are out.
My questions are as follows:
On the driver's side, near the stove, is a strange nautical looking window. Is this original or was it installed by the previous owner? At this point I should note that the previous owner was a fairly handy boat owner who did several alterations to the Casita - typically quite good alterations.
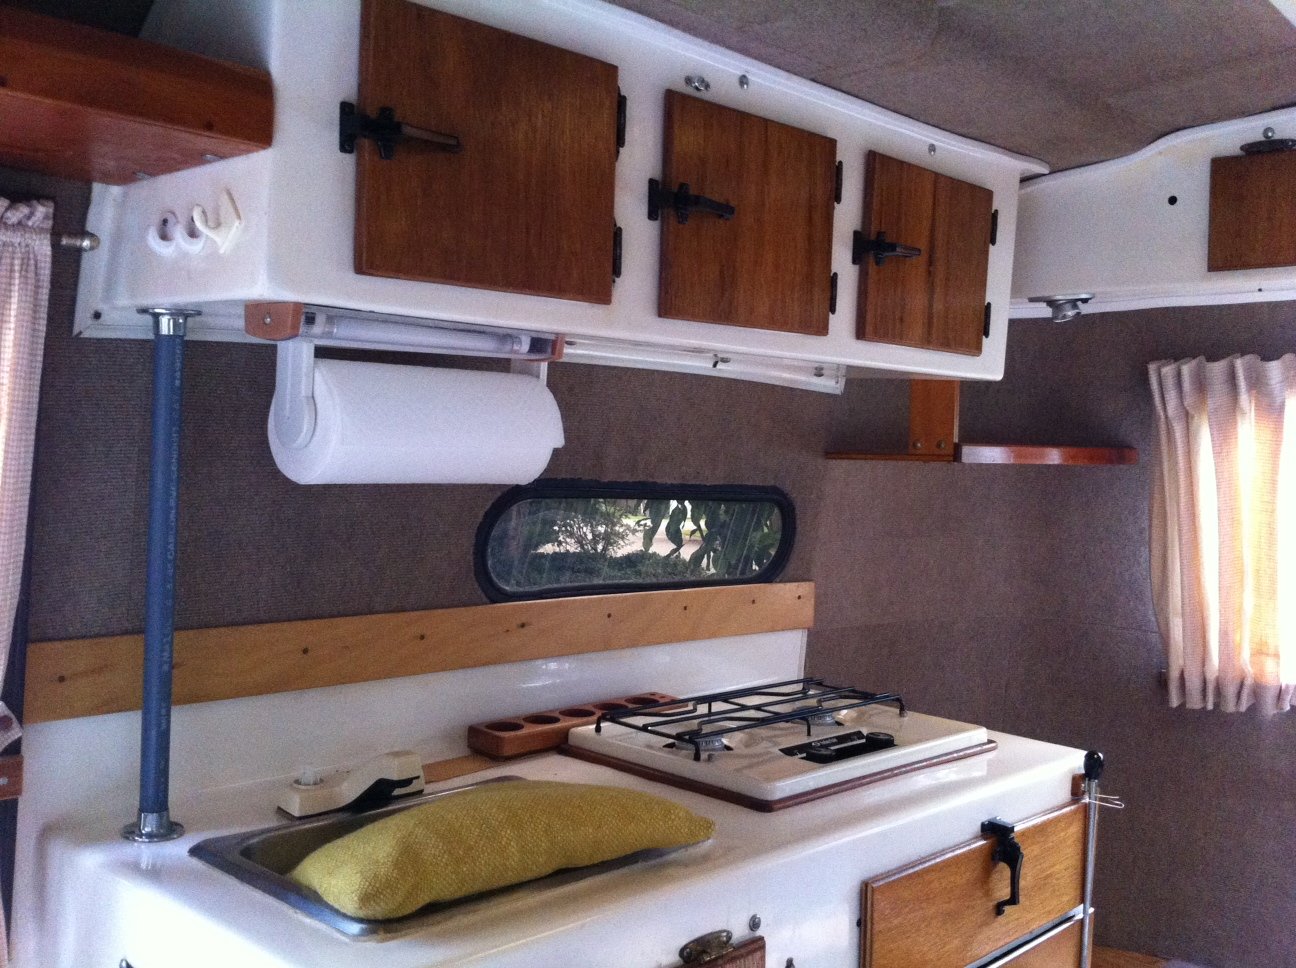
The area around this window has a strange inward bulge on the shell. It is hard to see in photos but apparent in person. I somewhat suspect that the cabinet and shelving changes by the PO may have structurally weakened this area, which was then complicated by the addition of a window. Unless someone can point out why this window is critical, I will probably just fiberglass over it. Then the important step is to add a support to the stove side of the galley for stability.

As you can see in the photos, both the front and rear windows are solid non-sliding plexiglass windows. Is this factory equipment? Is it possible to get an off the shelf window that will drop in here. Minor sizing issues are not a problem, I am already doing some fiberglass work.

Also, the PO installed dual roof vents in the Casita. I plan to install a Maxx Fan or Fantastic fan during my renovation. Is there any reason to have 2 vents? This just looks like an opportunity to leak.

The last photo above also is a good external view of the small oval window. If you look closely you can see the numerous fiberglass patches all over the exterior. Hence the plans for a new paint job. 
Thank you for your feedback.
B
|

|

|
|
07-25-2013, 07:50 PM
|
#2
|
|
Member
Name: Doug
Trailer: Trillium
Ontario
Posts: 64
|
Sub
|
|
|
|
|
07-25-2013, 08:05 PM
|
#3
|
|
Senior Member
Trailer: 1988 16 ft Scamp Deluxe
Posts: 25,705
|
Just because your trailer is a 1982 vintage doesn't automatically mean there's something wrong with the frame. Do you know something you haven't said? The axle is probably dead, but you don't have to pull the body off to change that.
The kitchen window is not original to the Casita. I like having a kitchen window, but maybe not one quite so low to the counter?
Those big plexi windows are original. The only way you'll get a real glass window to work, is to fiberglass the window area into a flat area. You'll notice both the front and rear windows have compound curves. If you lay a straight edge in the middle of the window, you'll be able to tell exactly how much the body curves from that point to the sides.
Two passive vents, if sealed properly, won't leak any more than one passive vent and one powered vent. But, I agree, I'd change one out to a powered vent. Having one of each allows you to pull in cool air and exhaust out the other which can be handy.
Hope this helps! 
On EDIT: Nathan is preparing a 1975 Boler that he wants glass windows in front and back. Here's a look with lots of pictures of the work he is doing: Nathan's Window Work for Glass
__________________
Donna D.
Ten Forward - 2014 Escape 5.0 TA
Double Yolk - 1988 16' Scamp Deluxe
|

|
|
|
07-25-2013, 08:40 PM
|
#4
|
|
Junior Member
Name: B
Trailer: 1982 Casita 13'
Virginia
Posts: 27
|
Quote:
Originally Posted by Donna D.

Just because your trailer is a 1982 vintage doesn't automatically mean there's something wrong with the frame. Do you know something you haven't said? The axle is probably dead, but you don't have to pull the body off to change that.
[/URL] |
So far on the frame I have found 1 spot rusted through enough that I can poke my finger through it. So a sandblast, repair and coat of POR 15 is minimal.
I also want to put trailer brakes on it so an axle upgrade is planned.
Thank you for the feedback on the windows. I appreciate it.
|
|
|
|
|
07-25-2013, 10:24 PM
|
#5
|
|
Junior Member
Name: Nathan
Trailer: 75 Boler
B.C.
Posts: 25
|
The best part about buying a previously renovated trailer is figuring out if the previous owner did top notch renovations or subpar ones. Sometimes the top notch renos are the worst.
It looks as though the original owner has done some nice renos to it already. The shell has been de-riveted and nearly ready for paint. That Interior looks nicely finished off as well.
Now the question is how far do you want to dig?
New windows; in most cases will mean a new inner liner. Unless one of the windows is leaking and the liner is wet, I probably wouldn't dig that deep.
The Cause of the indentation could be a numerous of things. But again unless its leaking it comes really to the question wether your willing to rip out the liner or not... Looking at the picture of the side again, maybe the window is meant to be on a slant? Resting a flat edge on the window wont show anything.
The one thing I would look for is how he mounted the cabinets, usually people will screw the cabinet to a block of wood which is mounted to the inner haul. Question is how that block of wood is mounted to the haul and fiberglassed is the only answer. Any type of glue or two part epoxy and your asking for a slap upside the head (or in this case a cabinet upside the head).
|
|
|
|
|
07-26-2013, 07:14 PM
|
#6
|
|
Junior Member
Name: B
Trailer: 1982 Casita 13'
Virginia
Posts: 27
|
Quote:
Originally Posted by Nat
New windows; in most cases will mean a new inner liner. Unless one of the windows is leaking and the liner is wet, I probably wouldn't dig that deep.
The Cause of the indentation could be a numerous of things. But again unless its leaking it comes really to the question wether your willing to rip out the liner or not... Looking at the picture of the side again, maybe the window is meant to be on a slant? Resting a flat edge on the window wont show anything.
The one thing I would look for is how he mounted the cabinets, usually people will screw the cabinet to a block of wood which is mounted to the inner haul. Question is how that block of wood is mounted to the haul and fiberglassed is the only answer. Any type of glue or two part epoxy and your asking for a slap upside the head (or in this case a cabinet upside the head).
|
I think I can live without replacing the windows in the front and rear, I really don't want to go so far as redesigning mounts for a flat window. Thanks for the suggestions both of you.
In regards to the slanted window, I know it is hard to see in the photo but there is a good indentation above the top window seal. I can actually push out the indentation with only mild pressure from the inside. Very hard to see in the photo due to the thick window gasket and the window pane being slanted in the gasket also (appears to be so by design).
The cabinets are mounted on metal angle brackets fiberglassed to the wall. A few of these have actually failed it appears. So my theory is that the indentation is due to the overhead cabinet pulling down on that unsupported portion of the shell. I think it will be ok if I just add another support pole for now. Perhaps next winter I will redesign the interior with self supporting cabinets.
Tomorrow is the big day for pulling the frame off. The big challenge will be finding all the bolts. I had hoped to avoid removing the plywood floor but I suspect that many bolts are hiding under there. By chance does anyone have a link to a thread that shows bolt locations for a 13' Casita of around 1982 vintage? I have found many Boler threads, and a few old Casita refurb threads. But nothing that clearly shows the bolt locations. To make things complicated, there are no visible bolts underneath. I strongly suspect the body is attached directly to the frame with self tapping screws/bolts.
Big fun. Thank you all for the advice.
|
|
|
|
|
07-27-2013, 10:08 AM
|
#7
|
|
Junior Member
Name: Nathan
Trailer: 75 Boler
B.C.
Posts: 25
|
My Boler had self tapping screws. I think most trailers do unless they were swapped out at one time. I do believe all the screws holding the shell down to the frame are located in/under the 3 seats, kitchen, and closet. My Boler also had one aftermarket screw through the middle of the floor pan into the crossmember which if I had no access to, I would cut with a reciprocating saw or just a plain hacksaw blade.
Have Fun ")
|
|
|
|
|
07-28-2013, 06:12 PM
|
#8
|
|
Junior Member
Name: B
Trailer: 1982 Casita 13'
Virginia
Posts: 27
|
Success
It has been a long weekend of labor to get the shell separated from the frame of my Casita. The weekend started with a thorough roof inspection from my assistant.

I then spent the weekend attempting to access the frame bolts. Unfortunately I quickly discovered they were all hidden under the plywood flooring of the Casita. Worse yet, the plywood flooring could not be removed without removing almost all of the internal bits. So a relatively simple project (in theory) turned into a weekend of Casita stripping. In the end, I now have an accurate number in regards to how many bolts were holding the body to the frame of my Casita: 58
I feel quit confident that this body would have remained attached at near supersonic speeds.
This is what I found under the plywood floor

The strange thing is that the self tapping bolts were only attached through the fiberglass shell. They were all underneath the plywood floor. This seems like a lost opportunity to distribute the stress of attachment throughout the floor. Not to mention all those self tapping screws are just an invitation for rust points on the frame. I am strongly considering the addition of attachment brackets to the frame so that I can just re-attach with 6-8 sturdy bolts that go through the plywood floor, fiberglass bottom, and frame. Not to mention that if the frame is ever damaged, it will no longer be a weekend long project to get the frame free.
At the end of the weekend, I was able to get a clear look at the condition of the frame. So far it looks like only one spot has significant rust issues. At least now I have the opportunity to repair it, replace the axle, and give it a good coat of POR 15.

|
|
|
|
|
07-28-2013, 07:11 PM
|
#9
|
|
Senior Member
Trailer: 1988 16 ft Scamp Deluxe
Posts: 25,705
|
You will NOT regret using POR-15... the rust killer choice of hotrodders.... some who spend $$$$$$$$$$$$$ on rebuilds/repairs. Just make sure you are covered head-to-toe when you paint it on, otherwise YOU will be a different "culture" when you're done  POR-15 loves RUST!
__________________
Donna D.
Ten Forward - 2014 Escape 5.0 TA
Double Yolk - 1988 16' Scamp Deluxe
|
|
|
|
|
07-30-2013, 01:40 PM
|
#10
|
|
Senior Member
Name: Steve
Trailer: Scamp 13
California
Posts: 1,890
|
with a hollow tube frame you might consider this product. Eastwood Internal Frame Coating
I have used it on my Bronco truck frame. If you use it, insert the tube into the frame and spray while rotating the tube a little as you slowly withdrawl. there are several holes in the spray nozzle spraying side ways. I kept using the same spray tube switching it from can to can that way I could spray some more later with a clean tube. You cant easily clean the tubes so being conservitive will help if you need to spray some left overs. Tape up any through holes in the frame so the paint does just run or spray out. If I was doing my trailer frame I would buy 3 cans.
|
|
|
|
|
08-04-2013, 07:11 PM
|
#11
|
|
Junior Member
Name: B
Trailer: 1982 Casita 13'
Virginia
Posts: 27
|
Week 2 update
No sense starting a new "build" thread" since I have this one going. So here is our progress on weekend 2.
Although the original project scope was little more than removing the frame, we keep digging deeper to inspect and fix more items. Most of this weekend consisted of the final dis assembly and lots and lots of silicone removal.
The belly band has been removed. Glad we did because I discovered a fairly significant crack/leak the rear of the Casita. This was obviously caused by the installation of a spare tire carrier directly onto the fiberglass shell.

I also found another strange vertical crack on the rear. Looks like more fiberglass work in my future.

Today SWMBO decided the wall carpet needed to come down. This basically made the project a complete renovation. The nice thing is that this allowed us to really go to town cleaning the inside.

I am strongly considering removal of the belly band and just glassing over the whole joint. The only thing that has caused pause is our paint plan. We plan to paint forest green on the bottom half and off white on the top. I need to find a stick on trim piece or pin stripe type material to cover up where the two colors meet because I have no confidence in my precise taping abilities.
|
|
|
|
|
08-12-2014, 09:26 AM
|
#12
|
|
Junior Member
Name: B
Trailer: 1982 Casita 13'
Virginia
Posts: 27
|
It has been just over a year since my last post in this thread. A lot has happened in that time. Essentially we have totally rebuilt the camper from the ground up. About the only original equipment left is the frame and shell. A quick photo series of the process follows.
As noted above, there were a lot of holes in the Casita. Body work and patching became a major project.
Example of cracks, holes, and belly band repairs needed at the rear. When possible I ground/sanded to original fiberglass. The large rectangular patches at the bottom corner were fun. Nothing like patching over patches.

First layer on the outer patches

Same area of the rear, view from the inside.

There was lots of sanding and fiberglass work. Good skin and respiratory protection was critical. So of course we tried out our best Breaking Bad pose.

|
|
|
|
|
08-12-2014, 09:36 AM
|
#13
|
|
Junior Member
Name: B
Trailer: 1982 Casita 13'
Virginia
Posts: 27
|
I thought a lot about how to polish up and replace the belly band. Then I realized it was essentially a useless piece of trim with no structural purpose. So it had to go.

This was probably a good idea because the inner belly band seal was in pretty bad shape.

After removing the belly band I initially filled the gap with thickened epoxy. A nice peanut butter consistency was used for strength and limited sagging.

The gap is sealed.

Thickened epoxy is nice, but the real strength comes from fiberglass. I brought the seam up to level and applied a strip of glass all the way around.

Next came a whole lot of leveling and fairing. The red stuff is West Systems 407 fairing compound. I think in total I have used 2 cans.

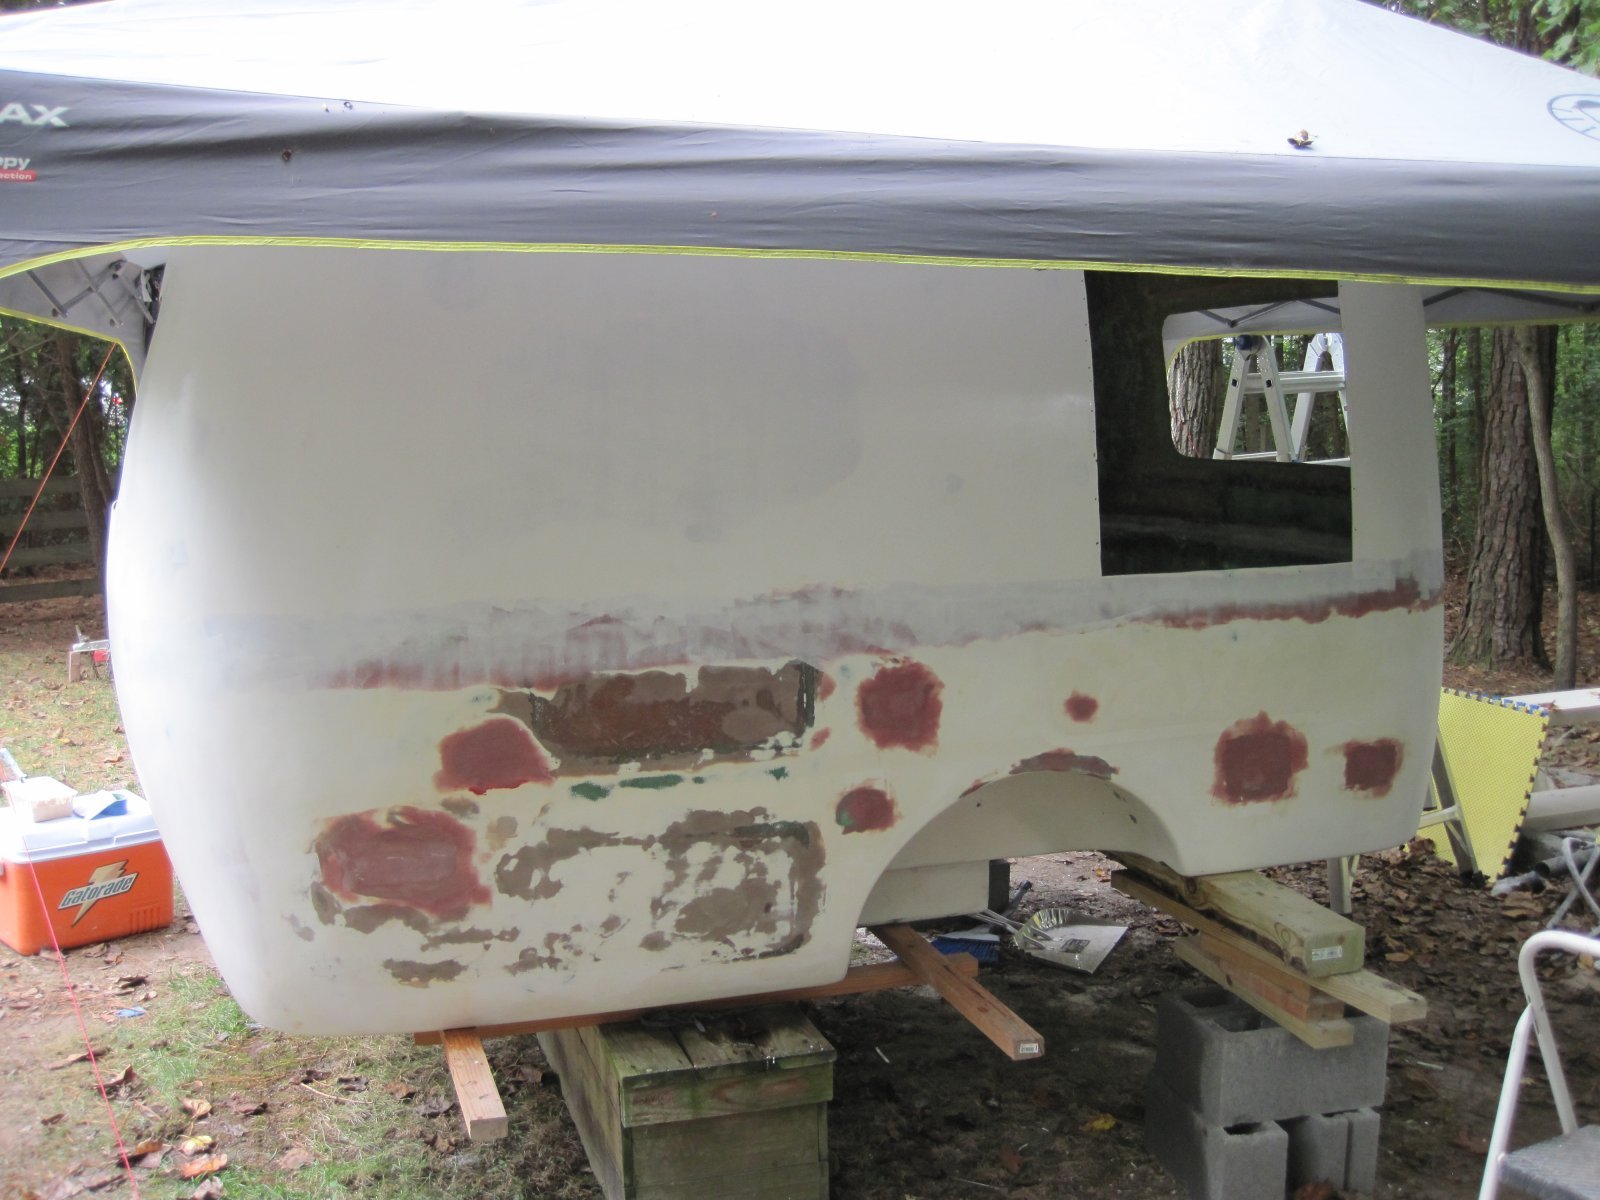
More patches on the side. The old poorly installed window has been removed and sealed up. It looks like I had started applying primer before I took this photo. Note the huge amount of old patches, filled in access hatches, etc. Big fun.
|
|
|
|
|
08-12-2014, 09:55 AM
|
#14
|
|
Junior Member
Name: B
Trailer: 1982 Casita 13'
Virginia
Posts: 27
|
At this stage it was time for primer and paint.
Here is a shot of the front. One coat of Rustoleum marine primer on the right side.

One or two coat in total at this point. I was using a small roller to apply. Would have gone on a bit thicker and likely been more efficient to use a brush for the first coat or two.

Finally primed up and ready for paint.

About that point I got my frame back from the sand blast guy. This is bare metal. The frame is upside down as I was about to paint with POR. After painting it was taken to a trailer shop for hole repair (see hole on left side).

For some reason I have no good pictures of my freshly POR'ed frame. Here is a close up of the area near the door. I also added a coating of non silicone based caulk to the top of the frame. There were over 50 screw holes in the top of the frame and I wanted to plug them. The caulk also slightly cushions the fiberglass body from rubbing on the frame.

|
|
|
|
|
08-12-2014, 10:14 AM
|
#15
|
|
Junior Member
Name: B
Trailer: 1982 Casita 13'
Virginia
Posts: 27
|
The frame then spent an extended period of time at a trailer shop. Those knuckleheads ended up taking months to do a simple axle swap and repair. They actually installed the axle backwards the first time. I would strongly discourage anyone in the VA area from dealing with Commonwealth Trailer Sales in Sandston VA.
Eventually I did get the frame back. A new Torflex Dexter #9 axle in a zero degree down, leading arm configuration was installed. The axle included trailer brakes. New 14 inch wheels were installed.
I seem to have misplaced a lot of the interim photos, but we did get the Casita back together and managed to start using it in March of 2014. A fresh coat of Rustoleum marine paint was applied to the exterior. New running lights and break lights were installed. Here it is on our first trip to Nelson County VA.

The interior is very much simplified from the stock configuration. My wife had zero desire to cook inside so the galley was not replaced. We desired a larger bed, so I rebuild the bed to extended from the rear of the camper to within inches of the door. The size is between king and queen size. Loads of storage under the bed now. Pretty much all that is on the inside is a bed in the back, and a bench up front. The interior has been insulated with single sided Reflectix.
Its hard to get an interior shot, but here is a view through the front window of the bed area. You can also see the redesigned vertical supports I added (the arched things).

Second trip to First Landing State Park.

I also redesigned the door latch to a more modern and secure configuration.


The camper is very much still a work in progress. We are actively working on the inside. We have done some painting to the interior. I will be installing an electrical system this weekend based around the Progressive Dynamics PD4045. New curtains and curtain tracks are planned for the following week. New headliner is planned for this winter or next spring.
We had better get moving because we have a 2 week RV trip planned to Nova Scotia that starts in 4 weeks.
|
|
|
|
|
08-12-2014, 11:13 AM
|
#16
|
|
Senior Member
Name: Nate
Trailer: 1981 Casita 13. TV: 2011 Honda CR-V
Wisconsin
Posts: 118
|
Nice to see what you've done, thanks!
We're starting to strip down our '81 Casita, so interesting to see the similarities! I'm not sure any of your windows were original. Ours are all aluminum-framed, including the front and rear windows.
I pulled up the carpet in the bunk area last night, and it looks like my frame fasteners go THROUGH the plywood.
Any comments on the Rustoleum paint? Rolled? Sprayed? Holding up OK?
How about the Belly Band patch? I hadn't thought of eliminating it! Holding up OK there?
And finally, how'd you eliminate the weird bowing around the kitchen window? Did adding new support eliminate it?
Anything you'd do differently?
|
|
|
|
|
08-12-2014, 12:28 PM
|
#17
|
|
Junior Member
Name: B
Trailer: 1982 Casita 13'
Virginia
Posts: 27
|
Floor Fasteners: I don't know who (factory or previous owner) installed all those screws, but I did not put it back together that way. I sealed all the holes with fiberglass. Then secured the floor (through the plywood) with a combination of stainless steel carriage bolts and zinc elevator bolts.
The Rustoleum paint was great. We used their primer and Oyster White for the paint. Rust-Oleum 206999 Marine Topside Paint, White, 1-Quart - House Paint - Amazon.com. Application was via the roll and tip method. Seems to be holding up quite well.
Belly band: Holding up very well. Anything from duct tape to chewing gum would be more structurally sound than the factory belly band. The belly band is purely a decorative cover of the seam.
Weird window: I totally did away with the window. The window was installed poorly and causing that bowing. I removed the window, screwed wax paper covered plywood to the inside in an area a few inches bigger than the hole. This provided a solid flat surface to work on, and mostly eliminated the bowing. I then applied fiberglass to the outside of the hole. Once cured I removed the plywood and fiberglassed the inside. You can sort of see the patch in the linked photo - it is the large green oval that has one coat of primer on it. http://www.fiberglassrv.com/forums/m...icture7423.jpg
Anything I would do differently:
1) Replace the jaluzi windows. They are old, don't work well, and have edges that are deadly weapons. Too late now because I am not going to do more body work.
2) Spend more time with fairing compound. A handful of body imperfections are bugging me.
3) Buy epoxy resin, hardener and fiberglass mat in bulk. I started with a quart of resin and hardener. I ended up using a gallon and a half of resin, several containers of hardener, and 2-4 rolls of mat. Fortunately I learned and only bought big containers after the 1st trip to West Marine.
Good luck with your project.
|
|
|
|
|
09-11-2014, 09:23 AM
|
#18
|
|
Senior Member
Trailer: No Trailer Yet
Posts: 721
|
Nice project and thanks for the writeup and pictures.
Joe
|
|
|
|
|
|
Currently Active Users Viewing This Thread: 1 (0 members and 1 guests)
|
|
|
| Thread Tools |
Search this Thread |
|
|
|
| Display Modes |
 Linear Mode Linear Mode
|
 Posting Rules
|
You may not post new threads
You may not post replies
You may not post attachments
You may not edit your posts
HTML code is Off
|
|
|
|
 » Recent Discussions
 |
|
|
|
|
|
|
|
|
|
|
|
|
|
|
|
|
|
|
|
|
|
|
|
|
|
|
|
|
|
|
|
|
|
» Upcoming Events |
No events scheduled in
the next 465 days.
|
|


 Taco
Taco


