 |
|
 06-19-2016, 08:09 AM
|
#101
|
|
Senior Member
Trailer: No Trailer Yet
Posts: 700
|
Then I smoothed it out and beveled the edges, using a simple hand file.
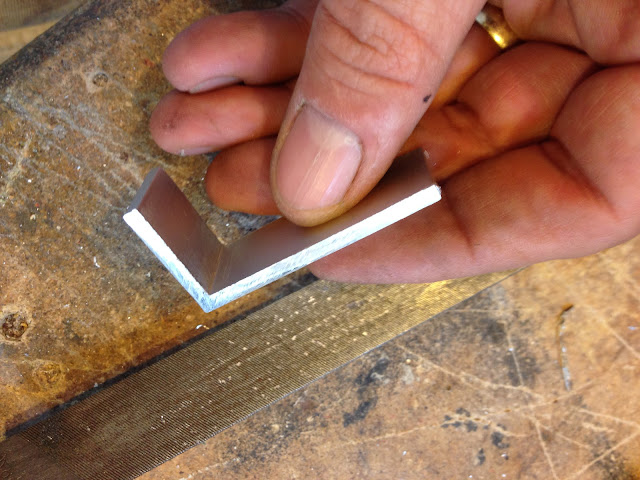

Then a bit of hand sanding. Next I drilled 3 holes, and countersunk them. Then some polishing.
Last year I bought a metal polishing kit at Canadian Tire.
Mastercraft Buffing and Polishing Kit, 7-pcs | Canadian Tire
The kit includes 3 cotton buffer wheels and 3 different grades of polishing compound. It was my first time using the kit - my first time polishing aluminium I should say - and I was amazed at the results. Within minutes, my little brackets became like chrome.
 
I can't believe how easy and quick the metal went from dull aluminium to a mirror finish, and that didn't take hours, it got shiny like that less than 5 minutes!! I never expected a nice result like this:
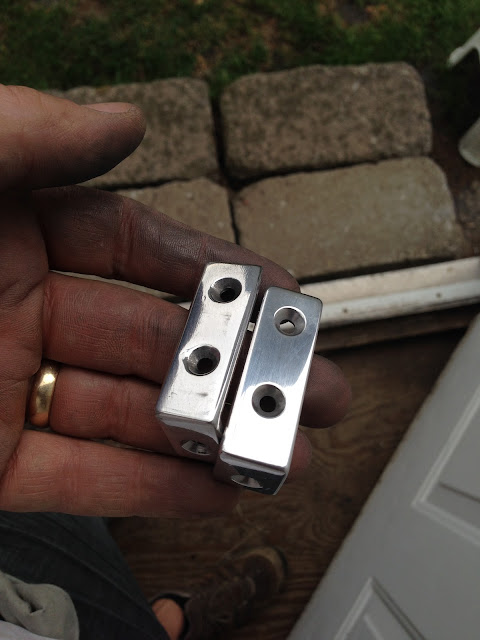
 
 
Using small stainless bolts, I mounted the brackets over the damaged corners of the range, effectively hiding and reinforcing the broken edges. And the result doesn't look bad or out of place (my wife approved!!)


(Continued...)
|

|

|
|
06-19-2016, 08:18 AM
|
#102
|
|
Senior Member
Trailer: No Trailer Yet
Posts: 700
|
I thoroughly cleaned the dirt and rust on the stove top interior, and cleaned the burners, then sprayed some hi-temp paint (gas grill paint actually).
Looks much better now:
 
The space in the cabinet where the range sits wasn't super clean, so we did some cleaning in there too. There are some old stains caused by water, food spills or whatever, but the wood wasn't damaged at all. I must say that the cabinet construction is very nice in general, good plywood and solid wood, nothing like the stapled particle board (cardboard!) found in today's RVs.

With the range out of the cabinet I was able to take apart the top "hutch" and remove the old counter top.
Now I could see that my furnace, which sits in the same cabinet, just left of the range, looks like it could use some TLC...
Oh well, might as well tackle this one right now.
 

The furnace
The gas furnace in the 5500 is a Coleman ST-200 forced-air furnace. It's got a LP gas heat exchanger, a 12V fan, and is thermostat-controlled. It's a rather simple and older design. It's got no electronic or automatic ignition, there is a pilot flame that has to be manually lighted with a match or ideally, a grill lighter. This pilot flame in turn ignites the main burner according to the thermostat signal, and then the fan kicks in and pushes the warm air around when the heat exchanger gets hot enough. Simple enough, but the thing is, last time I tried I couldn't get this furnace to light up.


It was last fall, I decided to give the heater a try, and I never succeeded. The pilot wouldn't stay lit, it went out as soon as I released the start button. And the flame was very tiny, certainly not enough to properly heat the thermocouple. Now with the range removed from the cabinet and the LP gas line disconnected, and my 12V system being a mess for now, there was no way I could test the furnace again.
So I took it out of the cabinet. Only about 4 screws to remove, the main gas line and some wires to disconnect, and the furnace simply slid out the cabinet.
I installed the furnace outside on a table, rigged a gas bottle and regulator, and used my 12V booster pack as a 12V source.


You can get the manuals for this heater in the document center of the forum (which explain why my laptop sits on the table by the furnace. Not, this heater doesn't have any USB ports or Wifi connectivity!!)
The manual includes the wiring schematic, which is quite simple.
The main heater switch has been replaced in the past with some generic switch that wouldn't fit the mounting hole of the original, so it was just hanging there by the wires.
 
I couldn't even figure On from OFF on that switch, so I replaced it with a new one that's like the original.
 
I tried again to light the pilot burner but just like last year, it wouldn't stay lit. This is often caused by a defective thermocouple, but with such a tiny flame even with the valve button fully depressed, I figured there was something wrong with the valve or the pilot burner. Then I saw some flames coming from lower down the pilot burner, from the air inlet holes. It was hard to seen since all of this is inside the heat exchanger and the only access is a 1" hole used to light it up with a match. So there I was using a flashlight trying to see what's going on in there through that small hole.
Eventually I decided to take the pilot and thermocouple unit off the heat exchanger. Just a couple nuts to remove, but the hardest part was trying not to bend the thin metal tubes too much.
 
(Continued...)
|
|
|
|
|
06-19-2016, 08:21 AM
|
#103
|
|
Senior Member
Trailer: No Trailer Yet
Posts: 700
|
Once I had the pilot burner in my hands I saw right away that it was completely clogged with dirt of rust. I gave it a good cleaning, using some carb cleaner and compressed air, then made sure the jet (orifice) was clean.
I put everything back in place and tried it again. Now I got a nice blue and stable pilot flame, directed right at the thermocouple as it should. I released the start button, and the flame stayed perfectly stable. Great !!
Then I shorted the thermostat wires together, simulating a "closed" thermostat, and immediately I heard the 'click' of the main gas valve opening, then right after I heard the main burner ignite! Again, nice blue and stable flame. And heat!! After a couple minutes, the blower kicked in. I was relieved! I ran the heater through its paces, starting it up and shutting it down, simulating start cycles, all was good. I made sure here wasn't any leaks, cleaned the dust, cleaned and spray painted the outside.
There was a safety paper label on the front panel that was dirty and almost unreadable. The same label appeared in the manual, so I printed off a new one and used it to replace the old one.


Then I put it back in the cabinet. Looks much better now, and it works!

I applied a some wood stain in the cabinet where the range sits. Please no comments on the ugly color, that was a leftover, and it will be hidden anyway (good thing!!  ). I just wanted to protect the wood from any water, spill or moisture, and give it a cleaner look and better smell!


Now I'm ready to put the new counter top, then reinstall the range, sink, and a new faucet.
|
|
|
|
|
06-20-2016, 01:59 AM
|
#104
|
|
Member
Name: Linda
Trailer: Boler 17 ft
Ontario
Posts: 83
|
Wow!
You are a brave and handy man! Good job!
Linda
|
|
|
|
|
06-24-2016, 07:48 AM
|
#105
|
|
Senior Member
Trailer: No Trailer Yet
Posts: 700
|
Last weekend I put on my new countertop.
Wife wanted stainless, so I found a way to get one at a decent price. I found a SS service table at a restaurant equipment store. That's the type of rectangular table with 4 legs, sometimes on wheels, with a lower shelf, commonly used in restaurants and hotels. Its available in many sizes, including 24" X 48", the exact size of my countertop, and has finished edges all around.
I looked carefully at the table before buying it, to make sure it would fit the top of my cabinet. The guy at this store said I wasn't the first one to buy a similar table to cap a counter in an RV or house. For small project like this, it is a much more affordable option than a custom made SS countertop.
So last Saturday I got my 4" angle grinder out, put on a cutting disk, and went on to butcher that nice and shiny new table!
I needed to cut a hole for the sink, an opening for the range, cut one of the corners off to make it fit the trailer wall near the door frame, and two 1" holes for the faucet.
On that 1st picture, there wasn't anything cut yet, I was just checking how all of this would fit on top of my cabinet. The table comes with a white protective plastic film, on which I draw where I was going to cut, using the old countertop as a guide.


That's the underside of the table. It's shiny as a mirror. There are two stiffeners running lengthwise under the table, and make it 3/4" thick, the same thickness as the original counter top. The 4 brackets for the table legs, which I will need to cut off, are visible.
 
I started by cutting off the corner as needed. Only one corner needed to be cut like this, the other 3 stayed square. I was almost getting blind with the sun reflecting on the shiny surface!


After I just cut the 4 leg brackets:
 
Here I'm about to cut the hole for the sink:
 
Just checking the fitment. Looks good so far:
 
One more fitment test after I cut the opening for the range:
 
I slid the range in, just to make sure it fits right:
 
(continued next post)
|
|
|
|
|
06-24-2016, 07:50 AM
|
#106
|
|
Senior Member
Trailer: No Trailer Yet
Posts: 700
|
Then I drilled the two holes for the faucet, using a bi-metal hole saw. Worked like a charm, and while drilling I kept spraying some WD40 lube to avoid any overheating of the saw or metal sheet:
 
The following pictures show the final result. I took the protective film off, then simply put the range, sink and faucet in place and snapped the pictures. Nothing is screwed in yet, I just wanted to see how it looks. Still some cleaning left to do.


Good enough, and the wife is happy! (most important point!)
It was a bit pricier than a laminate counter top, but not by much. It wasn't harder to install either, just different. It should outlast the trailer, and we really like the look.
When I picked up the table, I was surprised at the weight. It's a pretty well built and sturdy table, and was heavier than I anticipated. But once I cut the opennings, it didn't feel much heavier than the laminate countertop it replaced. Out of curiosity, I weighted them: the SS counter is only 4.5 lbs heavier then the old counter top. I can live with that!
We also put in a new faucet. The old faucet was leaking at the base, it was an all-plastic cheapo thing, original to the trailer. We replaced it with a similar-looking, all brass, residential faucet. It was a plug'n play replacement, as the original faucet used standard fittings.
I also put a new strainer in the sink. The old one was made of "chromed plastic" and the "chrome" was peeling off. Got a new one at my local RV shop, since nothing at the hardware store would fit. That strainer is smaller than a standard kitchen sink strainer, and larger than those used for bathroom sinks. I was told they are only available from specialty plumbing stores or RV parts stores. And of course, they are twice the price of a standard one... The worst is I bought 2 because the bathroom will need a new one too!
|
|
|
|
|
06-24-2016, 09:17 AM
|
#107
|
|
Senior Member
Name: Ellpea
Trailer: 1989 Lil Bigfoot
CA
Posts: 1,382
|
Great read. Not *quite* as exciting as an episode of Game of Thrones ") , BUT it kept me riveted all morning anyway! You're going to have an awesome trailer when you're finished, and probably better than *new*!
Now that I'm completely caught up, will enjoy reading your reports. I like how you're doing those, BTW -- step by step per project.
__________________
Best,
EllPea in CA
|
|
|
|
|
06-24-2016, 09:37 PM
|
#108
|
|
Senior Member
Trailer: No Trailer Yet
Posts: 700
|
Thanks Ellpea!
We all like to see pictures of other people's' trailers, so I take a lot of pictures. But then I need to explain all of them!
The 5500 is a special trailer, not only because it is rare, but also the interior is built differently from other Trilliums (only the Jubilee is apparently similar). I just hope all of this can help other 5500 owners work on theirs, that's all!
|
|
|
|
|
06-25-2016, 05:01 PM
|
#109
|
|
Senior Member
Name: Dave W
Trailer: Trillium 4500 - 1976, 1978, 1979, 1300 - 1977, and a 1973
Alberta
Posts: 6,926
|
Carl, I am sure that there is, and will, be several 5500 owners who really appreciate your insights. Thank you!
|
|
|
|
|
06-25-2016, 08:14 PM
|
#110
|
|
Senior Member
Trailer: No Trailer Yet
Posts: 700
|
I'm almost done rebuilding and installing the cabinet above the kitchen counter. Looks super nice so far. I'll have pictures and update this post tomorrow night or monday.
|
|
|
|
|
06-26-2016, 11:12 AM
|
#111
|
|
Member
Name: Anne-Marie
Trailer: 1977 Trillium 1300
Ontario
Posts: 73
|
Very nice work Carl and resourceful too! Looking forward to continued photos.
|
|
|
|
|
06-27-2016, 07:39 PM
|
#112
|
|
Senior Member
Trailer: No Trailer Yet
Posts: 700
|
I've redone the cabinet above the kitchen counter. I took A LOT of pictures, but due to the 8-pictures-per-post limit on this board, I will not post them all. I have over 40 pictures, it would take too much time to repost everything. So here's the condensed version of my blog post on this job. I'll put a link at the bottom if you want to access my blog and see all the pictures (and laugh or scratch your head at the goofy the Google-translated text from French to English!)
So this upper cabinet is all wood (no FG), and has two vertical supports on each side, made of plywood & pressed wood, covered with the typical "faux wood" finish. These supports are screwed against the wall into wood (for the most part, the same wood pieces as the window frames actually) with metal brackets. They also rest on the top of the counter, and that's where my problems started.
Every time there was some water or liquid spilled on the counter, the ends of the supports would soak it up. 35 years later, the ends are in pretty bad shape: the wood has swollen, delaminated, and rot. I had to do something about this.
Second issue: the bottom of this cabinet, made up of 1/8" thick plywood, had to be replaced. The inside was dirty from various spills in there over the years, it was full of holes drilled for the different lights attached under it over the years, and the "faux wood" finish was peeling just above the oven, I presume because of the heat from the burners.
Other issues: the metal brackets holding the cabinet where dirty, tarnished and rusted. There are also plastic brackets holding the shelf (common to many Trilliums) that turned yellowish over time, not very good looking. And I had some pieces of brown "edge moulding" that were missing.
First, I replaced the thin plywood at the bottom of the cabinet. To protect it from the heat from the stove just below, I doubled it with a thin aluminium sheet. I found this thin aluminium at my local hardware store, it is sold in rolls of various lengths and widths and is not very expensive. It's thin enough that you can cut it with a utility knife: you score it a few times with the knife, then snap it off. The look of the bare aluminium sheet nicely matches the stainless steel of the counter top. So here's my first picture, showing the cabinet kinda upside down, with the new aluminium-lined bottom:

I didn't want to leave the other side of the plywood on bare wood, so we applied some of that sticky vinyl liner that they sell to protect shelves. It's got a "metal" finish, it looks pretty good and matches the rest:

Then I tackle the damaged wood at the bottom of the vertical supports. Here's what it looked like:

Both support ends were like that. I salvaged what I could, but had to cut a bit off the ends and reconstruct them using new plywood and construction glue (Lepage's PL Premium). Then in an attempt to prevent the same water-sucking and wood rot issue later, I prepared some FG resin (polyester) and used it to seal the ends of the supports (that's why they look wet in the following pictures).


Using aluminium to cover the bottom of the cabinet gave me an idea. The repairs I did at the ends of the supports were visible. I thought of capping them with some of this aluminium. It would look good, and match the steel counter. So I cut 6" strips of aluminium, and sprayed some 3M's glue to attached them over both sides of the ends of the supports, effectively hiding my repairs.

(continued next post)
|
|
|
|
|
06-27-2016, 07:56 PM
|
#113
|
|
Senior Member
Trailer: No Trailer Yet
Posts: 700
|
I also screwed an aluminium edge band to replace the old plastic trim and the edges of the vertical supports. It is visible in the previous picture, as well as in the next:

Here is one of the ugly yellow plastic brackets holding the shelves in my trailer (most Trillium owners will recognize this):

We decided to simply paint them over using silver spray paint. Looks entirely different now:

Here's the whole cabinet ready to be reinstalled:

Before we put it back in, I needed to clean the metal brackets. The wire brush on my drill removed the dirt and surface rust, then I sprayed them with the silver paint:

There's about a dozen of these holding the kitchen counter and cabinet (and another dozen throughout the camper!)

Two of these brackets (one on each side of the cabinet) were attached through the roof with pop-rivets (there is no wood to screw anything on the ceiling).

On the roof, the rivet is covered with some sealant. Although there was no sign of leakage, I was sure this was the result of some botched job of a previous owner, but after asking about this on the forum, it's apparently how they came off the factory!

(8 picture limit - continued next post)
|
|
|
|
|
06-27-2016, 08:14 PM
|
#114
|
|
Senior Member
Trailer: No Trailer Yet
Posts: 700
|
Of course I had to drill the rivets off to remove the brackets and the cabinet. I'm not a big fan of pop-rivets, especially in a spot like this, and I decided to replaced them with small SS bolts. To guarantee a water tight repair, I spoke with my local RV repair center. I explained what I wanted to do, the fact that's it's a fiberglass shell. They agreed that silicone was NOT the sealant to use, and I was recommended some Sikaflex 221 as being the best stuff to use. It's even available in "colonial white" that matches the trailer's exterior color.


Then the cabinet was finally put back in position. Now was time to install the stick-on stainless steel tiles we'd bought just for this. They are glued on a thin plywood.
Then I snapped a bunch of pictures. I found it pretty hard to take good pictures of the final result, due to the light contrast of the window. But I took a bunch of them anyway. They are not all good (I tried again later as it was getting darker) but you'll get an idea how it looks with the stainless steel counter:


Here's the link to my blog, using translation from Google:
https://translate.google.com/transla...-text=&act=url
You may just want to scroll through the pictures if you're interested (there are more than I posted here) and you can revert to the original text if you feel like practicing your French!
|
|
|
|
|
08-31-2016, 01:29 PM
|
#115
|
|
Senior Member
Trailer: No Trailer Yet
Posts: 700
|
As previously mentioned, we are currently renovating our house, and working on the Trillium isn't our first priority right now. But I did work on it a bit, just to get out of the house for a change.
My next big job will be the electrical system. I will redo pretty much everything, AC and DC. However, there are a couple things I need to do before I can start working on it.
One of the things I needed to fix, are the upper cabinets and shelves on the ends of the trailer. The reason is my future electrical system includes new light fixtures, and these fixtures are mounted under the upper cabinets and shelves. There must have been 3 ou 4 differents types of light fixtures in that trailer, installed by the previous owners over the years. Every time a fixture was installed or replaced, new screws were used, new holes were drilled under the cabinets. As a result, the cabinet's bottoms are full of holes. Also, various curtain rods and blinds have been installed and removed over the years, they were also screwed under the same cabinets, and also left a bunch of holes. So the bottom of the cabinets and shelves are not looking very good, and the wood has serious damage in some places.
Here's how these cabinets and shelves look in a 5500. I'm talking about those up near the ceiling, the ones with the sliding panels, and on the sides they are simple shelves. The front and the rear of the trailer have a similar arrangement (this picture is not from my 5500 but mine is made the same):

All these cabinets are made with aluminium extrusions and angles, and thin 1/8" plywood with a "fake wood" finish. Everything is held in place with a bunch of screws, attached to the windows' interior wood frame. So it's simply a matter of removing a few screws and the whole cabinet/shelf assembly comes off.
Here are a few pictures of mine. Pictures are taken with the camera pointing up, to show all the holes and wood damage under the cabinets.


The interior of the cabinets wasn't very good looking either. As it was on bare wood, it was almost impossible to clean thoroughly.
So I was looking for a way to fix or hide the damaged wood, have a proper surface to mount my fixtures, and make the inside easier to clean.
I decided to replace all the plywood parts, except the sliding panels, which are still in good condition. I got some 1/8 plywood from my local hardware store, and I used the old ones as a template to cut the new ones. No need to saw, the thin plywood is easily cut using a simple utility knife. Here I've cut the bottom of both main cabinets:

One issue I had was the old plywood had this "fake wood" finish, and the new one was on bare, natural wood. Finding a wood stain that matches that faux finish proved next to impossible. There are too many colors available, and the type of wood also affects how the stain will look. So after a couple tests we decided to do it differently.
When I rebuilt the cabinet above the counter last spring, I lined the underside of the cabinet with a thin sheet of aluminium, to protect it from the heat of the range burners. It looks nice, the bare aluminium matching the stainless steel countertop and the aluminium extrusions of the cabinets. So we decided to do the same with all the cabinets and shelves.
The aluminium sheet I used is regular aluminium flashing you can get at most hardware stores. Thin and light, it is usually painted on one side and on bare aluminium on the other side.

It is easily cut using a utility knife.
On the inside of the cabinets and shelves, we put some metallic finish, Con-Tact brand adhesive shelf liner. Very durable, easy to clean, and looks super nice.
 
|
|
|
|
|
08-31-2016, 01:33 PM
|
#116
|
|
Senior Member
Trailer: No Trailer Yet
Posts: 700
|
So here's the rear cabinet, rebuilt with the new material. The interior metallic adhesive what is visible.


Same cabinet, turned over, showing the underside lined with the aluminium sheet.

(the electric wires were going to the old fixtures. I kept them for now but they are not connected to anything now).
In all, I did 6 cabinet/shelves, 3 on each end of the trailer.
Before putting the cabinet back in place, I figured I might as well attach the new curtain tracks. They are KVARTAL tracks from IKEA. I bought them last fall, while they still had them (I was told they were about to take them off their catalog, so I bought them right away. Good thing because it looks like they are actually discontinued now). We liked the brushed aluminium look, they are small and simple to install in the trailer. Here's one track screwed under the cabinet:

I have 6 such tracks, of various lengths. The following pictures show the cabinets back in place in the trailer, with the curtain tracks installed. Ignore the ensolite around the windows for now, everything will look more cleaner once I've put frames around the windows to hide that.


So... I'm ready to eventually start on my electrical system. This will probably deserve a few posts here and on my blog. I've got a few interesting ideas in my mind, and I already have in hand pretty much everything I will need to built an entirely new system: wiring, breakers, volt and amp AC and DC meters, fuse box, terminal box, switches, light fixtures, etc. I love electrical work, and I can't wait to get started!
|
|
|
|
|
11-19-2016, 08:25 AM
|
#117
|
|
Senior Member
Trailer: No Trailer Yet
Posts: 700
|
The installation of the new electrical system in my 5500 is almost completed.
A previous owner of my trailer had messed so much with the electric stuff that I decided to rip everything out and start over from scratch.
All I kept is the original wiring for accessories, wiring that runs hidden behind the cabinets and the Ensolite.
Out is the old converter, light fixtures, batteries, and all the stuff the previous owner installed over the years to "improve" the trailer. I'm back to a more basic, simple and reliable system.
To give you an idea, here's how my trailer was "improved" by a previous owner:
On the AC side, there was non-original wires running at many places, 14/2 "romex"-type residential wiring of various colors (some white, some red, some blue), even some "BX" armoured cable, multiple junctions boxes here and there, an outlet here, another one there...


Different types of "lamp wire" running in many places, some was white, some was brown, or clear. An old style screw-in 120V fuse, rigged in a lamp socket.

Some switches, lights and labels added to the the converter front panel.

It wasn't better on the DC side. A bunch of terminal blocks screwed on the back of the converter case, white wires labeled "Blue", others labeled "Red", a 12V socket here, another one in there, dozens of connectors, fuses, all kind of different wire types and sizes, sometimes connected, sometimes not.

In one of the cabinets, sat an old Canadian Tire marine-style battery charger, hard-wired into all this. A small inverter, also hard-wired. Two large deep-cycle 6V batteries (both dry and dead). Two small solar panels, with a charge controller.

Many light fixtures had been replaced over the years. I don't think there was two of them identical.
And then some tv coax cable, small 120V adapters, 12V fans, and multiple lights and switches added.

To link the 7-pin harness from the tow vehicle to the trailer's lights system, a big and heavy metal box containing some big fuses and a bunch of large terminal blocks has been installed under the front dinette seat. The thing was about the size and looked like a residential 240V sub-panel!

One night I sat in the trailer, and just tried to understand the logic behind all this. I'm no electrician, but I know how AC systems work, and I'm pretty familiar with quite complex DC system as they are part of my work everyday. I just couldn't figure it out, and couldn't imagine how I could make this safe and workable. So I decided to take everything out and redo it.
(continued on the next post due to the 8 pictures limit of the board)
|
|
|
|
|
11-19-2016, 08:25 AM
|
#118
|
|
Senior Member
Trailer: No Trailer Yet
Posts: 700
|
My plans were for a more simple and efficient system, understandable by anyone:
-We opted for a single 12V, GR27 deep-cycle battery. In our old popup, we could run over a week on such a battery, I don't see why it wouldn't work the same in this small trailer. And we now have two solar panels that our popup didn't have.
-Our popup had all interior LED lights, and we needed to upgrade the lights of the 5500 to LEDs as well.
-The old 70s era converter had to go. It has been replaced with a newer unit with a good charge control.
-We added a CO/LP detector, as the trailer didn't have any.
-I wanted a DC voltmeter to keep an eye on my battery charge level, and an AC voltmeter to make sure the campground's power is adequate.
-I wanted a "master switch" to shut off everything in the trailer when we're not camping.
-I wanted USB sockets to recharge our phones and pad.
Once my plans were made, I sourced all I needed from various online sellers (DealExtreme, Amazon), my local electronic stores, and local hardware stores.
Here are the details on my components:
Converter
After many web searches, I opted for Progressive Dynamics' PD4135.

Good reliability record, compact size, great battery charge control, and enough AC and DC branches to fit my needs. Found it at a fair price from a reseller based in Nova Scotia (I'm in Canada, I try to avoid buying anything from the US due to the very high customs and brokerage fees, on top of the bad exchange rate).
30A cord
My trailer came with a 15A cord, I'm guessing 14 AWG wires. My new converter has a 30A capacity. I could simply have put a 15A main breaker in the converter and keep the trailer on a 15A system. But this new converter was giving me the opportunity to upgrade the trailer to 30A service. All I needed besides the 30A main breaker is to replace my old 15A cord for a 30A-rated one.
These are usually quite expensive, but I found a 25' 30A RV extension cord at Costco at a good price. I simply cut the female end of it and wired it in the converter. As a bonus, I used the discarded female end to make a 15A to 30A adapter, so I can plug the trailer on a standard 15A outlet if needed.
 Light fixtures
As mentioned, I was going all LED.
I was looking at those under cabinet 12v LED puck lights that they sell in places like Home Depot. I found them usually quite expensive, like 12$-15$ each. And I needed about 10 of them...
Another issue is many of these are made for residential use, powered by a constant 12V supply. In a trailer, sometimes the converter may push over 14V, which could eventually damage the LEDs or shorten their life. Not good.
Then one day I was at my local hardware store when I saw a cart full of these pucks on sale for $1.75!!

The thing was, they were not LEDs, they were regular G4 xenon bulbs.
But then I thought that I could maybe replace the bulbs with LEDs...
The pucks had a brushed metal finish, exactly what we wanted. I couldn't pass that up, so I bought 10 of them.
I figured if I can't make them work in the trailer, $17.50 isn't too much of a loss.
I found some G4 LED on the internet, at about $3 each. And they are rated for 8V to 30V, so I guess they can survive the converter's highest voltages.

That made the pucks about $5 each, still a good price.
However, I had to tinker a bit with the pucks: I found there wasn't enough space in them to install the LEDs. There is a metallic reflector behind the xenon bulb that I had to remove to make space for the LED.

I simply had to drill a small rivet to take the reflector out.

However, the same small rivet also held the whole fixture together, casing and outer decorative ring. The light was falling apart!

The fix was simply to glue the parts back, using construction adhesive.

(continued on the next post)
|
|
|
|
|
11-19-2016, 08:26 AM
|
#119
|
|
Senior Member
Trailer: No Trailer Yet
Posts: 700
|
The whole thing took a couple evenings of my time to do, but it was well worth it.

Side by side, original xenon bulb, and modified with LED:

The LEDs doesn't put out as much light as the halogen bulbs, but the difference is not that great. Can you tell which is which?

Also, a single original halogen bulb draws 1.45 amp, while the replacement LEDs are only drawing 0.12 amp each, less than 10% of the halogen.
One difference between using pucks like these versus regular RV light fixtures, is that the RV fixtures usually have switches on them. So I had to add a few switches to control the trailer lighting, and find a place to mount those switches.
Switches
My local electronics parts stores carries a large selection of different switches. Not sure which type to pick, I consulted with my decoration department manager (my wife). As an ex-flight attendant, she said she liked the old aircraft-style traditional toggle switch like they have in aircrafts. Fine with me, as they are quite easy to install (just a hole to drill).

Now her "aircraft-style" comment got me thinking, and that gave me a couple ideas on how I was to mount the switches. More on this later!...
Master Switch
I also wanted a battery cut-off switch, to switch everything off in the trailer while we're not camping. All I could find were the big red standard battery cut-off rotary knob. I didn't like the look of them, as I was planning to mount it on some "control panel" with my voltmeters and solar panel controller. Most standard toggle switches are only rated for 15 or 20 amps, not quite enough. Thanks to member Francois here on the forum, I was able to source a 50A-rated, similar-looking toggle switch at Canadian Tire.
 DC voltmeter
A few years back I put a digital voltmeter in my popup camper to monitor my battery. It worked good enough, but since then, things have evolved a bit and now some nice little meters can be found at decent prices. I went with what is called a "power analyzer", which is a tiny meter primarily designed for RC hobbyists (to monitor and test battery and motor performance of radio-controlled toys). The same meters are also popular for use with solar panel arrays. Mine is sold under the "GT Power" brand, but clones can be found online under other names (Turnigy, Medusa, etc), just google them up.

This little thing measures and displays in real time voltage and current, then computes watts. It also computes total Ah and Wh, so I can really see how much power the trailer uses over time. The unit also stores in memory the peak amps and watts, and lowest measured voltage. You can look up on Youtube for various videos showing this meter in action or undergoing accuracy tests (it is very good). I paid $17 CAD for it.
It comes in a black plastic case, not really made for panel mounting, but I opened it up and got rid of the case and managed to install it in my control panel.
AC voltmeter
Just to keep an idea on the campground's AC voltage, which could be damaging to equipment if too low.
I put this in the "nice to have" category.
It also lets me know how close I am to the 30A (or 15A) limit.
 Solar panel controller
This controller was already in my trailer when I bought it. Sold by Sunforce, it is a decent 30 amp PWM controller, that they still market. I decided to keep it and mount it in my "control panel".

(continued next post)
|
|
|
|
|
11-19-2016, 08:27 AM
|
#120
|
|
Senior Member
Trailer: No Trailer Yet
Posts: 700
|
Reading lights
We wanted bedside reading lights. I found these 12V LED lights on the web, they have a flexible neck and narrow light beam, so one of us can read in bed without disturbing the other.
 USB sockets
We wanted the ability to recharge our phones in the trailer. I found these 12V USB sockets on the web. I hard-wired them, as they draw virtually no power when not in use. I installed two of these, one at the rear near the bed, and one up front near the table. Both are near shelves, where the phone or tablet can be left while charging.
 Wiring
My Dad had some 8 AWG wires laying around that he gave me. Perfect to hookup the battery, converter and charge lines.

Needless to say, I also needed smaller 14 AWG wire, numerous crimp connectors, terminals, wire loom, heat shrink, switches, tie-wraps, etc.
As soon as I'm done cleaning up the trailer, I'll snap a few pictures of the final result!
|
|
|
|
|
|
|
Currently Active Users Viewing This Thread: 1 (0 members and 1 guests)
|
|
|
 Posting Rules
|
You may not post new threads
You may not post replies
You may not post attachments
You may not edit your posts
HTML code is Off
|
|
|
|
 » Recent Discussions
 |
|
|
|
|
|
|
|
|
|
|
|
|
|
|
|
|
|
|
|
|
|
|
|
|
|
|
|
|
|
|
|
|
|
» Upcoming Events |
No events scheduled in
the next 465 days.
|
|


 Cantaloupe
 Launch Pad
 Life Support
 Wedding Gift
 Linear Mode


