 |
|
 11-20-2016, 07:22 AM
|
#121
|
|
Senior Member
Trailer: No Trailer Yet
Posts: 700
|
My new Progressive Dynamics converter didn't fit the opening left by the old unit.
But, just below where the old unit was, is an empty space in that cabinet.
Also, I wanted to have the connections between the trailer circuits and the converter branches to be inside some sort of protective enclosure.
And I needed some place to mount this "control panel" I wanted, with the switches, voltmeters and solar controller. Once the old converter removed, it looked like this:

So I decided to mount my new converter just below in that empty space (i just had to cut an opening), and use the metal enclosure of the old converter as a junction box, since it already fits the opening above the new converter. My new "control panel" will be used to close the front of the old converter metal casing.
First I opened up the old converter, salvaged what components were worth saving and threw them in my parts bin. I junked all was left but the metal casing. The old converter internals:

Then I cut and opening below for the new converter:

Here I have the new converter in position, with the wires from the converter and the trailer up in the metal box. I started to put nice identification labels on each circuits using my P-touch, it looked real nice and clean, but then I ran out of tape. So I reverted to using painters tape... I hate doing that!

Now the famous "control panel"...
When my wife said she wanted to have aircraft-style metal toggle switches, I thought of pushing the concept a little farther. First, I decided to use an aluminium plate as a front panel, with appropriate openings for the switches, voltmeters, etc. The plain aluminium look will fit nicely with all we already have in the trailer.
Then looking up the web, I saw I could get some nice ring-type switch guards that are often used with toggles switches in aircrafts and spacecrafts. Now I thought that would look great. I could get the guards from the manufacturer or some eBay reseller, but I found them quite expensive (remember, I'm in Canada!).

Searching the subject on the web, I saw a cheaper alternative to achieve a similar look: small, nickel-plated u-bolts. So that's what I went with.
 Mounting the switches
I could have mounted the toggle switches right through the cabinet's plywood. But I wanted something that looked nicer, and something in line with the look of my main control panel. So I made two switch panels, using the same aluminium plate I used on my main panel. The first one is mounted on the side of the fridge cabinet to control the rear lights. It wasn't so evident for the switch panel for the front & galley lights. The best spot was a 4in wide wood trim between the door frame and the galley.
So I started to cut some aluminium plates, and drill holes in them to mount my switches and switch guards. A drill press would have helped, but I don't have one. It turned out not too bad. Here are the front are rear switch panels:

The rear one has a larger hole to mount a USB socket.
Once I was satisfied with the small switch panels, I cut the larger main panel. Unfortunately, I deleted by mistake the pictures I took when working on it. 
(continued on the next post)
|

|

|
|
11-20-2016, 07:23 AM
|
#122
|
|
Senior Member
Trailer: No Trailer Yet
Posts: 700
|
Here I'm testing how the rear panel will look, with the switch guards and USB socket:

I had to cut a hole in the trim between the door and galley to make space for the switches.

Here is my main panel, face down, with the wiring almost completed.
 Switch labels
Now, how to identify the various switches?
I thought of simply make some labels with the P-Touch. But they would look like what they are, simple P-Touch labels...
I was looking for a way to print my own labels on the aluminium plates. Searching the web, I soon came across some metal printing technique used in electronics to fabricate home-made PCBs (printed circuit boards). I will not explain in details how PCBs are made at home, you can Google that up or search YouTube on this and you will find a lot of information.
The principle is to print a mirror image whatever is needed on glossy or photo paper using a laser printer. Laser here is important, an inkjet will not work.
Then the paper sheet is laid face down on the metal plate, and then a hot iron is used to press down the sheet against the plate. The "ink" used by a laser printer, called toner, is actually a fine plastic powder. The heat from the iron will melt the toner, which will stick to the metal plate. Then the plate and paper sheet is soaked in water, after some time the paper can be rubbed off, and the toner stays on the metal plate. Voilà, printing on metal!
Electronic shops actually sell a special toner transfer paper to make PCBs. I bought some and decided to give it a try.
I was starting from scratch, so I could print whatever design I liked. I already had a Trillium logo on file, and a "Trillium 5500" lettering that looks like the original. But for the switches, I just needed some kind of ON and OFF labels.
I like graphic design, and I'm a typeface maniac. I wasn't going to simply print my labels using Helvetica or Arial! For me, the typeface choice was obvious, there is only one that fit the theme: Eurostile!
For some reason, Eurostile is THE font to use when you want to give a retro-future or 1970s high-tech style to any display or electronic equipment. This font can be found in just about all sci-fi movies, or anytime a futuristic look is required in a picture, book or computer screen, so much that we don't notice it it anymore. Check this:
Fontspots: Eurostile
So I had no choice but to use Eurostile. Most people will think this is no big deal, but it's small details like this that make the difference at the end. And as I said, I just like fonts!!
However, in the end the toner transfer technique didn't give as good results as I expected. I have seen, on the web, super sharp transfers to copper or aluminium plates, but after a few tries, even using a special toner transfer paper, I was never able to achieve super clean transfers. They look OK, but sometimes the letters are not as clearly defined as I'd like them to be. Maybe one day I'll try to do it again, but for now they are good enough.
The best labelling would have been using metal etching. If you want to see amazing vintage-style faceplates made with etched aluminium, using the Eurostile typeface (and some very good electronic works) check this:
Audio Infuser 4700
Photos of the final result in the next post:
|
|
|
|
|
11-20-2016, 07:24 AM
|
#123
|
|
Senior Member
Trailer: No Trailer Yet
Posts: 700
|
|
|
|
|
|
11-20-2016, 07:24 AM
|
#124
|
|
Senior Member
Trailer: No Trailer Yet
Posts: 700
|
Now some pictures of my LED light fixtures:


They are calling for snow tonight, so I'm not sure how long I'll be able to work on the trailer this year.
There are still a few things I haven't posted about yet on the electrical system: I don't have a battery yet, but the wires are in place and ready to hookup, same thing for the charge line from my tow vehicle. Also I've replaced the big metal box in the front with a smaller and neater plastic one. I will write a post about this later.
Visible in one of the pictures, I mounted a combined CO/LP detector just to the left of the converter, in the adjacent cabinet.
The water pump switch was originally mounted to the left of the converter. Down below like that, it just wasn't a very convenient location. I took the switch out, redid all the water pump circuit wiring and put the pump switch on my new switch panel near the galley, near the sink (the wide aluminium plate of my main control panel hides the opening of the old switch). Also, since the trailer has a small bathroom with sink and shower, I thought that a 2nd switch for the water pump near the bathroom sink would be useful too. In the end, my plan is to have two 3-way switches for the pump (just like staircase light switches), and a small indicator LED near each switch that turns on when the pump is turned ON by one of the switches. A lot more wires, but since I was redoing it all... The pump isn't wired yet - especially in the bathroom - but all the wires are in place, and if you look closely at the front switch panel you will see the pump switch and indicator light already installed and ready (bottom right switch).
If you look at the main panel, there is a red button just below my DC voltmeter. This is a reset switch, to momentary cut power to the meter in order to reset the accumulated Ah and recorded peak values. This stupid switch worked about 3 times then failed. Fortunately it failed closed, so the meter still works, but I can't reset it (unless I cut power entirely from the trailer). So I will eventually have to open up the panel and replace that switch.
Next job I guess will be the interior window frames. I had to unglue the Ensolite around the windows last year to replace the rotten wood, it was a PITA, so I don't intend to glue it back. And there is a bit of damage to the Ensolite around the windows that I need to cover with something (visible on some of the pictures here). It's getting cold now, so this will probably have to wait to next year.
|
|
|
|
|
01-06-2017, 11:17 AM
|
#125
|
|
Senior Member
Trailer: No Trailer Yet
Posts: 700
|
I've owned this trailer for a year and a half, yet due to the renovations I hadn't spent one single night in it.
It never crossed my mind that my first night in it would be on the 5th of January, with a morning temperature of -17C !
Well that's exactly what happened!
No, my wife didn't lock me out of the house!
And no, it wasn't an irresistible urge to finally spend a night in the trailer!
It's because I'd just bought a new winter sleeping bag, and I wanted to try it out before I head on a real winter camping trip!
I love winter camping, I've done it a few times in the past. I'm talking camping in a prospector-style tent, not in a trailer. Usually in the middle of nowhere, in a snowmobile expedition.
My old sleeping bag was getting old so I was looking for a new one, which I got at a good price after the Holidays. It's a NorthFace Aleutian -20F-/-29C, a real winter bag.
So I wanted to give the bag a test before going on a real trip, to see how it compares to my old bag. We have a lot of snow this year, and I first thought of building myself a quinzhee (snow shelter similar to an igloo) in my backyard. If I get cold, all I have to do is go back in the house. But then my wife said: "Why don't you try it in the trailer". Hey! Good idea! I never thought of that!
My trailer is in my backyard, snowed in, but fully accessible (I check inside regularly to ensure everything is fine), there is a comfortable mattress, and it's probably going to be colder than a quinzhee (which has a fairly good insulation by the snow and can actually get slightly above freezing even if it's much colder outside). The forecast was showing colder temps over the next few days, with a nice -17C for last night. Just perfect!


Hopefully it's the last winter my trailer has to spend outside. Next year I should have a shelter for it.
I always remove the snow off the roof.
So last night I put on my warm underwear and set everything up for a night in the Trillium. I didn't lit up the furnace, the idea being to sleep in the cold.

The vertical post in that picture is one of 3 temporary roof support I set up in the fall to avoid any damage by the snow.
I don't know what was the temperature inside the trailer this morning, but outside it was -17C as forecasted. Maybe 1 or 2 degrees warmer in the trailer due to my presence and the trailer's thermal inertia and limited insulation.
And I never got cold! Not even the slightest feeling of coolness. My bag kept me warm all night, so far I'm satisfied with the purchase.
So there it is, I broke the ice  and slept my first night in my Trillium!
This morning there was frost everywhere on the windows, walls and shelves, due to the moisture of my breath.


Now I'll try to plan a little winter camping trip with my brothers and my Dad. Dad is always willing to go on such trips, although he's 81!
Here's the video of our last winter camping trip, two years ago.
|
|
|
|
|
01-26-2017, 04:46 PM
|
#126
|
|
Junior Member
Name: Wendy
Trailer: Trillium
Ontario
Posts: 16
|
Thanks for this..... its on my list....great info!!
|
|
|
|
|
04-28-2017, 06:42 PM
|
#127
|
|
Senior Member
Trailer: No Trailer Yet
Posts: 700
|
What's wrong here?? (click to enlarge)

|
|
|
|
|
05-02-2017, 08:03 AM
|
#128
|
|
Senior Member
Trailer: No Trailer Yet
Posts: 700
|
Our reno project should be mostly complete this year, and one thing I never checked was the condition of the wheel bearings and brakes.
So I pulled off the plastic hubcaps, and had a bit of a surprise. I took the picture shown above in my previous post.
Lug nuts installed backwards, tapered end facing out. Flat side against the wheel. 
I checked the other wheel: same thing!
Why would someone do that? 
I know for sure the previous owner didn't do that. He didn't look like a guy who would tinker with bearings and brakes, and he just had new tires and entirely new brakes assemblies put on just before I bought it. So some shop somewhere did that!
I took the nuts off, and got to the bearings. Full of grease, no problem.
I cleaned everything, inspected them carefully, and I couldn't find anything wrong with them, they looked perfectly fine.
So I repacked and reinstalled them, using new seals.
Brakes, as mentioned, were like new.
I put the wheels back on, this time with the lug nuts properly installed. Everything went on as it should, so I really don't see any reason why they were installed backwards. Strange...
|
|
|
|
|
05-02-2017, 08:59 AM
|
#129
|
|
Senior Member
Trailer: No Trailer Yet
Posts: 700
|
I thought about it all winter, and I finally had the time - and the guts - to do it last weekend: install an access door on the back on my Trillium.
Why at the rear? This door gives me access to storage space under the bed at the rear of the trailer. This space is about 16 inches deep, high as the bed platform, and runs the entire width of the trailer at the rear.
I needed a wide but low door. I finally found a used one on Kijiji for $40. Rounded corners, perfect size.
I wanted to use the cut out part as a door panel, so I tossed out the old one, which was basically only a piece of white styrofoam with two thin aluminium sheets glued on each side.
This used door wasn't new, so I had to clean, straighten and then polish the old thing. It then looked new - or at least as new as my trailer!
Then came to moment when I had to cut a hole in the trailer to install that door. Trust me, I thought about this for hours. They say "measure twice, cut once", well I must have measured 20 times, inside and out, then thought about it some more, before I had the guts to do it!
It's a one-way ticket. As soon as the shell is pierced, you're beyond the point of no return. You can't say "Ooops, that's not right, let's try it again!" So I measured again, looked at it once more, but then you reach a point where all that's left to do is cut the damn hole!
So I did it. I had my cut lines carefully marked on the wall.

I cut the straight lines using my oscillating multi tool. Real easy to follow a straight line with this.
 
The moment the blade first touches the shell is the worst part! Then it's clear sailing all the way.
 
The blade went through the 1/4" FG shell like butter.
I used my jigsaw for the rounder corners.
And there is it, a big hole in the back of my trailer!

I had to trim the cut out part about 3/4" to insert it in the frame. I used the old panel as a template. This old panel was about 3/8" thick while the FG cut out was only about 1/4". So I doubled it up with some 1/8 plywood to make up the difference. The plywood was stained, then seal in the aluminum frame with butyl tape.
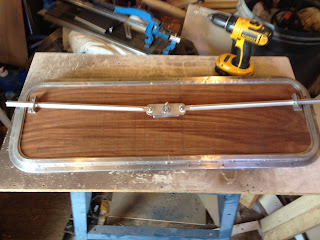
The old panel held closed with two separate latches, one of them lockable. I had no key for this old lock, and I didn't like the separate latches idea. I wanted a single handle latch, so I bought a garage door style T handle. It was just the handle, so I had to fabricate the locking mechanism. It works just like a garage door lock, with two metal rods extending on the sides when the handle is twisted.


(continued next post due to 8 pictures per post limit)
|
|
|
|
|
05-02-2017, 09:00 AM
|
#130
|
|
Senior Member
Trailer: No Trailer Yet
Posts: 700
|
It's all aluminium, made from various part I had on hand. Bolted using stainless steel bolts.
I put it a new seal, then cut some 5/8 plywood pieces for the mounting screws to thread in on the inside.
The door is sealed against the trailer with butyl tape, screwed with stainless steel screws, just like the windows.
I installed it with the hinge at the bottom. Having the hinge up would have limited the access to the storage compartment and would have required something to hold the door open. Now it just lays down on the rear bumper when I open it.
 
 
A little cleanup and scraping of the butyl tape and it was done. All is left now is glueing back some of the Ensolite I had to pull off on the inside, and may be add a light fixture and a switch.
I'm happy with the result, and even cutting the hole wasn't that hard to do. Just make sure of your measurements!
 
|
|
|
|
|
05-02-2017, 03:47 PM
|
#131
|
|
Senior Member
Name: Dave
Trailer: Casita SD17 2006 "Missing Link"
California
Posts: 3,738
|
Very nice Carl, looks like a stock factory item too.
|
|
|
|
|
05-08-2017, 06:53 AM
|
#132
|
|
Senior Member
Trailer: No Trailer Yet
Posts: 700
|
Anybody ever removed the door off a 5500 (or Jubilee, probably built similar) ?
Looks like there's an issue with the plywood floor near the door. 
|
|
|
|
|
05-11-2017, 04:47 PM
|
#133
|
|
Member
Name: Jennifer
Trailer: Trillium
Nova Scotia
Posts: 55
|
That's on my list this summer (with a Jubilee). The door itself needs some help. Mine is down to the fiberglass if you think pictures might help!
|
|
|
|
|
05-11-2017, 07:52 PM
|
#134
|
|
Senior Member
Trailer: No Trailer Yet
Posts: 700
|
Quote:
Originally Posted by Jennygdeans

That's on my list this summer (with a Jubilee). The door itself needs some help. Mine is down to the fiberglass if you think pictures might help! |
I took the door (including the frame) off my trailer. I have wood rot where the step is attached.
I'm in the process of fixing this, I expect to be done tomorrow or saturday. I'll have pictures.
In the meantime you can look up my blog. Google Translate isn't too bad, you'll get the idea:
https://translate.google.com/transla...-text=&act=url
|
|
|
|
|
05-13-2017, 07:30 PM
|
#135
|
|
Member
Name: Jennifer
Trailer: Trillium
Nova Scotia
Posts: 55
|
This is great! Thanks so much!
|
|
|
|
|
05-14-2017, 07:02 PM
|
#136
|
|
Senior Member
Trailer: No Trailer Yet
Posts: 700
|
Had to take the door off my 5500 to fix the floor under the door frame. The step is bolted through the floor at that location, and I also had water damage to the wood structure holding the step.

I needed to remove the door, remove the step, remove the rotten wood, install new wood, fix the floor, reinstall the step, reinstall the door.
Removing the door was a tough job due to the fact that the door frame was glued to the FG shell with silicone or some sort of sealant. The door is mounted in some recess on the side of the trailer that makes it very hard to insert a blade between the door frame and the shell to cut the sealant. I tried a bent putty knife, it didn't work very well. It would have done the job with butyl sealant, but not with this silicone.

I struggled almost an entire day on this and still wasn't able to get the door off the trailer. Finally I had to carefully apply heat to the door frame (while protecting the FG shell with a piece of sheet metal) to get the sealant to release. It doesn't take much heat for the silicone to let go.

I have the whole assembly in my hands, pulling hard on it, and the damn silicone still doesn't want to let go!!:


Another blob of old silicone:

Unfortunately, that sealant was stuck so hard to the shell that some FG actually ripped off when I tried to pull on the door (that was before my Dad suggested to use some heat to soften the silicone, which helped tremendously).
This is not good, I will need to fix this.

(continued next post)
|
|
|
|
|
05-14-2017, 07:03 PM
|
#137
|
|
Senior Member
Trailer: No Trailer Yet
Posts: 700
|
Once the door was off, I was able to cut the old rotten wood off using my oscillating multi-tool (love that tool!).


I eventually cut a larger area that allowed me to remove the damaged wood.


These wood pieces, where the step is bolted, are not normally visible, they actually fill the void in the "pontoon" under the plywood floor. I also needed an opening large enough to insert the replacement wood pieces, but I wanted to keep it small enough to keep the floor sturdy.
The space in the pontoon, between the plywood floor and where the step is bolted is 1" 3/8 deep, and is filled with layers of plywood. From what I could see, originally a 3/4" plywood on top of a 5/8" plywood filled the gap, and this is what I used to replace it. Since the original floor is 5/8" thick, the step is actually bolted through 2 inches of plywood (5/8 + 3/4 + 5/8).
I cut an opening about 2" wide along the FG shell, just enough to be able to slide my new wood pieces in.
Once the new plywood pieces correctly positionned, I cut some other plywood pieces to approximately match the cuts I did on the floor, and installed them. I screwed a bunch of corrosion-resistant 2" deck screws" to hold everything together. The screws reached down to the lower plywood layer and made the whole floor very rigid.
Then I drilled the holes for the step bolts, and put on 4 new galvanized carriage bolts. I tightened the step hard, to set the bolt heads in the wood.

I made a little drawing to show the floor near the door and the step support structure. I made it for my blog, which is in french, but you get the idea:

Next, I poured some FG resin all over the new wood, soaked it, let some drip n the cracks.

(continued next post)
|
|
|
|
|
05-14-2017, 07:03 PM
|
#138
|
|
Senior Member
Trailer: No Trailer Yet
Posts: 700
|
Then I spread a layer of short strand fiberglass filler all over the entrance area.

Now the floor near the door is very study. The step feels like it's bolted to concrete, no flexing at all.

Before I put the door back on, I cleaned all the old silicone off the frame.

The frame is made out of 4 aluminium extrusions, welded at the corners. Some of the welds have cracked.
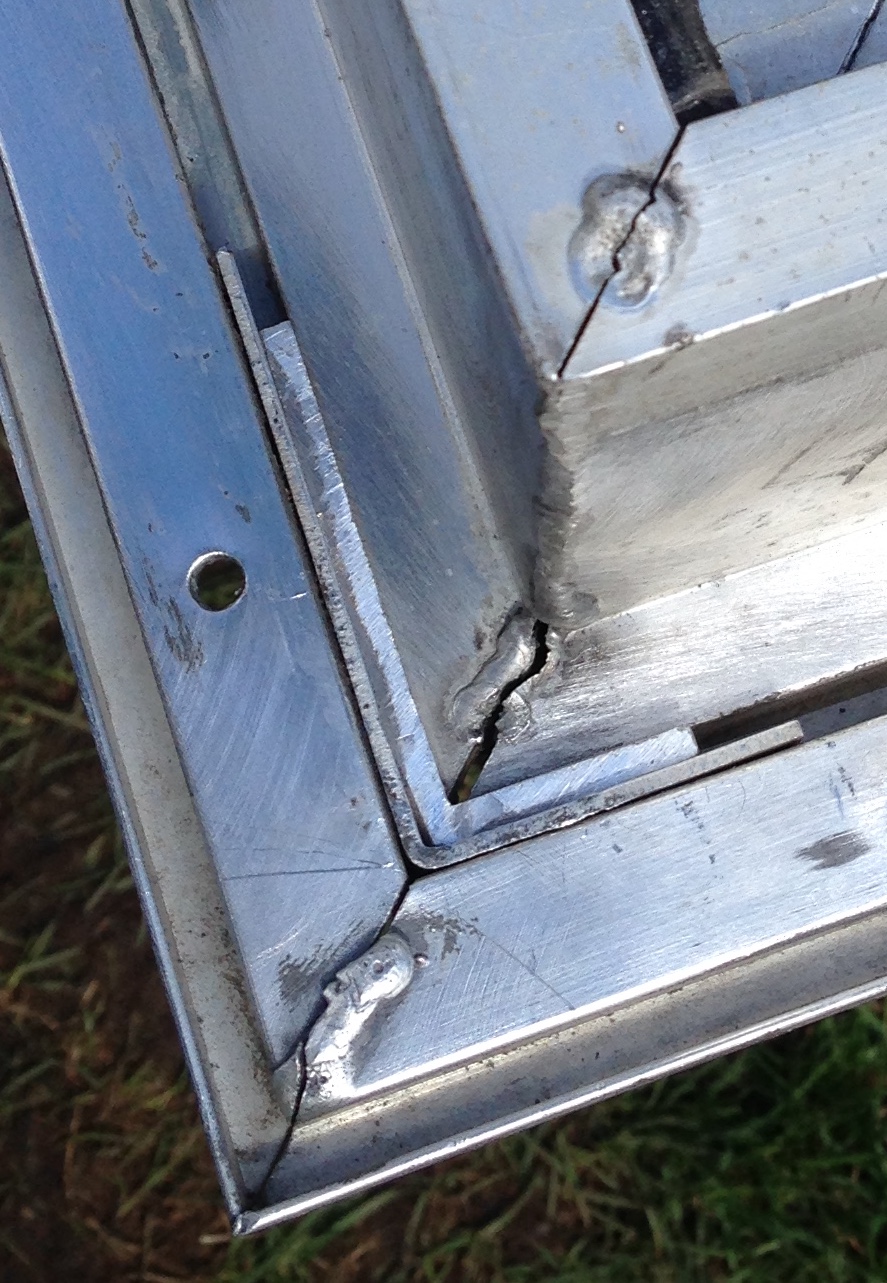
To reinforce the corners and to prevent further damage to the welds, I reinforced the corners with some aluminium pieces tightly wedged in the extrusion channels.

Another problem with the cracked welds is they can let water through, beyond the butyl seal. If water seeps in, it can damage the wood that supports the step. Since this would not be visible, the first indication would be a "soft" step, and at that point it would be too late, and I would be faced with he same issue I just worked so hard to fix. So these frame corners need to be absolutely watertight. I decided to spread some FG filler on the back of these corners. This stuff sticks hard to freshly cleaned and brushed aluminium, is very resistant, and can still allow some movement if the door frame ever flexes for any reason.
Before I applied the FG filler, I needed to make the door frame perfectly square. I know is wasn't square on the trailer to begin with, so this was my chance to fix this. I screwed one side of the frame to a sheet of plywood, then used a nylon ratchet strap to pull on the other side until it was square, then I poured the FG filler.


(continued next post)
|
|
|
|
|
05-14-2017, 07:04 PM
|
#139
|
|
Senior Member
Trailer: No Trailer Yet
Posts: 700
|
I also got ready to fix the torn off FG near the door edge. I used a couple wood pieces (wrapped in plastic bags to prevent the FG filler from sticking to them), held in position with clamps, to limit the spread of the filler and guide my putty knife. This repair will not ne visible, as it will be behind the door frame.

Once the filler was hard I took the wood pieces off. Not bad, a bit of sanding and it will be good enough.

So this is where I am right now. It has started to rain again, so reinstalling the door will have to wait until the sun comes back.

|
|
|
|
|
06-18-2017, 06:57 AM
|
#140
|
|
Senior Member
Trailer: No Trailer Yet
Posts: 700
|
Ok the door is back in place now.
When I first put the door back in position, I noticed that there was a gap between the bottom frame and the floor. Since we step on this all the time, the door frame flexes and this can't be good and can be the reason why the frame was cracked at the corners.
I had to put a shim of some sort under the door, I didn't want to use wood, so I decided to put some more Bondo short-strand FG filler. To get the correct thickness, I simply spread some filler and let the door squeeze it to the appropriate thickness. This way I was sure I got the right thickness. To prevent the door from sticking in the filler, I covered it with groceries plastic bags (FG filler doesn't stick to plastic bags).
Once the filler was set I took the door off, removed the plastic bags, trimmed the excess filler, and I was left with this:

Not super nice, but once the door is back on, nothing of this will be seen, and the bottom of my door frame is now fully supported.
So I finally put the door in place, sealed with butyl tape all around. Then I bolted the step back on, also using butyl. Step is now much more stiff, being bolted in new solid wood.

All is left to do on the door is putting some seals, which is in fact only stick-on closed-cell weather striping.
Next was a long overdue cleanup of the interior. Since last fall I've worked inside this trailer without really cleaning or pickup up the wood scraps, old parts, old screws, nails, bolts and nuts, bit of electrical wire or insulation, saw dust, metal shavings, hand tools, power tools, etc. It was getting hard to work in the trailer, and it was about the same in my shop!
So I got everything out, trashed the junk, and we went for a pretty intense cleanup of the interior, something that had never been done since we bought the trailer.

Now the interior reno is almost completely done. All is left is the flooring, and new curtains.
|
|
|
|
|
|
|
Currently Active Users Viewing This Thread: 1 (0 members and 1 guests)
|
|
|
 Posting Rules
|
You may not post new threads
You may not post replies
You may not post attachments
You may not edit your posts
HTML code is Off
|
|
|
|
 » Recent Discussions
 |
|
|
|
|
|
|
|
|
|
|
|
|
|
|
|
|
|
|
|
|
|
|
|
|
|
|
|
|
|
|
|
|
|
» Upcoming Events |
No events scheduled in
the next 465 days.
|
|


 Red
Red Linear Mode


