 |
|
 06-18-2017, 07:05 AM
|
#141
|
|
Senior Member
Name: KAY
Trailer: SCAMP
Missouri
Posts: 377
|
Your photo work is a real help to me, as well as seeing your persistence pay off. Thank you for documenting it so well.
Now where are those almost finished interior photos? Inquiring minds and all...
|

|

|
|
06-18-2017, 07:26 AM
|
#142
|
|
Senior Member
Trailer: No Trailer Yet
Posts: 700
|
Ah Ah! I limit the number of interior pictures and what is seen on them on purpose! ;-)
As I said, still a few things to do inside and out, and once everything is done, I'll have a full set of interior and exterior pictures!
|
|
|
|
|
06-18-2017, 08:04 AM
|
#143
|
|
Senior Member
Name: KAY
Trailer: SCAMP
Missouri
Posts: 377
|
I'll grab some popcorn and candy, and wait for the show to start!
|
|
|
|
|
06-18-2017, 08:13 PM
|
#144
|
|
Senior Member
Trailer: No Trailer Yet
Posts: 700
|
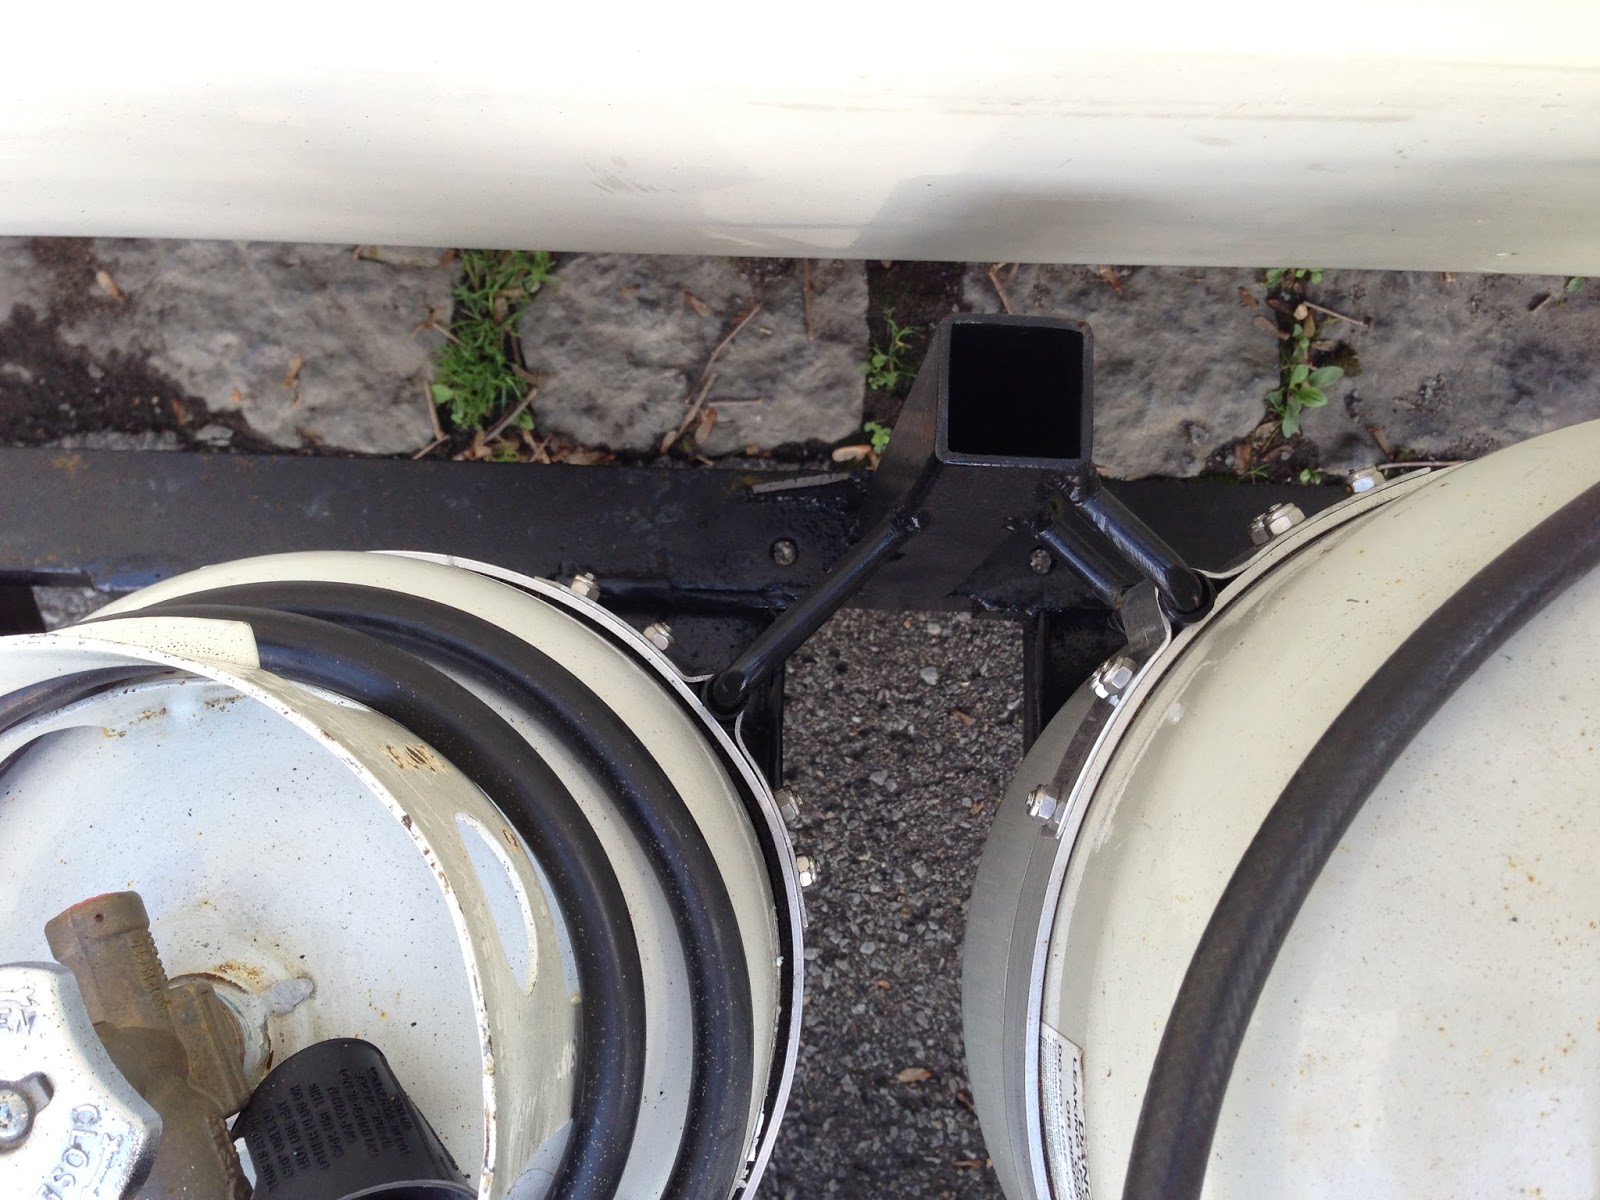
When I bought the trailer, it came with 2 new tires, but the spare was the original F78-14 tire from 1981! The rubber was dry and hard as concrete!
Got a new spare now, I just needed to mount it somewhere.
Last spring I installed an access door on the back of the trailer to access some interior storage space. My plan was to mount my spare tire on a folding mount, to keep access to the rear storage.
But then I saw that some trailers have the spare mounted *under* the trailer, with a "tire winch", just like many SUVs and pickup trucks now have. RV tire winches are available for purchase. Out of sight, out of the way: I liked that!

My trailer doesn't have a very high ground clearance compared to most recent RVs (where you need to climb 5 steps to get aboard!) but I took some measurements, and the only place where I could hang a spare under the trailer was behind the axle. Actually, behind the first crossmember behind the axle.
I made careful measurements, checked the departure angles from the rear bumper to the wheels, made the same calculations assuming a flat tire (as the trailer would obviously sit lower), and came to the conclusion that it would be safe to mount a tire under the trailer at this location, and it would never hit the ground before the rear bumper would, unless I drive over an enormously large speed bump, or board a ferry with an unusually steep slip, all situations that I can't see happen.
The floor of my trailer is made of 5/8 plywood, can support my own weight without any concern (I weight about 3 times the weight of the spare) so floor strenght is not an issue.
So I considered the whole project again, and decided to go for it.
And to simplify things, instead or using a tire winch, I just used a 8" long, 1/2" galvanized steel bolt. The bolt is inserted from below, and the only visible thing in the trailer is the tip of this bolt and the nut that holds it, which is accessible in the storage space under the bed. My welder (my Dad!) made me a bracket that goes in the spare tire hub, prevents the bolt from spinning, and has a spring that keeps the tire firmly against the underside of the trailer (just like a tire winch has).
Here's the bracket. I painted it black, then coated it with some light grease to protect it from corrosion.


Here's the bracket in the spare tire's rim:

A few pictures of the spare under the trailer:


Need the spare? Simply remove this nut, the spare will drop down. This nut is not visible unless you crawl under the bed. The nut rests on a lock washer, then 2in washer, then a piece a stainless steel sheet, to spread the load.

I sure like the clean look of the rear without the spare:

|
|
|
|
|
06-18-2017, 08:21 PM
|
#145
|
|
Senior Member
Name: KAY
Trailer: SCAMP
Missouri
Posts: 377
|
Just a suggestion. Run some flexible wire (like bicycle brake cable) through the tire and out to a spot on the rear bumper. You know the day you need that spare, it will be raining, and the high side will be in a puddle. Give yourself something to pull it out from under the trailer.
|
|
|
|
|
06-18-2017, 08:24 PM
|
#146
|
|
Senior Member
Trailer: No Trailer Yet
Posts: 700
|
Good idea! Thanks!
|
|
|
|
|
06-19-2017, 05:40 AM
|
#147
|
|
Senior Member
Trailer: No Trailer Yet
Posts: 700
|
Now it was time to install the new flooring.
When we bought the trailer 2 years ago, the flooring was made of old stick-on tiles. Many tiles had started to lift, they were not very good looking, and since I wanted to inspect the plywood under, we took all the old tiles off.
The plan was to eventually install some Trafficmaster Allure vinyl flooring. They're easy to install, not too expensive, and look pretty good. I helped my brother put some in his cabin, it looked very nice.
One day about 2 years ago, shortly after we bought the trailer, we came across a good deal on some vinyl tiles at our local Home Depot. They were 4mm thick, 12" X 24" vinyl "click" tiles.
4mm is thicker - and heavier - than what I planned to use. But the price was so good I couldn't pass them. Color was right too, dark gray (charcoal) which according to my chief decorator (my wife!) would look very nice in our trailer.
So we bought them, they were on final sale and we got them at less than $60 for 2 packs (they normally sell just under $80 per pack).
So this was 2 years ago. At that moment, we were not ready to install them as we were just starting the reno project, but the time came last week.
When we bought the trailer, there was a small wood trim all around the tiles (just a quarter round actually), some of it was missing, or damaged, so we took it all off with the old tiles. Now I needed some trim or moulding to replace them and cover the small gap at the edges of my new tiles. I was looking for something other than wood. I didn't feel like cutting tiny quarter rounds, sand them, then stain them, etc.
Instead, I went with some 1/2" aluminium angle. Not expensive, very lightweight, easy to cut, resistant, don't need paint, they will last forever and they will look good. I use small countersink screws to attach them to the base of the walls, they are not screwed onto the tile as the floor is floating.
So here are a few pictures:


Now the curtains are pretty much the last thing that's left to do inside. And we've started this job last weekend. Pictures to come!
|
|
|
|
|
06-19-2017, 06:52 AM
|
#148
|
|
Senior Member
Name: Patricia
Trailer: 1975 Ventura
Ontario
Posts: 353
|
I actually just bought the same flooring for my trailer at HD in Wpg a few weeks ago. I was surprised to hear your story since they still seem to be "on sale" at this point. But I was thrilled to get flooring that seems it will be impervious to water and easy to keep clean for such a good price. Nice to see that you are happy with it and it looks good,
|
|
|
|
|
06-29-2017, 05:54 AM
|
#149
|
|
Senior Member
Trailer: No Trailer Yet
Posts: 700
|
Finally made my new LP tanks brackets.
When I bought this trailer 2 years ago, the A-frame was loaded with 2 LP tanks, 2 large 6V batteries, the spare tire, and a huge and heavy home-made steel rack to carry all that stuff.
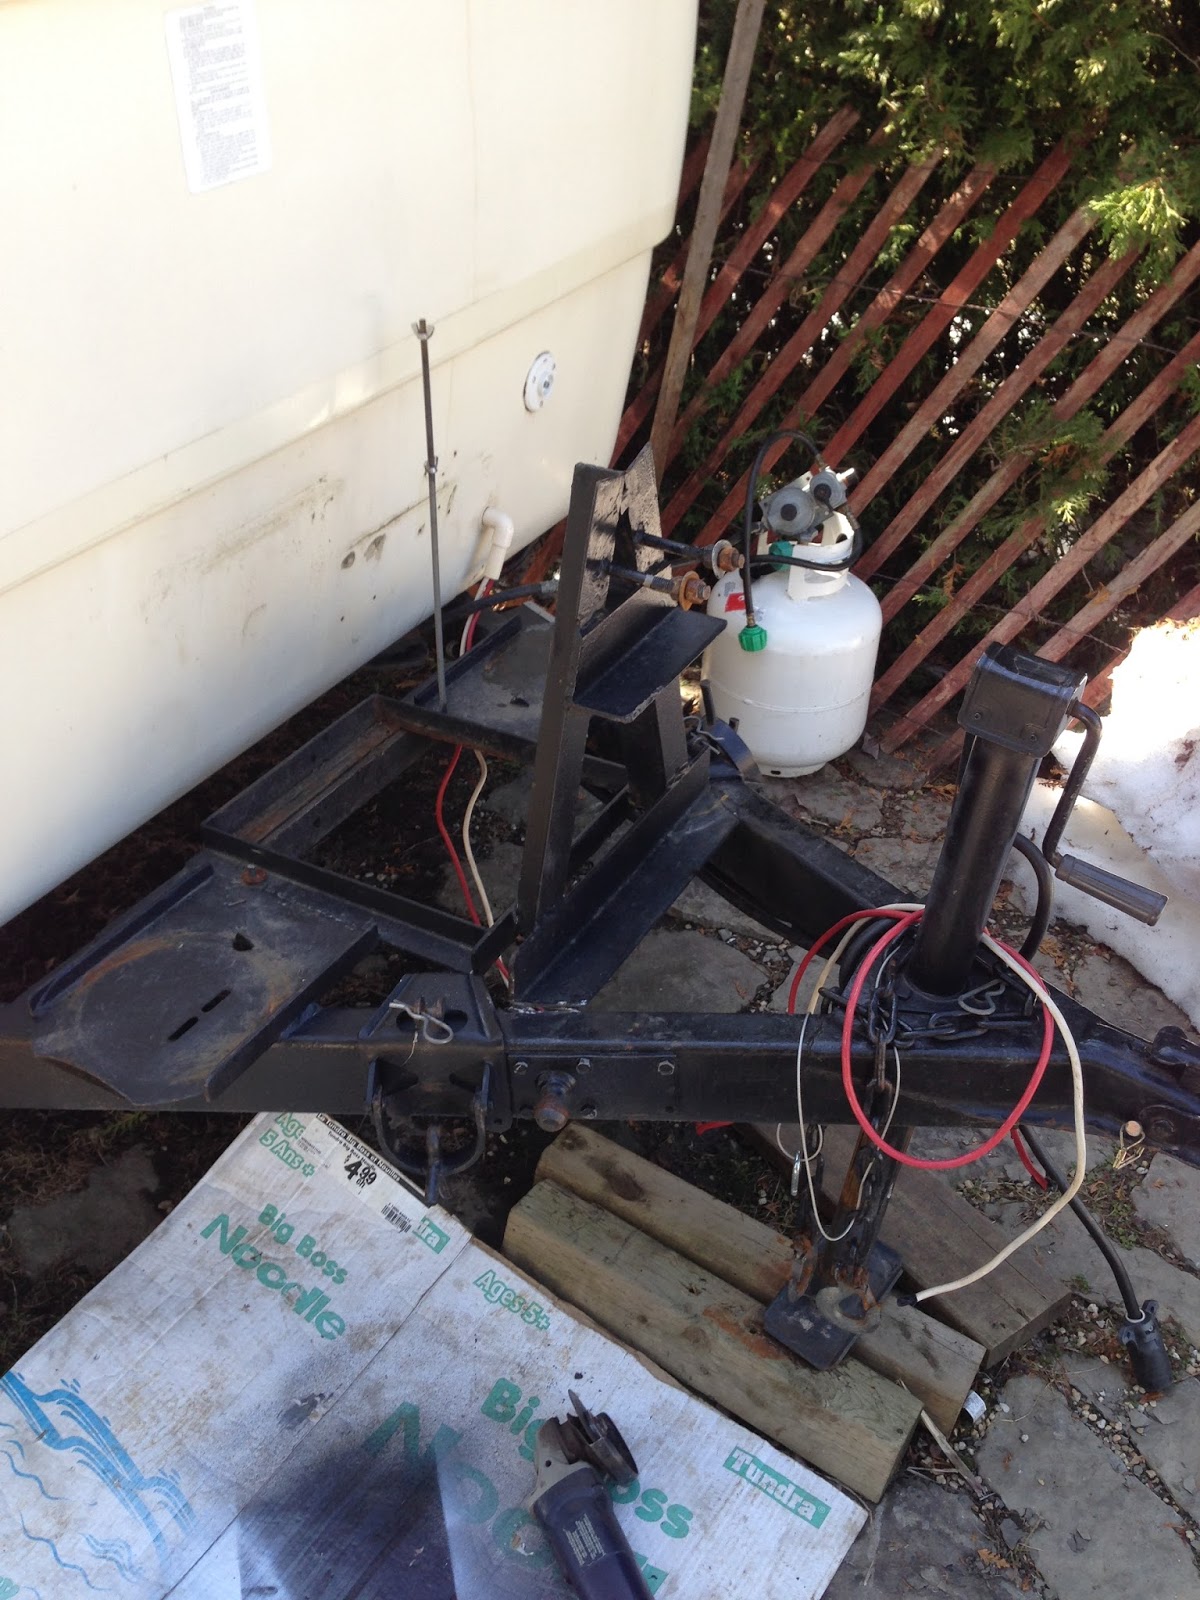
I took this big rack off the trailer last spring. I wanted to get back to a lighter and simpler dual-tank setup, so I needed a new rack for the tanks.
Actually, it's one tank.
Back in the day of our popup camper, we only had one tank. Just running the fridge and the external stove, a single tank would last at least a couple weeks. I think in 17 years of camping we only ran out of propane only twice. I must have 4 or 5 tanks at home, so I always leave with a full tank. I figure it will be the same with the Trillium.
However, I must say that I use to carry a 10lbs refillable tank for my portable grill (no more disposable and expansive green bottles for me). When travelling with the popup, I would just securely pack the tank inside with all our stuff. Not really an option with the Trillium, so I decided to make my tank rack a double one, to carry the trailer's main tank and my smaller 10lbs.
The issue I had was the 10lbs tank is smaller than the trailer's 20lbs, so a standard RV rack wouldn't work. Also, I needed the bracket for the 10lbs to release easily and quickly when setting up camp, but while providing some basic theft protection.
The rack I made actually uses parts of the big old rack that was on the trailer until this spring. I added a few iron angles as required to fabricate two small platforms, welded to a cross member and the A-frame. Then a vertical post, with 2 steel loops, was welded between the two.


Now a bit of paint:

A metal strap, attached to the loops on the post like a big clamp, will secure the tanks on their platform. I made the straps out of 1.5" wide, 1/8" thick aluminium flat bar.
I needed to bend the flat bar into a circle. This is 6061-T6 aluminium, so it is pretty stiff. Since I don't have a bender or an hydraulic press, I made a sort of bender out of thick plywood that I could use with my vise. I was able to progressively bend the flat bar into the proper curve.

To hold the strap tight around the tank, I first thought about using a big latch. You can even put a padlock on some of them, which would prevent my 10lbs from walking away. But I already have 4 keys for my trailer, I didn't want another one for my gas tank, and those rust-proof stainless-steel latches are pretty expensive...
So I went the simple - and cheaper - way: I simply used a big bolt. The bolts have a 3/4" nut, which is the same as my leveling jacks. So the same hand crank used to work the stabs will release a gas tank in seconds. And anyone interesting in walking away with my tank will have to carry some tool to release the strap. Maybe not as secure as a real lock, but you can't just grab it and run, and that was my goal.
So here it is with the 2 tanks in place. Note the smaller 10 lbs tank. The attachement from the strap to the steel loop is made of tempered aviation aluminium. I glued some rubber on the inside face of the strap.
All bolts are stainless steel.

|
|
|
|
|
06-29-2017, 05:55 AM
|
#150
|
|
Senior Member
Trailer: No Trailer Yet
Posts: 700
|
Here are the big galvanized steel bolts. A few turns of the crank (or 2 seconds with my cordless drill!) and I can slide the bottle up, off the rack.


The hose on the 10lbs tank is not hooked to the trailer, it's the adapter hose for my grill. However, I can hook the trailer to the 10lbs in case the main tank runs dry.
I'm still using the same regulator that was on the trailer. It is a fairly recent Marshall auto switch-over unit. I simply plugged the unused side, so I can go back to a dual tank setup if I ever want to.
|
|
|
|
|
06-29-2017, 07:41 AM
|
#151
|
|
Senior Member
Name: Robert
Trailer: 2015 Escape 19 "Past Tents" 2018 F150 Lariat 2.7L EB SuperCrew
Arkansas
Posts: 1,298
|
That's tidy work, and much better than what you started with. I think another benefit is your reduced tongue weight. Just curious, but have you weighed it since the mod?
__________________
"You can't buy happiness, but you can buy an RV. And that is pretty close."
|
|
|
|
|
06-29-2017, 09:17 PM
|
#152
|
|
Senior Member
Trailer: No Trailer Yet
Posts: 700
|
Around 300 lbs empty.
|
|
|
|
|
06-29-2017, 11:08 PM
|
#153
|
|
Senior Member
Name: Robert
Trailer: 2015 Escape 19 "Past Tents" 2018 F150 Lariat 2.7L EB SuperCrew
Arkansas
Posts: 1,298
|
Quote:
Originally Posted by Carl V

Around 300 lbs empty.
|
That's super. In going back and reading this whole thread, I'm quite impressed. From an old tired heap with a sound shell, all the way to a very sharp rig.
__________________
"You can't buy happiness, but you can buy an RV. And that is pretty close."
|
|
|
|
|
07-04-2017, 10:35 PM
|
#154
|
|
Senior Member
Trailer: No Trailer Yet
Posts: 700
|
Got a new (new to me) weight distribution hitch.
When I got the trailer, it came with an old weight distributing hitch (chain type) and a standard friction blade anti-sway.
This kit looked quite old, I'd never seen any like it. I could read "Bock" stamped on it. Searching the web, I found this was the name of the manufacturer, and this system was patented in 1961!
The main issue with it is there wasn't any tilt adjustment for the ball mount. You know, the washer stack or eccentric washers... nothing. Due to the configuration of my vehicle, I wasn't able to transfer much weight due to the lack of tilt, so the whole thing was pretty much useless for me.
And I hated the anti-sway. I never knew if it was tight enough, or maybe too tight.
My popup had a Reese 350 Mini WDH with integrated anti-sway. No hassle, worked perfectly all the time. I liked it. So I was looking for something similar for my 5500.
These WD systems with integrated antisway are pretty expensive here in Canada. We're talking $700 or more. So I was looking in the classifieds for a used one. I was looking for an Equal-i-zer, Husky Centerline or Reese SteadiFlex.
I expect my tongue weight to be in the 350-375 lbs loaded, which would put a 400 lbs system close to the max, considering the stuff that is carried in the back on the vehicle as well. Since 400lbs-rated systems are also pretty much inexistant in the used market, I also watched for a 600lbs-rated one, which are much more common.
I finally found a 600 lbs Equal-i-zer for $325 two weeks ago. Last weekend I found the time to install it and go for a test drive. Trailer was empty (renos not quite completed at this time), so I know I will probably have to re-adjust everything once we're loaded.
Being able to properly adjust the weight distribution made a major improvement over the old kit I had. I went to our local industrial park, where everything was closed on a Saturday morning, and tried some quite agressive maneuvers like quick lane changes at moderate speed. The sway control works as advertised, the trailer following the Highlander like if it was part of it. Very secure and stable. Just like my popup was with the Reese.
So I'm quite happy of my purchase.


|
|
|
|
|
07-04-2017, 11:02 PM
|
#155
|
|
Senior Member
Trailer: No Trailer Yet
Posts: 700
|
New stabilizers
My trailer came with 2 automotive-type scissor jacks bolted under the front frame, and at the rear it had two old flip-down jacks, that had been repaired or "improved" by a previous owner as there was much welding on them.
I was looking to replace them all with real crank-down RV stabilizers. I was looking at the classified just in case, and then I came across a guy who was selling 4 nice stabilizer jacks for $40. Over here just a single jack is like $80, so I jumped on it.
When I got there, I saw that these jacks were much larger than I thought, as they came off a much larger trailer than my 5500. They were also heavier. But... they were like new, and the price was right... so I gave the guy his $40, he was happy, and so was I !!
Once I got home, I looked up the model number for the jacks. They are BAL C-Jacks, model 23222, rated for 4500lbs each !!
Too big for my trailer? Bah.. let's call them "big enough"!
If I ever have a flat tire, I'll be able to use them to jack the trailer up. One single jack could support my entire trailer!
So last weekend I cut the old jacks off my frame, and bolted the new ones. I wasn't able to install the rear one at the very rear end of the trailer, like under my rear bumper, due to clearance issues. My new jacks require like 4 inches of clearance under the frame/bumper, and my rear bumper only clears my sloped driveway by about 1 inch! So I installed them a little bit forward, and at an angle so the leg is even further forward. I had to weld a slight modification to the jack's attachment bracket because of that angle. This way the jacks clears the rear departure angle of the trailer. I did the same at the front, although clearance was less of an issue.


The jacks are raised and lowered using a hand crank with a 3/4" socket. Actually, I'll be using my 18V cordless drill with a socket adapter, which is much faster.
While I was at welding, I had a 3/4 bolt welded to the end of the shaft of the crank of my tongue jack.

(I needed to paint that bolt but it was raining!)
With this bolt, I can also use my cordless drill to raise and lower my tongue jack. So no more cranking for me!
|
|
|
|
|
07-05-2017, 02:39 AM
|
#156
|
|
Senior Member
Name: Dave
Trailer: Casita SD17 2006 "Missing Link"
California
Posts: 3,738
|
Nice find Carl, did you try to lift the TT off the ground for a tire change with them yet?
|
|
|
|
|
07-05-2017, 06:23 AM
|
#157
|
|
Senior Member
Trailer: No Trailer Yet
Posts: 700
|
Quote:
Originally Posted by Borrego Dave
Nice find Carl, did you try to lift the TT off the ground for a tire change with them yet?
|
LOL no yet!
They are built stronger than my Highlander's scissor jack, which I planned to use in case of a flat (haven't tried it either).
Or I'm just going to get a small bottle jack, they are pretty cheap.
Making sure I can lift the trailer in case of a flat is on my To Do list before we head out on our first trip.
|
|
|
|
|
07-05-2017, 01:25 PM
|
#158
|
|
Senior Member
Trailer: No Trailer Yet
Posts: 700
|
Hey, I just thought about that, I can check that off my list, I KNOW my Highlander's jack can lift the trailer as I've done it last spring when checking the brakes and bearings!! 
Too much stuff in my head!! 
Or may be it's my age? 
|
|
|
|
|
07-11-2017, 07:59 AM
|
#159
|
|
Senior Member
Trailer: No Trailer Yet
Posts: 700
|
Another big project was completed last weekend in our trailer: the curtains!
When we bought our 5500, it came with old plastic blinds. This is how it looked:

I hate blinds.
They let a lot of light through, they are noisy and hard to clean and I don't like the look. So we got rid of them, including the cheesy valences and the plywood pieces that held them.
We clearly prefer curtains. The only place where we kept a blind, is at the window behind the range, due to the fire risk with a curtain. We put a new aluminium blind, with the bottom permanently attached to the wall with a bracket.
We wanted our new curtains to:
-look good (obviously!), including the track, or rod system.
-block the light (I like it dark in the trailer in the morning)
-be easy to slide open or close
-be not too expensive
I looked for some time at different curtain rods and track systems, and finally found some nice tracks at IKEA. It's an aluminium track system called KVARTAL.
Now don't run at your local IKEA to get them. When I bought them in the fall of 2015, they were on final sale, and the lady at the store said they were going to pull it off their 2016 catalog. And they did, so the KVARTAL tracks are discontinued and not offered anymore. At least in Canada, might be different in the US.
The KVARTAL tracks are made of 1" tall aluminium extrusions. I love the aluminium finish, we have a lot of it in the trailer, so the fit was perfect. These tracks can be mounted using various brackets or directly under a shelf or cabinet. They have small hooks on rollers that ride smoothly in the tracks where the curtains are attached.


I mounted the KVARTAL tracks right under the shelves. They are quite small, not obtrusive at all, almost invisible under our aluminium lined shelves and the window frames. This next picture was when I rebuilt the front shelf, where I pre-installed the tracks (the shelf is upside down).


Once the shelf was in place in the trailer, with the track underneath, along the wall:
 
Two years ago, when I resealed the windows, I had to unglue the Ensolite around the windows. I didn't want to glue it back in case I had to take a window off again, so I needed something to attach the Ensolite to the wood frame, some sort of interior trim that would look good. Also, a previous owner had used some MDF moldings for this purpose, that he nailed with a brad nailer. I took these off as well, as the MDF had sucked water, and the small nails had rusted. So the Ensolite around my windows has many small holes with rust marks so I needed to come up with some window framing that covered that as well. Picture showing damaged Ensolite around the windows:
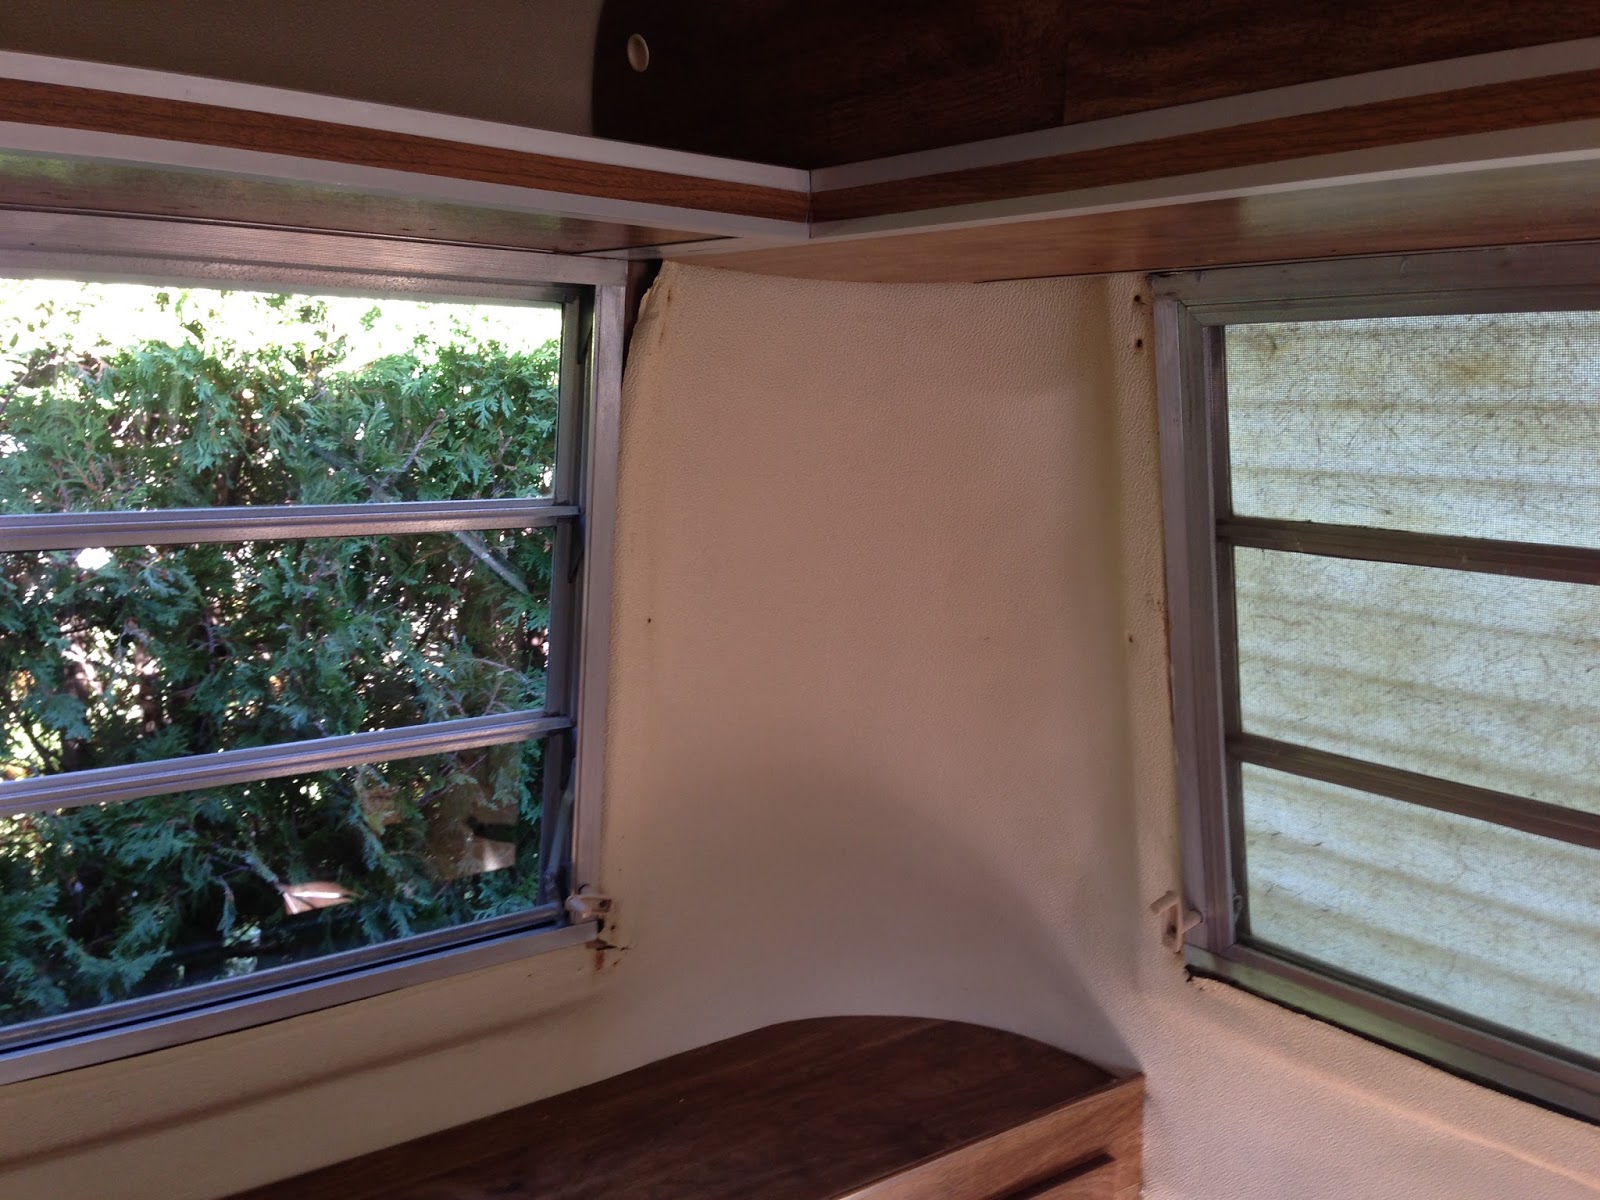
Old MDF trim I took off. Rust spots due to rusty nails:

I finally decided to frame my windows with some 1.5" wide, 1/8" thick aluminium flat bar. I sanded the aluminium to give it a uniform, brushed metal look, then screwed it with SS screws over the Ensolite, to the wood frame around the windows. The flat bars hold the Ensolite in place and hide the holes, rust spots and other damage on the Ensolite near the edges around my windows, and I can take unscrew everything off easily if I ever need to pull a window off the trailer for some reason. And again the aluminum finish looks nice in our trailer.


(continued next post)
|
|
|
|
|
07-11-2017, 07:59 AM
|
#160
|
|
Senior Member
Trailer: No Trailer Yet
Posts: 700
|
Sanding the aluminium to give it a nice uniform finish:

Another issue with my trailer, also probably common to many FG trailers: the walls - and the windows - are not vertical. Trailers are wider at the waist, so when a curtain is hung from the top of a window, the bottom just hangs 2-3 inches away from the window frame. This lets the light in, and doesn't look real good. I've seen many options to solve this: a 2nd track or rod at the bottom, bungees, steel wires, snaps, velcros, etc. None of these solutions had much appeal on me, and I was trying to figure a different way.
Then one day I got the idea while I was showering in a hotel room! The shower curtain had magnets embedded at the bottom, that made the curtain stick to the bath tub. I thought is was a good idea for my trailer's curtains. But unfortunately, there is absolutely no ferrous metal in my windows where a magnet could stick on. Everything is aluminium and screwed with stainless steel screws.
I wasn't far from the final solution: I simply decided to put the magnets on the frame itself, and the steel part on the curtains, in the form of a small metallic chain sewed in at the bottom of the curtains. This would make the curtains stick to the window frames, and still allow the opening and closing of the curtains easily, without having to undo a strap, snap, velcro, whatever.
I had no idea if this was going to work or not. I had never seen this before anywhere. In my mind, of course, it worked perfectly! And once I had this idea in my mind, there wasn't any other solution that looked as elegant as this one. So I had to try it!
First, I had to find proper magnets. I found some at a decent price at DealExtreme. They have a great selection of very strong neodymium "super magnets", all sort of sizes and shapes. I ordered some round, washer-shaped magnets, about 3/4" in diameter.

I screwed my "super magnets" at the bottom of each window, using the same screws that holds my "flat bar" window trim, about one every 4 inches.

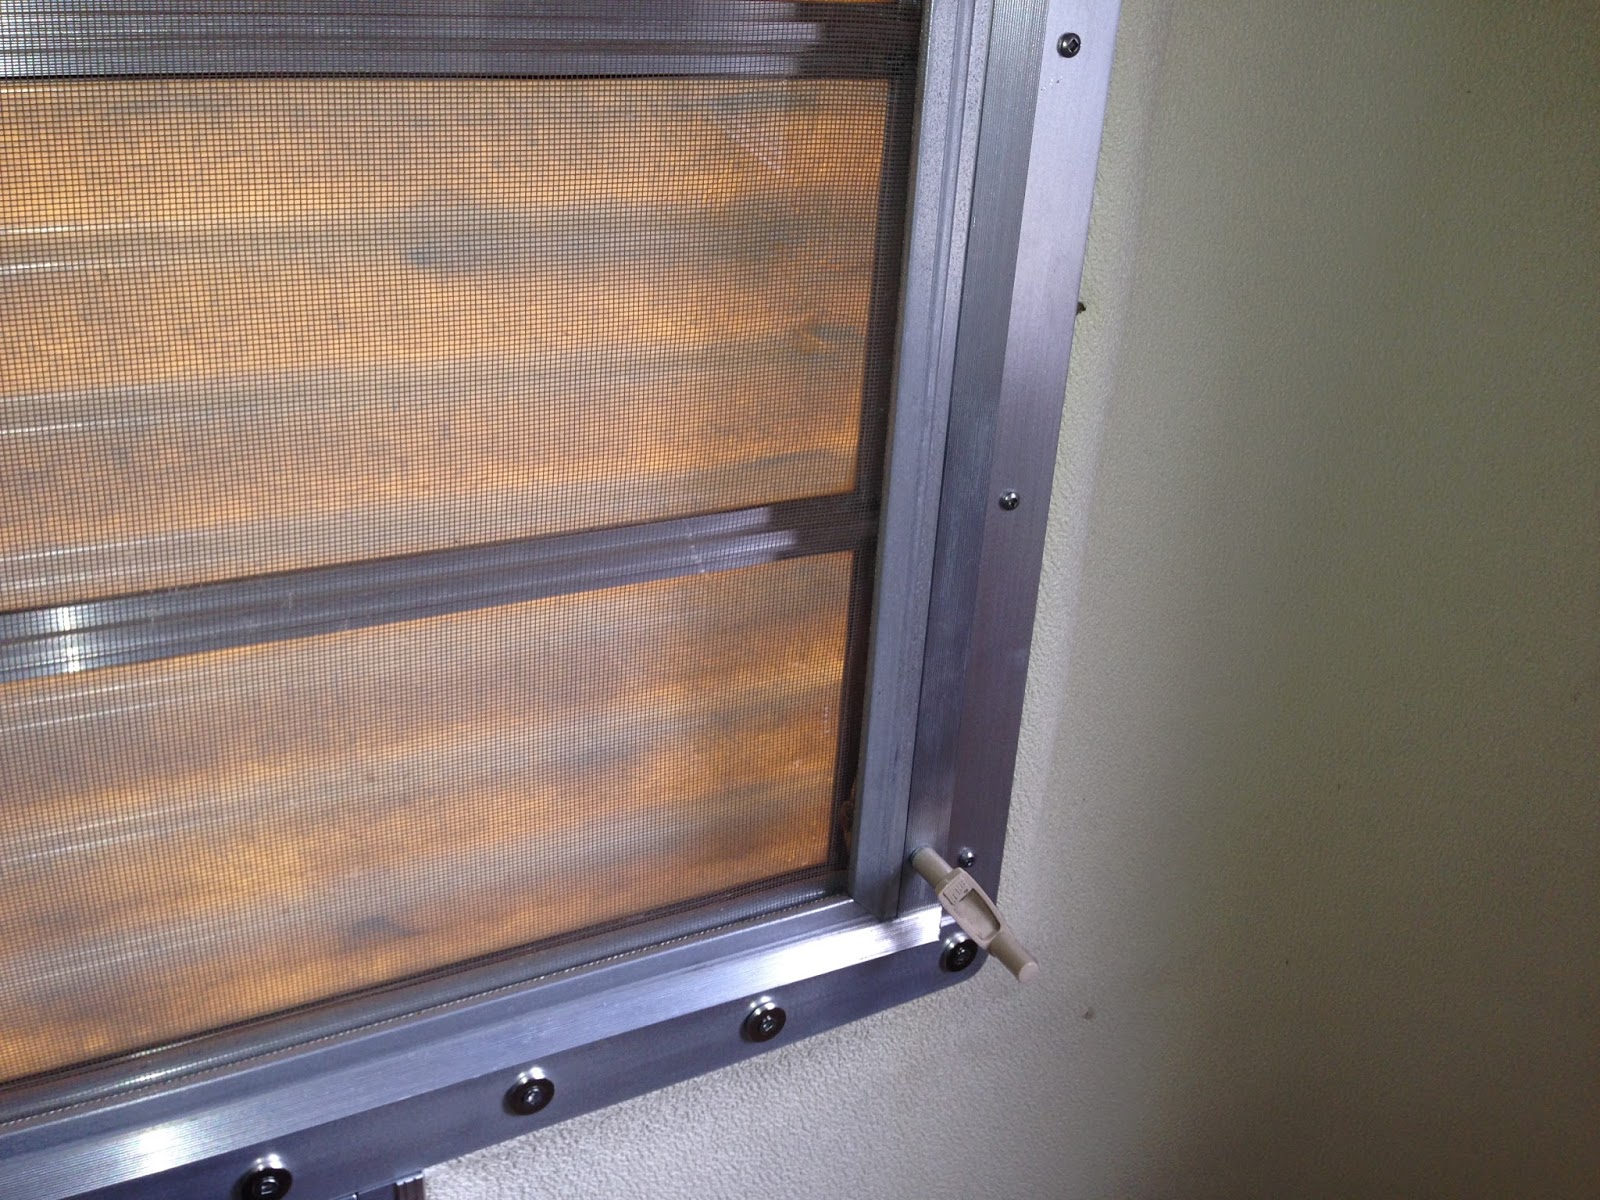

At my local hardware store, in the electrical section I found some small steel ball chain that is used on lamps switches.

(continued next post)
|
|
|
|
|
|
|
Currently Active Users Viewing This Thread: 1 (0 members and 1 guests)
|
|
|
 Posting Rules
|
You may not post new threads
You may not post replies
You may not post attachments
You may not edit your posts
HTML code is Off
|
|
|
|
 » Recent Discussions
 |
|
|
|
|
|
|
|
|
|
|
|
|
|
|
|
|
|
|
|
|
|
|
|
|
|
|
|
|
|
|
|
|
|
» Upcoming Events |
No events scheduled in
the next 465 days.
|
|


 Bobby Troup
 Past Tents
 Linear Mode


