 |
|
 07-01-2016, 08:47 PM
|
#81
|
|
Senior Member
Name: Kelly
Trailer: Trails West
Oregon
Posts: 3,046
|
Quote:
Originally Posted by Talia

Natural clay, or a polymer?
|
Plastiicine clay. I use it now and then for mold making work so I have it on hand. It keeps for years in a sealed bag. It is perfect for this kind of project where you want to contain a substance with a temporary dam that is easy to remove and clean up. You don't need sulfur free for the task I am doing on the Campster, it is just the kind I already have on hand as I was doing mold making work. Regular plasticine is available at most art supply stores and at some craft stores too such as Michaels.
Plasticine Clay: Multiple Uses in Mold Making «
So my fiberglass repair method approach for this medium small hole has its roots taken from mold making methods. I am casting resin that has fiberglass cloth embedded in it against a silicone mold to fill up the hole. Then more cloth and resin will go over that filled area. It is just a small variation on working with a backer board. The plasticine does easily solve the issue of how to prevent leaks at the edges of the backer.
|

|

|
|
07-02-2016, 10:03 PM
|
#82
|
|
Senior Member
Name: Kelly
Trailer: Trails West
Oregon
Posts: 3,046
|

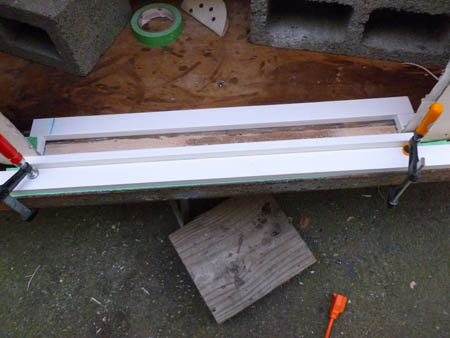
An important piece of progress today I created the wood frame that is on the inside of the doorway. The photo above is where I had it set on sawhorses so I could set the door into it for a check fit to make sure I got my measurements just right. That door is way heavy for me, what were they thinking? Nowadays you can build them much lighter but still strong. I think at some point I will change the glass out for Polycarbonate which should take a few pounds of weight out of it. As long as it does not leak anymore I will be a happy Campster 
The wood frame I created is made from Doug Fir 1" x 3". Doug Fir has a very good strength to weight ratio and it also has some rot resistance as well. Not as much rot resistance as cedar or white oak but better than many other species. It is a perfect compromise wood, native to my Pacific NW region, suitable for the purpose.
Without this sub-structure frame my door would not have the best level surface I can give it. I do need this wood frame in place before I can finish the doorway. My Campster doorway was a botched job by the installer and there was not enough material left for properly attaching the aluminum door frame. Only a few holes had material that screws could grip into. So I have had to extend the fiberglass further into the opening. To trim that new excess material to the right size I will be able to run a top bearing, flush trimming router bit against the edge of the Doug Fir frame. But some areas such as corners and the last bit down by the bottom will need to be trimmed with other tools such as an angle grinder, Dremel, etc.
So what size did I need to make the frame? The same as the width and length of the aluminum extrusion's surface that sets into the opening plus approximately 1/4" wiggle room. In this case that width is 24" plus the 1/4" of wiggle space. Why wiggle space? Because I know my aluminum frame has a slight bow where the lock insets, I do want to put some butyl tape under the threshold piece, plus in the real world nothing is ever a perfect dimension or perfectly square. I can always remove some material if the opening is too snug but I don't want to have to add any material back in. Of course lumber is also never perfectly straight but the two pieces I got are pretty darned straight with no visible twisting or bowing. So 1/4" is what I chose for a little bit extra adjustment room.
Tomorrow I will take some more photos of how the frame is held together for keeping it squared up during installation. I will be mixing up thickened resin to bed the wood frame into since the Campster walls are not straight. The mixture will bond the wavy fiberglass walls to th.e much straighter wood. Then I will be able to get the aluminum frame, with butyl tape layer under it, pulled nice and snug without the previous distortion it had. Hopefully it will also resolve the big gap that was between aluminum frame and the door's vinyl D seal.
So tomorrow maybe I should post a recipe for my special cookie dough in the food section? Wood flour and resin. Add flour until the mixture forms a soft dough. Spread with a spatula. It is a self baking recipe. Do not lick the bowl 
|
|
|
|
|
07-03-2016, 06:06 AM
|
#83
|
|
Senior Member
Name: Jonathan
Trailer: 1991 16' Casita
North Carolina
Posts: 178
|
Wow Karin! I spent time reading through your project while sipping my morning coffee, what an amazing job you're doing on this Campster. You've got mad skills and a wonderful attention to detail, very impressive! 
Jonathan
|
|
|
|
|
07-03-2016, 08:19 AM
|
#84
|
|
Senior Member
Name: Patricia
Trailer: 1975 Ventura
Ontario
Posts: 353
|
Impressive work
As always, impressive work and impressive write up. Looking forward to pics and the recipe.
I will need to make a new door for my trailer. Following from your comments on the weight of your door, if you were constructing a door from scratch, what materials would you use?
|
|
|
|
|
07-03-2016, 11:00 AM
|
#85
|
|
Senior Member
Name: Ellpea
Trailer: 1989 Lil Bigfoot
CA
Posts: 1,382
|
Quote:
Originally Posted by k corbin
So tomorrow maybe I should post a recipe for my special cookie dough in the food section? Wood flour and resin. Add flour until the mixture forms a soft dough. Spread with a spatula. It is a self baking recipe. Do not lick the bowl |
LOL! Sounds *delicous*!
__________________
Best,
EllPea in CA
")
|
|
|
|
|
07-03-2016, 01:24 PM
|
#86
|
|
Senior Member
Name: Kelly
Trailer: Trails West
Oregon
Posts: 3,046
|
Quote:
Originally Posted by Patricia D.
As always, impressive work and impressive write up. Looking forward to pics and the recipe.
I will need to make a new door for my trailer. Following from your comments on the weight of your door, if you were constructing a door from scratch, what materials would you use?
|
"from scratch" I don't believe that is a good way to go. You need specialized aluminum extrusions to make it work properly that are designed to have some strength. Although you might potentially get away with a Z shaped extrusion for the outer door frame and a U Channel extrusion for the door panel edge.Anyway you do have to purchase that material by the foot from a metals supplier. Typically those suppliers are not selling it at an affordable price in small quantities and unless you live in a large city you might not be able to find what you need locally. You also have to find the gasket that works with the set of extrusions you purchase. Then you need to create a panel of a thickness that fits exactly into the extrusion.
You will need to make a jig so you can assemble the extrusions perfectly squared up for the frame.
As to making the door panel it is a sandwich, a ridged foam filler with an overlay on each side. The overlay could be Filon which is a flexible fiberglass material being used as exterior flat panel coating on some trailers and motorhomes. Or you could use aluminum sheet material as an overlay. If you want a painted aluminum panel it is best to purchase one that already has a painted surface as it takes special coatings and primers to get a good paint bond on aluminum and that is much better done in a factory type application.
You will need to source hinges, screws for the hinges, a window, screen and also locks. Then you have to make the appropriate sized cutouts for the window and the lock. You will have to cut a hole in the aluminum frame extrusion for the lock plate.
All in all you can save yourself a whole lot of time, money and frustration by having a door made for you by a company that is all set up with the materials and the assembly fixtures, the cutting tools and the skilled, experienced people.
If your door is not salvageable and the budget is super tight then
it is going to be much easier to fix up a door that is having a few problems rather than to building one from scratch. Or you could find one in good shape from an RV junk yard or craigslist. If it not the perfect size check it out for the potential of cutting it down to size to fit the opening. You can make the Campster door opening several inches wider and an inch or so taller if needed.
Or you could create a lovely carved wood, Gypsy Vardo style door to fit into the opening....That could be my someday, when I am in the right mood to make it, door as I enjoy doing a bit of wood carving now and again and I do know how to make stained glass windows and have the tools for it 
|
|
|
|
|
07-03-2016, 01:50 PM
|
#87
|
|
Senior Member
Name: Kelly
Trailer: Trails West
Oregon
Posts: 3,046
|
Quote:
Originally Posted by shaggydoink
Wow Karin! I spent time reading through your project while sipping my morning coffee, what an amazing job you're doing on this Campster. You've got mad skills and a wonderful attention to detail, very impressive!
Jonathan |
Thanks Jonathan, glad it entertained you for the morning. I am enjoying your modification thread as well.
|
|
|
|
|
07-03-2016, 04:58 PM
|
#88
|
|
Senior Member
Name: Patricia
Trailer: 1975 Ventura
Ontario
Posts: 353
|
Sorry, I should have been more explicit in my question. The door frame is more or less salvageable as is the little window.
When the PO bought trailer there was no door, just a wooden screen door. He made one but it is too heavy and too thick for the frame. So far I have found one Texas company that makes custom doors but with exchange etc, it would be about $500.
I am not phased by the thought of having to make the door itself. I was not sure what to use for the skin but the fg panel sounds like it might work. Many of the products used in trailers are unfamiliar to me so it is great to have this help.
I am going to keep my little wooden screen door. It is a novelty.
I think I will leave the carving for another lifetime. I want to get on the road sometime in the fall.
|
|
|
|
|
07-03-2016, 05:06 PM
|
#89
|
|
Senior Member
Trailer: 1988 16 ft Scamp Deluxe
Posts: 25,711
|
Patricia, maybe Fredericks post will give you some ideas how to build your own door, direct link: http://www.fiberglassrv.com/forums/f...tml#post443239
Now, back to Karin's rehab....
__________________
Donna D.
Ten Forward - 2014 Escape 5.0 TA
Double Yolk - 1988 16' Scamp Deluxe
|
|
|
|
|
07-03-2016, 05:31 PM
|
#90
|
|
Senior Member
Name: Patricia
Trailer: 1975 Ventura
Ontario
Posts: 353
|
Thanks for the link, Donna. You are right, I did not mean the hijack the conversation.
|
|
|
|
|
07-03-2016, 06:22 PM
|
#91
|
|
Senior Member
Name: Roger
Trailer: Trails West Campster andTeardrop American
California
Posts: 123
|
Back from my trip, so if any photographs will help, give me a shout. Will be taking the Campster to a shop to re-install the fridge.
Good Job Karin
|
|
|
|
|
07-03-2016, 11:43 PM
|
#92
|
|
Senior Member
Name: Kelly
Trailer: Trails West
Oregon
Posts: 3,046
|

Before I put in the upright wood door frame I needed to install the new floor section that replaced the rotted area. So I mixed up some wood flour and epoxy resin. I was of course just joking yesterday about having a recipe as you just mix up some resin and then stir in wood flour until it is as thick as you need. Generally for this kind of job stir until it is about the consistency of peanut butter. If I am applying it to a vertical surface I make it a stiffer mix so it does not run down the wall. But all the work I was doing today was on a horizontal surface so peanut butter was just about right. There is a gap between the shell and the edge of the floor board I installed so I used my wood flour with resin mix to fill that up to the level of the floor board. You can see that as the lighter stripe by the edge of the opening.

The photo above is the epoxy I am using, Mas is the brand, I am using the medium hardener. The weather is in the mid 60s today so medium takes 4 to 6 hours to harden up to very firm. I do use dispensing pumps. If you have a lot of epoxy fiberglass to do they are very handy. The ratio of is 2:1 so these pumps are calibrated that one push of each creates the perfect mix. You just go back and forth between the two until you have a sufficient amount then stir it up.

So even though I now have a nicely leveled floor that goes all the way to the original level of the door frame cutout I still have problems to solve with the door installation that were created at the factory. The opening was cut to be level with the original floor however the aluminum extrusion of the threshold hits on the top of the center bumper support piece and that tips the threshold up on a slope that goes towards the interior....Oh no my cup will runneth over and will rot the floor should I leave it that way. 

There is also another problem with that threshold extrusion installation. I will have not just one but four screws loose! Look at the photo above at the screw hole that is supposed to secure the threshold in place. (actually I set the upper piece down for the photo but it is identical to the lower one) As you can see the screw holes are so low that they won't even penetrate the fiberglass of the shell due to the curvature of the shell.
The solution to my threshold issues is a simple one, I need to raise the threshold up higher by about 1/2" so the screws will have material to grip into and so that the threshold is not tipped at an angle from hitting against the surface of the bumper frame. To do this task of making a threshold I did not want to use a material such as wood as that is an area that is going to be prone to leaks and I don't want to deal with any rot under the threshold. Those corner joins in the extrusion need to have very firm support under the threshold so that they don't come apart. So wood is out, that leaves metal, plastic or fiberglass....or....or.. I could make my own threshold that will be a material that fiberglass cloth will readily stick to, that will strongly bond to the flooring, be structurally strong and it won't rot. Oh yeah, another batch of my cookie dough is just the thing I need. Look everyone, I can make my own composite lumber and it is easy to do
I had some white PVC lumber on hand that is 5/8" thick, that dimension will do nicely for the height of the threshold riser. Fiberglass does not stick very well to PVC especially when you coat the surface with some Johnson's Paste Wax. So my mold the threshold in place frame was very easy to do. I used double sided tape to stick the PVC lumber to the floor. On the outside edge I trimmed the lumber so it matched the height of the pieces on the floor and then pushed it against the shell with another piece of lumber held in place with a couple of clamps. Because my wood flour mix is quite thick it is not going to drain out of any small cracks. There might be a little squeeze out of the resin mix but it will be easy to trim off.

I mixed up my wood flour and resin batch, peanut butter thick, and dropped it into the mold using the stir stick. Just work your way across, bouncing the stick up and down a few times on the blobs you drop in to get them to spread out and completely fill out to the edges and the bottom. I have slightly over filled because I am not sure how much shrinkage might happen. Tomorrow morning I will trim it to level and flush with the top surface of the form. How I will trim it to flush depends on how hard it is in the morning. Then I can remove the mold pieces get on to the next steps in the doorway modification.
Have a great 4th of July holiday!!!
|
|
|
|
|
07-04-2016, 03:42 PM
|
#93
|
|
Senior Member
Name: Kelly
Trailer: Trails West
Oregon
Posts: 3,046
|

My molded in place DIY composite threshold is done. I have put a contrasting piece of blue tape on the floor in the photo above so it is easier to distinguish the wood colored threshold from the wood floor. I had a little more sanding than I hoped for as there was no shrinkage during curing. As you can see at the outside edge it did make a smooth transition to the outside surface of the shell. The screws that hold on the aluminum door frame will now have plenty of material to grip into. There is no flex in that threshold when you step on it ") I still have a layer of fiberglass to apply to the outside of the shell around the door frame area as there was a crack in that lower left hand corner of the entry. Well I consider that little project a success....but wait for it....we are not yet done problem solving for this area of the door way threshold, this fix on its own is not enough to solve the problems of the frame breaking apart at the corners.

So now I have yet another issue to solve before the lower aluminum extrusion can sit well supported on the threshold. This time the problem lies with the extrusion itself. Look above at the cross section photo of the extrusion. I have represented the top surface of threshold base I just created in the color blue, my DIY composite is of course thicker in section and the extrusion is formed at 90 degrees, I was photographing at an angle. The inside edge simply does not have adequate support for resting on top of the threshold base. There is only a 1/8" wide edge at the outside edge of the frame for it to be supported on. That is ridiculous because that is next to nothing for support. If anyone steps onto that edge is going to rotate downwards which puts a lot of stress on the screws just below that edge and if those give way, which over time will happen, then the joints at the corners of the frame will break and of course that will cause a leak.

Fortunately the fix is very easy to do. You just need to add a filler strip into the extrusion that is the approximate height and width of the channel under that frame piece that rest on the threshold. A piece of aluminum bar stock that is 1/4" thick and 3/4" wide is a good solution and it is easy to find at hardware stores or places such as Home Depot. Cut it to length, use a small amount of epoxy under the bar stock filler inside the extrusion channel to keep it in place when you are doing the door installation. It is hard enough to install a door without parts falling out while you are working. The door frame will be bedded onto a marine bedding compound or thin butyl tape when it is set in place so it is OK if the filler strip is a few thousandths too high or a little bit too narrow for filling up the channel.
Johnathan mentioned my having wicked skills. I think the most wicked skill that everyone needs in any kind of renovation work is to be able to do "if then thinking" as in if someone steps on the outside edge of the aluminum threshold extrusion what is going to happen?
Or another version of it is "why did that happen" as in why did the joints in the lower corners of the door frame have broken welds and why did the corners of the fiberglass shell fracture at the upper and lower corner of the door lock side of the frame. If I do not solve these underlying issues of structural support I will soon have more leaks.
Now I am ready to move forward with bonding my wood door frame in place. After that I will add more fiberglass to the outside of the shell around the doorway. Eventually there will also be a "how I will attempt to support an entry assist handle in a very thin fiberglass shell". But those are for future episodes of "Karin's Campster Renovation".
|
|
|
|
|
07-06-2016, 01:35 AM
|
#94
|
|
Senior Member
Name: Kelly
Trailer: Trails West
Oregon
Posts: 3,046
|

No I did not get the wood door frame support epoxied in place today.
I have the best excuse ever....the dog ate my last mixing container 
|
|
|
|
|
07-06-2016, 03:53 AM
|
#95
|
|
Senior Member
Name: Dave
Trailer: Casita SD17 2006 "Missing Link"
California
Posts: 3,738
|
Have not heard that since the school days. From the pic it looks like the pooch was just nibbling. Sure you weren't just taking an extra day off for the forth of July weekend .
|
|
|
|
|
07-06-2016, 08:27 AM
|
#96
|
|
Senior Member
Name: Talia
Trailer: Hunter Compact Jr.
USA
Posts: 117
|
Quote:
Originally Posted by k corbin
"from scratch" I don't believe that is a good way to go. You need specialized aluminum extrusions to make it work properly that are designed to have some strength. Although you might potentially get away with a Z shaped extrusion for the outer door frame and a U Channel extrusion for the door panel edge.Anyway you do have to purchase that material by the foot from a metals supplier. Typically those suppliers are not selling it at an affordable price in small quantities and unless you live in a large city you might not be able to find what you need locally. You also have to find the gasket that works with the set of extrusions you purchase. Then you need to create a panel of a thickness that fits exactly into the extrusion.
You will need to make a jig so you can assemble the extrusions perfectly squared up for the frame.
*snipped for brevity*
|
It's actually not as difficult as all that. People who build their own trailers make their own doors quite often with materials that are readily available from big box or hardware stores without having all the issues you mention.
|
|
|
|
|
07-06-2016, 09:48 AM
|
#97
|
|
Senior Member
Name: Roger
Trailer: Trails West Campster andTeardrop American
California
Posts: 123
|
FASCINATING
|
|
|
|
|
07-06-2016, 09:53 AM
|
#98
|
|
Senior Member
Name: Kelly
Trailer: Trails West
Oregon
Posts: 3,046
|
Quote:
Originally Posted by Talia
It's actually not as difficult as all that. People who build their own trailers make their own doors quite often with materials that are readily available from big box or hardware stores without having all the issues you mention.
|
I did say you could make it with Z shaped extrusion and U channel. I guess you missed that sentence, it was buried in the middle section. But Z channel is not a common hardware store item although you can create it from two sections of L shaped angle.
|
|
|
|
|
07-07-2016, 12:07 PM
|
#99
|
|
Senior Member
Name: Kelly
Trailer: Trails West
Oregon
Posts: 3,046
|
The mold in place composite "wood" I created for raising my threshold while a bit pricey to make has proved to be good stuff!

So today while standing above the Campster on the 2nd story building's walkway I was looking down at the rotting wood that goes around the popup and mounts the lift hardware. I had looked for structural PVC lumber (composite deck boards are not structural quality as they don't have fiberglass in them) but no one carries it and special order is expensive. So what to do if I don't want to keep having trouble with rotted popup wood
I have decided to make forms for creating my own structural composite 3/4" x 1-1/2" lumber. To create my mold I will use PVC lumber from the home center stores for the surrounds as the epoxy does not bond strongly to it and screw them to a non-stick base. Wax the form, then mix up my resin and wood flour plus some fiberglass strands and trowel it into the form. After it sets I will remove the sides, take out the lumber, put the mold back together and cast the second piece. One form for the longer length, a second form for the shorter length.
No end grain issues to worry about! Plus because it will be structural quality it will be strong enough to level and stiffen that roof edge and I can set it on a butyl rubber base. Down side .... epoxy is not inexpensive but I do have plenty of wood flour and fibers on hand and the labor cost is zero.
This is a simple enough DIY project that most anyone could manage it. But do note that I am going to be using a medium speed setting epoxy which gives me lots of working time before it sets up. So if I need to mix up a second batch to finish filling a mold section I can do so.
Rain is coming this next few days and this will make a good indoor project to do that will help speed things along when the sun comes back and I can take the top off to replace the rotted material. I will have to start the fabric part of the popup job so I can coordinate its installation. As you can see from the dirt around the popup in the photo above I also had better get some perimeter locking trim with attached bulb seal ordered to act as a water barrier when the top is in the down position.
|
|
|
|
|
07-07-2016, 12:37 PM
|
#100
|
|
Senior Member
Trailer: Trails West Campster 1970
Posts: 3,366
|
Your popup top is very different from mine (the one I lost).
|
|
|
|
|
|
|
Currently Active Users Viewing This Thread: 1 (0 members and 1 guests)
|
|
|
 Posting Rules
|
You may not post new threads
You may not post replies
You may not post attachments
You may not edit your posts
HTML code is Off
|
|
|
|
 » Recent Discussions
 |
|
|
|
|
|
|
|
|
|
|
|
|
|
|
|
|
|
|
|
|
|
|
|
|
|
|
|
|
|
|
|
|
|
» Upcoming Events |
No events scheduled in
the next 465 days.
|
|


 1971 Trails West Campster
 Outbacker
 1970 Trails West Campster
 2011 Escape 15A
 Linear Mode


