 |
|
 07-17-2016, 08:05 PM
|
#121
|
|
Member
Name: Jeanne
Trailer: Burro
North Carolina
Posts: 48
|
Karin, do you use a block to sand the ceiling with? I've got limited strength in one of my shoulders and am looking for the easiest way to remove liquid nails from the ceiling.
Love all of your creative way of doing things. I look forward to your updates.
Jeanne
|

|

|
|
07-17-2016, 09:56 PM
|
#122
|
|
Senior Member
Name: Kelly
Trailer: Trails West
Oregon
Posts: 3,046
|
Quote:
Originally Posted by Jeanne D. in ca

Karin, do you use a block to sand the ceiling with? I've got limited strength in one of my shoulders and am looking for the easiest way to remove liquid nails from the ceiling.
Love all of your creative way of doing things. I look forward to your updates.
Jeanne
|
No block, the ceiling is not very flat so a block would just do a lot of hit and miss. But that is for old dried contact cement which is pretty easy to take off.
Liquid nails is a whole other ball game and I can't give accurate advice on something I have never done which is take liquid nails off of the inner surface of gunned fiberglass. i suggest you post that question in the owner helping owners section as it is might apply to all kinds of trailers. But it does not apply to my remodel. I feel fortunate there were very few owner modifications done. The worst thing they did is put silicone around windows.
|
|
|
|
|
07-18-2016, 06:29 PM
|
#123
|
|
Senior Member
Name: Kelly
Trailer: Trails West
Oregon
Posts: 3,046
|
Working on my pop up top this week. It is down from the roof and lying upside down on a table. I had to replace all of the wood that was against the roof as it was badly rotted. I wanted to make my own composite wood and it was easy to cast but turned out to be too heat sensitive when I really needed it to be very stable. So I cut new wood pieces from an IPE deck board material. IPE is a very hard and oily wood, sometimes called poor man's teak. It should last a a very long time. (Yes all you worry warts types I already know all the precautions for safety and tool use for that species of wood). I won't try to paint the IPE as it does not take paint well because of the high oil content. It will eventually turn a dark grey which will look just fine with my color scheme. The IPE will not be touching the aluminum pieces ofthe track rail and all the fasteners that do touch it are stainless steel so there won't be any corrosion issue with the metals.
Fortunately all of the wood framing pieces that are directly against the underside of the fiberglass top are in sound condition with no rot on them. So I will just put a fresh coat of paint on them.

Before removing the top I secured it in the open position so it would be easy to adjust and install the new fabric with it in that position while it was out on the table top. To brace it in that position on each of the two sides I took four pieces of plywood. Two on each side of the two braces. Then I screwed them together. At the moment I have taken off the springs and taken out all the old rusted fasteners so much of the mechanism is now disassembled. But when I want to reassemble everything it will go back together into the same exact position because of those plywood plates. Except I will have to turn those screws around to face the outside, oh well. My pitiful excuse for putting them in on the wrong side to start with is there was no one around to help bring the big heavy wood ladder down the stairs and I was too impatient to wait for the help with it.
Today I brushed rust off the steel pieces such as the springs and some other fittings and coated them wit Ospho which is a product that converts the rust from iron oxide into iron phospate. If you want to know more about what Ospho is just click the blue link on its name. Tomorrow I will paint those metal pieces to protect them and of course that will make them look much nicer. They will get put back together with new stainless steel fasteners.
But before I put things back together I am going to paint the fiberglass with primer and also put my new color scheme on it.
It is a slightly rainy evening so I am going to cut my fabric and start sewing the new canvas. I have my measured plan ready for cutting. Now if I can find where I stashed the fabric I bought a few weeks ago 

|
|
|
|
|
07-19-2016, 01:33 PM
|
#124
|
|
Senior Member
Name: Kelly
Trailer: Trails West
Oregon
Posts: 3,046
|
Bent pop top lift arm

The pair of lift arms on the pop top were considerably bent on one side of my pop top. Fortunately the other side was still in good shape so at least I knew how they are supposed to look. You can see in the photo above a good arm lift lying next to a damaged one. The blue tape at the end is just holding some bushings that belong in the holes at the end in place so I don't loose them and wonder where they belonged...senior brains need that kind of help ")

I have now managed to get those damaged arms straight using the bow method of placing blocks underneath and using a good strong clamp to pull it back to being straight.
Of course the problem could happen all over again if I don't remember to put my hands on both handles in the pop top roof when lifting and lowering the roof so that it goes up and down straight. I guess I should create a warning sign-plate to paste onto the ceiling to remind myself and others of the folly of not paying attention to how we do things.
A while back someone asked the question of what material was on the inside surface of the popup top. On my Campster is is 1/4" thick, 3 layer plywood with a piece of white vinyl on the finished surface. Even after 45 years time it is still in perfect shape so I will leave it be. My aluminum handles used for raising and lowering the top are still firmly attached so I will just polish up the metal and leave them be as well.
The Jeep hood, hold down, latches that secure the top in position when closed were quite rusty so I ordered 4 more of them and they arrived yesterday.
When the pop top was removed my roof sprang back up to the proper level. I will take advantage of it being off to figure out how tall my upright post for bracing at the ends of the cabinets should be. That will be done by clamping some square tubing against the long sides on the underside of the roof opening to hold it nice and straight. I will also be sighting along it from outside. That way I will know what adjustments to make so I can get an accurate measurement from the floor to the underside of the ceiling for the height of my post and beam setup. It will be better to install those new supports before the pop top goes back into place so I am not trying to fight the weight of it while installing the posts and beam bracing. My seating base and kitchen cabinets will tie into that structure so I do need to make sure it is all squared up. But that is just thinking ahead and will be shown in another episode of Karin's Old Campster. I guess that means I have some cabinet framing decisions to make in the next couple of days.
|
|
|
|
|
07-24-2016, 10:07 PM
|
#125
|
|
Senior Member
Name: Kelly
Trailer: Trails West
Oregon
Posts: 3,046
|
I finished painting the roof section of the pop up today. New color scheme of red with black trim to match my Honda Element. I am using marine paints. The primer the store recommended is hideous to work with, too thick and sets up too fast. I don't need a high build primer and I don't want to spend my time sanding it even. Even thinning and adding Penetrol did not help. All I can say is I am glad it is way up top where the brush marks won't bug me.
Fortunately the red paint is OK to work with as is the black. So tomorrow I will take back the other quarts of primer and go find some XIM brand primer which I much prefer working with.
This afternoon I decided to get serious about taking off the original color stripes on the sides of the Campster. At first I though they were vinyl so I tried the pin stripe eraser with no success. Then I got out the heat gun. It turns out there was as very thin vinyl pin stripe outlining a wide painted stripe. So it was a two step process. Heat gun to help release the pin stripe followed by sanding off the colored paint stripe. I almost got the job done but quit around 6:30pm to give the Condo neighbors a quiet Sunday evening dinner time out on their balconies with a nice view of the water. Besides by that point in time my hands were tingling from using the random orbital sander and my back was also saying it was quitting time.
By the end of this week I want to have the new canvas done, the roof painted and the pop top reinstalled. Then I have two windows to pull out and rehabilitate and finish up putting filler into the chips, gel coat cracks etc. Someday I will get the outside painted. That will feel like I am really on the home stretch! Of course I won't have an interior in it yet but that is the easy part to do. At least I will no longer get covered with fiberglass dust.
|
|
|
|
|
07-25-2016, 06:43 PM
|
#126
|
|
Senior Member
Name: Kelly
Trailer: Trails West
Oregon
Posts: 3,046
|
Took the Dremel motor with a fibered cutoff wheel to the fasteners on the original water fill fittings as well as the original sink drain and vent. No choice but to take off the heads of the fasteners as they were so corroded that even vice grips could not be used on them.
Now that I have all that old worn out and leaky junk removed I have decided to patch in those holes and upgrade. First of all I will put in a small holding tank under the sink, I can make it removable or have a drain. Before the sink drained only to the outside and you could put a portable container under it. But that just makes for yet another setup and break down chore and there are already enough of those things to do.
While it is rare there have been some incidents I have heard of with people putting "stuff" into peoples water fillers. I have seen a version with a locking door that contains both a gravity fill and a city water fill. I think I might go that way instead. I can get it in black for $20.00 on Ebay. It will really clean up the look of the outside and there won't be any protruding pieces to get knocked into.
Good thing I saved back some of the old fiberglass from the kitchen counter. I can take a hole saw to it and that will create my filler pieces to patch up the 4 round holes left by the various tubes that went through the shell. I will do that in the next couple of days.
|
|
|
|
|
07-26-2016, 05:34 PM
|
#127
|
|
Senior Member
Name: Ellpea
Trailer: 1989 Lil Bigfoot
CA
Posts: 1,382
|
Karin's aluminum cabinet frames
Quote:
Originally Posted by k corbin
...
For structural framing of the lower cabinets I will be using aluminum angles. While it does cost more than using wood the build goes faster and it is lighter and stronger too. The aluminum flexes well with the movement of an RV without falling apart versus wood cabinets that are screwed and stapled together. I have used that type of framing in my Sunrader remodel. ...

 |
Karin, I've been very interested to see how you proceed with your cabinets. I know you're still busy with your other tasks, but would love to see more about how you finish these out, if you have other photos and time to give more info. 
(I realize that would probably be a new thread!)
__________________
Best,
EllPea in CA
")
|
|
|
|
|
07-26-2016, 08:44 PM
|
#128
|
|
Senior Member
Name: Kelly
Trailer: Trails West
Oregon
Posts: 3,046
|
Quote:
Originally Posted by Ellpea in CA
Karin, I've been very interested to see how you proceed with your cabinets. I know you're still busy with your other tasks, but would love to see more about how you finish these out, if you have other photos and time to give more info.
(I realize that would probably be a new thread!) |
It will only be a few more days before I start putting in some aluminum framing. 
It won't be a new thread, I will post it on this one.
|
|
|
|
|
07-28-2016, 02:01 AM
|
#129
|
|
Senior Member
Name: Kelly
Trailer: Trails West
Oregon
Posts: 3,046
|
flling round holes
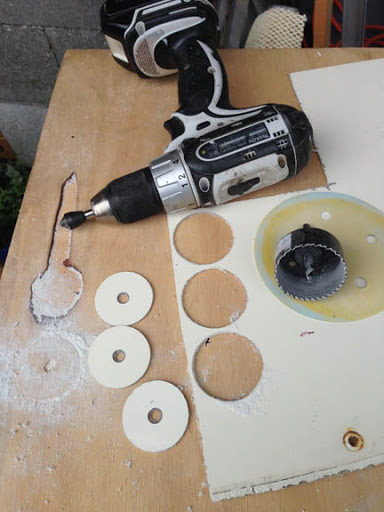
Time to fill up those old plumbing inlet and outlet holes. I used a 2-1/8" hole saw and cut some disc out of the fiberglass scrap I saved from my original kitchen counter in the Campster. Looks like I am making donuts. There is even flour on the cutting board.

I took advantage of the center hole for securing them to a waxed backer board. The backer goes on the outside of the shell and then I take advantage of the screw holes that secured the original inlet and outlet fittings to run a screw through on into the backer board so I could pull it tight against the shell. Then working from the inside I forced some epoxy putty into the small crack between the hole and the plugs I made. Let the epoxy harden, then removed the backer board. Next I filled in the little gaps and the screw holes from the outside. Let the epoxy cure then back to the inside where I sanded the surface flush and applied two layers of fiberglass cloth across the repaired area. Always a lot of drying time but that is not a problem as my list of work is plenty long and there are other things to do while I wait for the cure.

Back to the outside where I sanded things flush then used some epoxy with micro balloons to make a lightweight filler to smooth over the repair area. Let dry and sand flush. All filled up nice and smooth and strong. Ready for priming and painting when I get to that stage of the renovation.
I also started on my pop-top fabric this week.

My sewing skills are a little rusty, my stitch lines are not perfection but each zipper I put in is just a bit better than the one before it. No big deal anyway as the screens and the zipper flaps will cover up those little wobbles in the zipper stitch lines. Fortunately I learned to sew when I was very young as my mother was a pro. I can't say as I enjoy sewing, used to love it in my teens and twenties but that was a long time ago. But it is a good skill to have.

I will get some more time in on sewing the pop up canvas this week along with getting the lift framing and mechanism back together. Plus things like sanding, priming and maybe even working on the other two window restorations.
When I woke up this morning I though of a simple latch mechanism for the windows that will be easy to employ. We will see how that goes, I need to dig though my hardware junk box to see if I have the needed pieces to make it or if I will need to put those pieces on my list for the next hardware store run.
|
|
|
|
|
07-29-2016, 05:24 PM
|
#130
|
|
Senior Member
Name: Jonathan
Trailer: 1991 16' Casita
North Carolina
Posts: 178
|
Mad skills Karin, simply mad skills!! 
Jonathan
|
|
|
|
|
07-29-2016, 11:54 PM
|
#131
|
|
Senior Member
Name: Kelly
Trailer: Trails West
Oregon
Posts: 3,046
|
Quote:
Originally Posted by shaggydoink
Mad skills Karin, simply mad skills!!
Jonathan |
Mad as in crazy, 
My friend's sewing machine is frustrating. Why oh why didn't I order the heavy thread bobbin for my machine? Oh yeah, because they want $65.00 for it. But now I realize it would have made that big of a difference in how the final project will look. My machine predates the ones full of plastic parts that let the needle wander back and forth instead of making a straight stitching line. I bought it new in 1971, but it weighs a ton so not a very portable portable for a person with weight lifting limitations.
Well at least the popup is not going to fall apart and it is installed way up there where no one is going to get a close look at it.
I am using 10 year life, vinyl coated polyester noseem screening in it. That should hold up for a very long time as it won't see constant UV exposure. This type of screening is a much better choice for the trailer than the traditional fiberglass screen which is only rated to last a couple of years. Not only is the UV resistance superior it is also a lot stronger and more resistant to punctures and pet damage. I got a roll of it from Lowes. There is plenty for the popup, the entry door and the windows too. Plus hopefully some extra for making a small zippered wall, entry room canopy with screened window openings.
|
|
|
|
|
07-30-2016, 07:10 PM
|
#132
|
|
Senior Member
Name: Kelly
Trailer: Trails West
Oregon
Posts: 3,046
|
I had applied some primer on the exterior yesterday evening. Had to work quickly as it starts kicking off as you are spreading it out. So today I went to sand with my power sander and it started taking off the primer, instantly loading up the sandpaper. I thought, oh no I am in a primer hell zone, this is impossilble even hand sanding was doing that kind of thing. Then it clicked...try wet sanding. Sure enough that is what was needed.
Can anyone explain to me why that information is not part of the instruction label? Everyone has to do at least some sanding on a project. Not everyone who is going to buy primer is experienced with that particular product. Fortunately I had some sand paper on hand that holds up to wet sanding. Being a warm day I did not mind getting wet. I just had the hose handy with a spray nozzle and also a bucket of water for dipping the sand paper into. That kept the paint buildup rinsed off as I was working. It is going to be quite the workout to hand sand the whole trailer but if that is what must be then that is what will happen.
Campsters do not have flat walls so hand sanding with loose sheets does seem to work better than any other method of sanding including sponge sanders. Your fingers give you a much better feel of the surface without a backer pad but I did get a blister on the pad of my right hand index finger. No pain, no gain??? 
I did go out and buy spray can versions of the primer for the second coat of primer. I will still have to do a light sanding but it will only take a fraction of the time versus getting out overlap brush marks. I am glad I did not have wet paint on this morning as the wind kicked up and blew grit all over the place. Being next to the beach means mornings and evenings can be rather breezy which is nice but not always what is wanted. But it pleased all the sailers who were out racing their boats.
Of course I would much prefer to take it to a shop for a paint job but that is not in the budget.
|
|
|
|
|
08-01-2016, 11:40 PM
|
#133
|
|
Senior Member
Name: Kelly
Trailer: Trails West
Oregon
Posts: 3,046
|

I pulled the front window out yesterday so I could get primer onto that side of the trailer and also because it needed rehabilitation. It has been leaking for a lot of years. The frame, vinyl seal and onto the glass was slathered with silicone but of course it still leaked. The putty tape had failed all along the edges as well.
Having been a professional assembler and fixer of many things my mind is always looking for the "why did that happen" solutions to issues.
Of course I do know that with windows on the slants created by the shape of the shell it can cause the channels in the windows to fill up fairly high compared to an RV that has straight up and down walls. Also on a lot of the fixed pane windows they don't put drain slots into the exterior of the outside channel. The combination of those two things can make the water flow over into the interior channel. But this window had another factor that made that even more of an exaggerated issue. When they formed the radius corners of the window at the lower bottom edge the channel was overly wide and not tight against the glass on the inside or the outside. It is always going to be a little wider from the bending process at those corners but this one particular corner was another 1/16" wider than the others on the inside of the window and that is where the water was spilling over to the interior.
So I scraped and scrubbed for ages getting the silicone off. Then I installed a brand new vinyl replacement seal around the glass on the outside. I also cut 3 slots for weep holes to the exterior surface of the window frame using my Dremel motor with a fiber reinforced cut off wheel. But I also wanted to address that issue of an overly wide gap between the glass and the frame at that lower edge on the inside of the window to keep water from spilling over to the inside should the seals leak and the weep holes get clogged. The concept it is will be forced to overflow to the exterior because it can't get out on the interior. It had to be solved or else trouble was bound to come again at some point in time as the seal aged. Those aluminum window extrusions are designed so that the fin that goes against the inside of the glass is fractionally taller than the fin on the exterior side but because they are sitting on a slant in molded fiberglass trailers and RVs that fractional difference is not quite enough due to the slope and the inside fin can then be functionally shorter than the outside one. Hence all the issues of water spilling over into the interior that we see on the window lower channels.
As there had been silicone applied in that area where the frame gaped from the glass I would not have been able to solve the issue with caulk as it would not stick to the residue of silicone that has entered the pores of the aluminum. The gap was a little to narrow to force butyl tape into it. Window glazing putty sets up hard and RVs need flexible putty. So I finally decided to use another kind of putty I have on hand that could be pushed into the gap but would remain flexible and water proof as well. Plumber's putty!!! It worked great and the water testing proved it. It is only a slightly outside the box solution and one that is reversible if needed.

I also needed to make some blocking to put behind the clamp ring so pressure would be applied to draw the frame tight to the exterior of the shell. For that blocking I used some PVC lumber as it will not rot should a leak around the window occur. I found some 1-1/2" wide by 1/4" thick PVC material at Lowes. It is just wide enough to cut radius corner segments from and when cut down the center on the table saw it is the right width for the straight sections. My little bandsaw was handy for cutting the radius corners. The pattern for the corners was traced directly from the clamp ring. There are alternatives to plywood for making clamp ring blocking and this method is one of them.
|
|
|
|
|
08-03-2016, 11:49 PM
|
#134
|
|
Senior Member
Name: Kelly
Trailer: Trails West
Oregon
Posts: 3,046
|
Worked on the pop top canvas project last night and finished all of the sewing for it this morning except the two seams. I won't do those until I do a check fit for the exact length by installing the panels and then pinning it exactly where the seams will be. I left an extra inch or so at the ends for adjustment just in case.
My back is not the best so doing a lot of sitting at a sewing machine set it off. Too much forward bending in my upper back can pinch a nerve that controls the acid to my stomach and gives me a severe nausea attack and that is what happened. So I gave up and slept a lot of the day away. But this evening I felt better and had help so I pulled out the sliding window unit that still needed rebuilding and got started with cleaning it up. What a mess, filth, dirt, old putty, silicone, etc. I will have to take the rivets out of the frame so I can remove the panes and replace the felt. At least this time around I know what it is that I will need to do and have the parts on hand to do it with including some of the new seals.
So a short work day split into two sessions but despite the issue of having to spend a lot of hours lying down I actually made important progress.
Before the window goes back in place I will need to clean and put primer onto that side of the trailer. I decided to tackle the primer job one side at a time as that is a full days work for me to get it all done.
|
|
|
|
|
08-07-2016, 12:20 AM
|
#135
|
|
Senior Member
Name: Kelly
Trailer: Trails West
Oregon
Posts: 3,046
|
Yeah no more leaks from windows! They all passed the drench with water test. The sliders slide, they even have handles on them! I have not fitted them with locks yet, I will save that for a rainy day project. Renovation of the second sliding window went faster than the first since I knew what to do. The rivets need to be removed to take the glass out so the felt sliding gasket can be replaced. But the nozzle of the pull riveter is too wide to put new rivets back into the frame. So you will need to buy or make a small diameter 3/8" long spacer to slide onto the pin of the rivet against the end of the puller thereby extending a narrower profile nose on the rivet puller. Fortunately the puller could still get a grip on the pin with that narrowed nose extender. Where there is a will there might just be a way to make the seemingly impossible possible I used 1/8" diameter, 1/8" grip length stainless steel rivets. They were in the bins of loose fasteners at the hardware store. The head of the rivet goes on the outside of the frame. On the inside after the rivet is pulled I used a Dremel motor to trim the length of the pulled end shorter so that it does not push out the felted slider gasket so much. They are very strong rivets so you can get away with trimming those tails a little shorter.
I took the covers off my tail lights to remove them for painting the shell and discovered a lot of corrosion on the bulb fittings. Enough so that it was not worth the labor time and cost for new fittings to fix them up. So I took a run to the RV parts store today and found some brand new ones of a similar size.
Whoever installed the old lights put a ton of silicone behind the lights so I had to get a long carving knife and work it between the fixture and the shell to cut through the silicone. Then of course scrape and scrape it off, then sand down the surface to get all the residue gone on both inside and outside. Fill in all the holes with epoxy putty. Add more fiberglass cloth on the interior to back up the putty filler. Then touch up the outside with some lightweight epoxy filler, sand smooth and now I can finally put some primer on the shell. Good grief, hours of time and a good sized chunk of change spent just to try to remove the tail lights so I could primer behind the lights.
Getting ready to put the canvas into the pop up. I painted the underside of the pop up lid today. Such a cheerful color of red .
At least I had orders for some of the tiny cardstock village kits I sell to cover the cost of new tail lights. Tiny travel trailer renovation funded by tiny buildings. But I do have to get busy designing this years new set so I can finish the trailer project as there are still a lot of items needed for the interior renovation. It takes a village to raise a trailer 

|
|
|
|
|
08-07-2016, 06:13 AM
|
#136
|
|
Senior Member
Name: Jonathan
Trailer: 1991 16' Casita
North Carolina
Posts: 178
|
Quote:
Originally Posted by k corbin
Good grief, hours of time and a good sized chunk of change spent just to try to remove the tail lights so I could primer behind the lights.
|
Ugh, I feel you on this!!
Your tiny villages are absolutely incredible, you are filled with many gifts KC!
Jonathan
|
|
|
|
|
08-15-2016, 11:25 PM
|
#137
|
|
Senior Member
Name: Kelly
Trailer: Trails West
Oregon
Posts: 3,046
|
I have not been doing much photography this week but I will take a couple of photos tomorrow after some color goes onto the lower half of the trailer. Priming and sanding does not look very exciting and it is certainly not interesting work to do either. Ran out of primer on Saturday afternoon, that was dumb of me as the paint stores that sell what I am using are not open on Sunday. So this morning it was an early run to the store. Fortunately I was able to get some spray painting done today as the parking lot was partially empty with a lot of people gone on vacations at the various businesses that are here.
Lots of questions while I am working out there where everyone can walk by me ....oh I like the white color to which I reply that is the primer, it won't be white for very long. Then this evening when I got some black on the lower part it was...oh that is going to be too hot to which I reply only the lower part is black. One neighbor said...you must have gotten that black color at the bottom idea from the RV up on the hill. To which I reply I got the idea from my car, it is a matching color scheme.
But the best question of the evening was...I have an good quality airless sprayer, would you like to borrow it to paint the upper part? To which I responded, oh thank you, yes I would like that very much!!!
Hopefully this weekend will be sunny without wind so I can get around to painting that upper half. I want to get the exterior done and over with, I am really tired of that part of the project.
The odds and ends of parts that go on the exterior are rolling in. I buy them as I can with the money from the miniature buildings. This last couple of weeks it was the bulb seal gasket for the pop up top lower edge, a new electrical 30 amp inlet, a drip cap for over the door, a piece of awning rail which will also go over the door and of course cans of paint and lots of various fasteners as well as the new tail lights.
I did finish sewing the canvas for the pop up Not a stitch perfect job but overall it looks very nice. I want to put some insulation against the underside of the popup roof while I still have it lying flat on the table but I need to purchase a piece of landau, closed cell foam for that. It is similar to ensolite but not as dense. I will glue marine vinyl to the foam for a finished surface. I also need to purchase a couple of 1/2" thick spacers to put under the handles for the top to compensate for the thickness of that insulation. Everyday I seem to need some small item or another from the hardware store, that situation will no doubt continue on for a while longer as I still have the interior to put together.
|
|
|
|
|
08-16-2016, 01:09 PM
|
#138
|
|
Senior Member
Name: Ellpea
Trailer: 1989 Lil Bigfoot
CA
Posts: 1,382
|
Quote:
Originally Posted by k corbin
It will only be a few more days before I start putting in some aluminum framing.
It won't be a new thread, I will post it on this one. |
Are we there yet? Are we there yet?
__________________
Best,
EllPea in CA
|
|
|
|
|
08-16-2016, 02:48 PM
|
#139
|
|
Senior Member
Name: Kelly
Trailer: Trails West
Oregon
Posts: 3,046
|
Quote:
Originally Posted by Ellpea in CA
Are we there yet? Are we there yet? |
I will get there when I get there. I am busy with painting the exterior and fixing the pop up area while we have some dry weather. The interior work is not weather dependent.
I am sorry if the sunshine is interfering with your schedule but I did already explain how the cabinet framing is done. So go back and read that posting. I don't see why anyone needs extensive instruction for how to rivet one piece of aluminum angle to another. It is basic stick building. Look at the photos I posted and you can see how it is done.
|
|
|
|
|
08-16-2016, 02:52 PM
|
#140
|
|
Senior Member
Trailer: 1988 16 ft Scamp Deluxe
Posts: 25,711
|
Quote:
Originally Posted by k corbin
This kind of build is so basic you don't need any extensive DIY instructions.
|
Says you because you have mad skills 
You've never seen me operate a saw 
__________________
Donna D.
Ten Forward - 2014 Escape 5.0 TA
Double Yolk - 1988 16' Scamp Deluxe
|
|
|
|
|
|
|
Currently Active Users Viewing This Thread: 1 (0 members and 1 guests)
|
|
|
 Posting Rules
|
You may not post new threads
You may not post replies
You may not post attachments
You may not edit your posts
HTML code is Off
|
|
|
|
 » Recent Discussions
 |
|
|
|
|
|
|
|
|
|
|
|
|
|
|
|
|
|
|
|
|
|
|
|
|
|
|
|
|
|
|
|
|
|
» Upcoming Events |
No events scheduled in
the next 465 days.
|
|


 Linear Mode


