 |
|
 06-29-2019, 08:14 AM
|
#41
|
|
Senior Member
Name: Steve
Trailer: 2018, 21ft escape 2019 Ram 1500 Laramie
NW Wisconsin
Posts: 4,500
|
Quote:
Originally Posted by ZachO

Thanks Jon. So I guess maybe conduit is the way to go after all.
Any insight into why solar power wires are always black? These systems are of course always installed outside, and heat, to some extent, is the enemy. So why black wire??
Anyway. Hiding the black wire under white conduit is probably a pretty good idea. |
Wiring is required to be suitable for the location wet , damp , underground , exposed to sunlight , temperature , subject to physical damage , ETC
Solar wire is rated for outdoor use in direct sunlight so it it has to be UV resistant
Black has the best UV resistance
|

|

|
|
06-29-2019, 08:56 AM
|
#42
|
|
Moderator
Trailer: 2009 19 ft Escape / 2009 Honda Pilot
Posts: 6,229
|
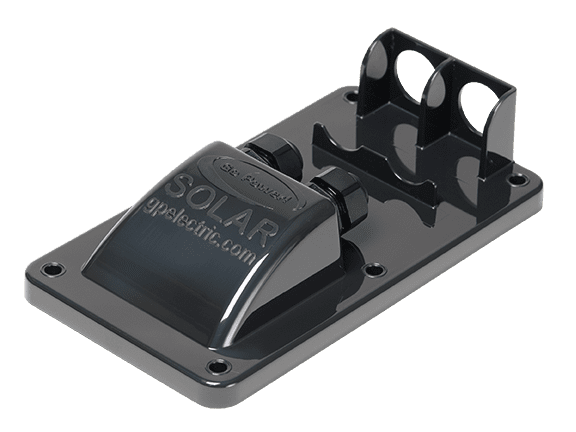
I used this Go Power cable entry plate on the roof of my trailer. A great to use unit, seals very well, and has two MC4 entries if you want to connect two solar panels without other connectors of the roof. Comes with a really heavy #10 wires for connecting to the solar controller.
https://gpelectric.com/products/cable-entry-plate/
__________________
2017 Escape 5.0 TA
2015 Ford F150 Lariat 3.5L EcoBoost
2009 Escape 19 (previous)
Most folks are about as happy as they make up their minds to be. Abraham Lincoln
|
|
|
|
|
07-05-2019, 12:47 AM
|
#43
|
|
Senior Member
Name: Elliott
Trailer: Bigfoot
Everywhere
Posts: 462
|
Quote:
Originally Posted by Josh and Sonya W
I had a 320 watt Panasonic solar panel mounted on our 25RQ last year. The wires were run through the fridge vent into the controller mounted on the wall adjacent to the fridge. I'm not saying this is right, but the system seems to be working fine. |
I'm looking at getting a Bigfoot and having a lot of solar installed on it. Where on the roof did you mount it? It seemed like unless the skylight or TV antenna's removed, there's not really space for something that big.
|
|
|
|
|
07-05-2019, 01:10 AM
|
#44
|
|
Senior Member
Name: John
Trailer: Escape 21, behind an '02 F250 7.3 diesel tug
Mid Left Coast
Posts: 2,941
|
I'd be perfectly happy with a trailer that had neither skylight, nor TV antennas. in fact, a skylight might be a big negative if it can't be completely blacked out so I could sleep in til noonish after staying up til 5am at an astronomy event.
|
|
|
|
|
07-05-2019, 01:26 AM
|
#45
|
|
Senior Member
Name: Elliott
Trailer: Bigfoot
Everywhere
Posts: 462
|
Quote:
Originally Posted by John in Santa Cruz
I'd be perfectly happy with a trailer that had neither skylight, nor TV antennas. in fact, a skylight might be a big negative if it can't be completely blacked out so I could sleep in til noonish after staying up til 5am at an astronomy event.
|
Absolutely. Unfortunately, finding a Bigfoot without antennas is rare and without the skylight would be a custom order with a 6-month wait if it's even possible. I'm tempted to just wait the 6 months, but I'll probably just lay the solar out around the antennas and skylight, possibly having a boat shop remove the TV antenna in the future for a 4th 180W panel.
|
|
|
|
|
07-05-2019, 02:21 AM
|
#46
|
|
Senior Member
Name: John
Trailer: Escape 21, behind an '02 F250 7.3 diesel tug
Mid Left Coast
Posts: 2,941
|
an antenna should be trivial to remove... and maybe you can use the hole the antenna cable goes thorugh to feed your solar cables... I would use a 'marine gland' or two to feed the heavy gauge solar wires through my fiberglass shell. these make totally waterproof seals for wires through a fiberglass hull.
like this...
|
|
|
|
|
07-05-2019, 02:29 AM
|
#47
|
|
Senior Member
Name: Elliott
Trailer: Bigfoot
Everywhere
Posts: 462
|
Very easy to remove, yeah, but it's one of those crank-up models so the hole left behind is pretty substantial. I could probably have some sort of cover plate bolted on in place of it, but I'd rather fill in with some variety of foam and fiberglass over the top so both the insulation and the "no leaky holes" properties of the Bigfoot are preserved.
In terms of wiring, there's already solar wired for a single panel on the new ones, though the controller location's a bit inconvenient and will probably have to change.
|
|
|
|
|
07-05-2019, 03:36 AM
|
#48
|
|
Senior Member
Name: John
Trailer: Escape 21, behind an '02 F250 7.3 diesel tug
Mid Left Coast
Posts: 2,941
|
the marine suppliers have a wide range of 'deck plates' to fill round holes in fiberglass...
or yeah, just patch it with glass but then you have to sand it down, glass it , then gelcoat the patch if you want it to look good.
|
|
|
|
|
07-10-2019, 07:37 AM
|
#49
|
|
Senior Member
Name: Z
Trailer: Sasquatch
Montana
Posts: 2,556
|
Ok, I understand the wisdom of using this hatch, but now instead of one hole to run a wire, I'm drilling 6 holes and need them to tighten enough to form a seal. I assume that around the roof vents there's a wooden frame to drill into.

Without that wood, will the fiberglass and insulation be enough for this thing? Hopefully I'll get to this starting today or tomorrow. I'll start a new thread...
|
|
|
|
|
07-10-2019, 08:42 AM
|
#50
|
|
Senior Member
Name: Francois
Trailer: Bigfoot
British Columbia
Posts: 1,163
|
in the roof....
this is what you'll find in your roof....
(pic taken in bathroom, interior vent trim removed.....97 BF 17 C ")
FWIW...I think that "plate" thing is overkill...but that's just me
Sikkaflex (?) is wonderful stuff...it keeps expanding for a while AFTER everything is tightened down....and stays flexible forever
|
|
|
|
|
07-10-2019, 09:15 AM
|
#51
|
|
Moderator
Trailer: 2009 19 ft Escape / 2009 Honda Pilot
Posts: 6,229
|
Quote:
Originally Posted by ZachO
Ok, I understand the wisdom of using this hatch, but now instead of one hole to run a wire, I'm drilling 6 holes and need them to tighten enough to form a seal. I assume that around the roof vents there's a wooden frame to drill into.
Attachment 130263
Without that wood, will the fiberglass and insulation be enough for this thing? Hopefully I'll get to this starting today or tomorrow. I'll start a new thread... |
I did all the splicing on the roof with MC4 connectors and added two to the leads to plug into the port. I installed mine with large machine screws with washers on the inside (it was in an unseen place above my fridge), butyl tape under the port, then sealed the rivets and edge with Dicor Roof Sealant. 2 1/2 years later it is just like new.
__________________
2017 Escape 5.0 TA
2015 Ford F150 Lariat 3.5L EcoBoost
2009 Escape 19 (previous)
Most folks are about as happy as they make up their minds to be. Abraham Lincoln
|
|
|
|
|
07-11-2019, 12:10 PM
|
#52
|
|
Senior Member
Name: Z
Trailer: Sasquatch
Montana
Posts: 2,556
|
Seeing as this hatch weighs nothing, doesn't need to hold anything down, and has very little wind resistance, does anyone see an issue with using an adhesive around the surface, rather than bolts? I'm feeling less and less inclined to drill 6 holes all the way through the roof with washers and nuts on my ceiling.
|
|
|
|
|
07-11-2019, 12:24 PM
|
#53
|
|
Senior Member
Name: JD
Trailer: Scamp 16 Modified (BIGLY)
Florida
Posts: 2,445
|
Use 3M 5200 adhesive and use a weight to hold it in place for a few days and you will be OK. Probably.
|
|
|
|
|
07-11-2019, 12:31 PM
|
#54
|
|
Senior Member
Name: Z
Trailer: Sasquatch
Montana
Posts: 2,556
|
Thanks.
If I can trust my solar panels to stay put with VHB tape, I figure there's no reason I can't trust something like this, too, which will have no wind under it.
|
|
|
|
|
07-11-2019, 04:25 PM
|
#55
|
|
Senior Member
Name: Z
Trailer: Sasquatch
Montana
Posts: 2,556
|
Here's where it's at. I looked at my roof for a while to decide where to put it. The panel is really light, but I still don't want to add any weight to the front of the roof, where it's slightly sagged and wavy. I think where I've got it on the back works, and allows a lot more space for future panels if I need them.
 
I think if I had to do it again, I'd use the Renogy mounts instead of the AM Solar mounts. More surface area, and the little tabs keep them flush. The AM Solar mounts already had the VHB tape, otherwise I wouldn't have used them. Their more than adequate, but I like more surface area, and they were hard to keep straight while I tightened the bolts.
Renogy mounts

This is what the AM Solar instructions said

High strength tape does no good if the surface it's stuck to isn't stable.
I washed the mounting area with soapy water, let it dry completely, then lightly sanded it with 320 grit sandpaper, wiped with a wet rag, let dry, then wiped with rubbing alcohol. I got the panel attached, and the tape is strong. I thought I'd do one foot at a time, but as soon as I stuck one foot on, I realized that was a bad idea. Hard to get the tape off the other feet once the thing is stuck down. Tried pretty hard to pull the first foot off about 2 seconds after sticking it down. No luck. So I had enough space with just the one foot stuck, to get the other three exposed and stuck. Then I went over them with Sikaflex. Pulling up on the panels, they don't budge. I don't see the fiberglass flexing as I pull, and there is no give. It's pretty solid.
 

Drilled holes up in the front corner of the camper, closest to the power center and battery. Inside a cupboard. It's dark and I didn't use a flash...
 
For the hatch, I used a marine JB Weld, and I'm going to go over it either with Sikaflex or Eternabond tape. Right now I've got my bag of tools sitting on it while the epoxy cures.
I need to neatly route the wires along the roof with something, and down through the camper interior to the charge controller, which I still need to install. But the panels are on the roof, out of my way, and the roof is sealed from rain. So for today I've done enough.
|
|
|
|
|
07-12-2019, 04:40 PM
|
#56
|
|
Senior Member
Name: Z
Trailer: Sasquatch
Montana
Posts: 2,556
|
I ended up buying this. Depending on how the cable entry looks, and whether the hatch I bought will ever come off my roof, I might switch them out. There were no instructions with the Go Power cable hatch. As I was pulling the wires through, it got harder and harder to pull. It eventually got easier...and a chunk of rubber pulled through with the cable. I'm assuming that chunk of rubber is part of what made the hatch waterproof. Oops.
|
|
|
|
|
07-12-2019, 05:04 PM
|
#57
|
|
Senior Member
Name: John
Trailer: Escape 21, behind an '02 F250 7.3 diesel tug
Mid Left Coast
Posts: 2,941
|
there's a soapy lube you use when pulling wires through a tight port like that. and yes, that rubber tube is undoubtedly the water seal, the outer part of that gland fitting acts like a compression fitting on that rubber seal.
last time I installed a wire with a gland like that, I removed the seal from the fitting, and pre-fit it on the outer end of the wire, fed the wire through from the outside, then assembled the fitting. or I put the wire through from the inside, a bit too much, then fitted the rubber seal on the wire and pushed it back into the compression gland thing.
|
|
|
|
|
07-12-2019, 05:16 PM
|
#58
|
|
Senior Member
Name: Z
Trailer: Sasquatch
Montana
Posts: 2,556
|
Mm, ok. I guess I should have googled instructions before pulling the wires through. Now I know!
|
|
|
|
|
07-12-2019, 05:25 PM
|
#59
|
|
Senior Member
Name: Gordon
Trailer: 2015 Scamp (16 Std Layout 4) with '15 Toyota Sienna LE Tug
North Carolina
Posts: 5,156
|
Quote:
Originally Posted by ZachO
Here's where it's at. ...
|
Great write up, I hope you update it in the next year or two so we know how it works out.
But I can tell you that I for one would never have done this. Why? Because it seems to be basically the same installation method used on Escape trailer for a while. They stopped doing it (using VHB tape only) after this....
Our solar panel blew off!! - Escape Trailer Owners Community
and
wow- solar blew off! - Escape Trailer Owners Community
see also:
When a solar panel blows off - Escape Trailer Owners Community
For one thing, your mounts are not attached to the fiberglass shell.. they are attached to the gel-coat on top of the fiberglass, and it seems that the bond between gel-coat and the underlying fiberglass has its limits.
|
|
|
|
|
07-12-2019, 07:05 PM
|
#60
|
|
Senior Member
Name: Z
Trailer: Sasquatch
Montana
Posts: 2,556
|
Yep, you can find plenty of opinions and experiences on both sides of this one. I'm not looking to get into that discussion.
Lucky for me my gelcoat is basically gone.
If it blows off in the next few years, you'll definitely hear about it.
|
|
|
|
|
|
|
Currently Active Users Viewing This Thread: 1 (0 members and 1 guests)
|
|
|
| Thread Tools |
Search this Thread |
|
|
|
| Display Modes |
 Linear Mode Linear Mode
|
 Posting Rules
|
You may not post new threads
You may not post replies
You may not post attachments
You may not edit your posts
HTML code is Off
|
|
|
|
 » Recent Discussions
 |
|
|
|
|
|
|
|
|
|
|
|
|
|
|
|
|
|
|
|
|
|
|
|
|
|
|
|
|
|
|
|
|
|
» Upcoming Events |
No events scheduled in
the next 465 days.
|
|


 2009 Escape 19
 "The Breeze"


