 |
|
 10-10-2020, 04:41 PM
|
#21
|
|
Senior Member
Name: Elliott
Trailer: Bigfoot
Everywhere
Posts: 462
|
Back at it now that the smoke's gone, and there's good news! The tank is actually more or less intact (some scraping on a corner or two, but I think that's either fixable or fine as is depending on tank wall thickness. It seems to have expanded laterally and bent the support bar/ledge, then shrunk back and fallen partway down. So it's returned to more or less the same shape and the underbelly distortion was from location rather than shape.
More good news, it is fairly replaceable if it is damaged. One side rests on a ledge that seems to be welded onto the frame (this one appears undamaged), but the (bent) support on the other side is just attached by a couple of bolts. It's under some tension, which might make it fun to unbolt, but not a big deal. The tank's not really rigid enough to be holding hazardous amounts of potential energy under tension.
The support bar itself is definitely damaged. It might be possible to bend it back to close enough to the right shape, but I'm not terribly optimistic. More likely I'll have to either order a new one from BF or (since shipping might suck) get someplace more local to make one.
Started figuring out what I'll need for the other three "while I'm at it" projects. SeeLevel sensors should be fairly straightforward. I think the 6" "junior" sensor style will be about perfect without trimming (tank is mostly 7" tall, and they recommend 1/2" between sensor and top/bottom). I should be able to reuse the existing signal wires easily enough, though I have a bit more research to do there. I'll leave the factory sensors in place but snip the wires where the leads are attached to the main wire.
Heating pads are a little interesting. There's very little clearance between the bottom of the tanks and the underbody panels. Basically zero, but some amount of flex. I think I'll have just enough room to fit a 7.25"x25" Facon panel per tank. It'll leave a lot of area uncovered, but since they kick on at 45F and run to 68F it should be enough to keep the rest of the tank well above freezing. Then an elbow pad each for the black and grey piping. That'll be about 20A, which means a dedicated fuse that I'll probably also use to turn them off since it'll usually get "toggled" only a few times a year. I considered running wire to a relay controlled by a switch at the tank display panel, but that's a lot of work and a potential failure point for not much benefit.
The existing insulation is fairly so/so, and I plan on adding more. It's a layer of Reflectix along the bottom plus 3/4" of EPS along the side. I'll probably strip the existing reflectix (may be a huge pain) and replace with 1/2" of XLPE foam plus a layer of radiant barrier foil. That'll around double the insulation. I may have to trim a ~2'x1' rectangle of foam around the bottoms of the tanks, or maybe I can get away with just letting the foam squish where needed.
|

|

|
|
10-10-2020, 04:47 PM
|
#22
|
|
Senior Member
Name: Elliott
Trailer: Bigfoot
Everywhere
Posts: 462
|
Photos of the problem: that plastic rectangle is the tank, and it should be resting on top of the metal ledge instead of next to it. Final photo is the other side showing it resting on top of the ledge as it should be.
|
|
|
|
|
10-10-2020, 05:03 PM
|
#23
|
|
Senior Member
Name: Elliott
Trailer: Bigfoot
Everywhere
Posts: 462
|
Some misc photos:
Wider angle of the tank. Currently at a jaunty angle rather than level and flush up against the main fiberglass trailer body like the other two. "Well there's yer problem"
This "board" is part of why the underbelly bulged so much. Really, Bigfoot? Really? Extra board just stapled on? Looks like they cut the 5'x8' plywood the short way and tacked a bit of scrap on instead of the long way then trimming to size. Definitely going to replace this. Seems like there's room for improvement in the design (maybe thinner plywood with a vertical "support beam" piece bonded to it along the top?, but I may just replace it with a single board or plywood piece. I would definitely appreciate advice from people with more carpentry knowledge. It's not structural exactly (I think it's mostly to bridge the gap between FG panels), but it'd probably be better if it flexed less going down the road.
Piping and underbelly are well-heated. I thought it was mostly just the small duct I could see from the top, but there's also a full-sized duct running to around the middle. Plus, the ducting is run so that it's basically resting on the ABS pipe around where the valves are. Despite the limited insulation, I think it probably stays within 10-15F of the cabin temperature even when it's really cold out.
|
|
|
|
|
10-10-2020, 05:08 PM
|
#24
|
|
Senior Member
Name: Elliott
Trailer: Bigfoot
Everywhere
Posts: 462
|
Tank placement/orientation:
I'd actually thought that the tanks were longitudinally-mounted, but I was wrong. They're transverse, with the fresh in front well in front of the axles, gray sort of above/in-front, and black centered somewhere in the vicinity of the rear axle.
So, black will reduce tongue weight but only by a small amount (I bet <50lbs, maybe <20lbs when full).
Gray filling will increase tongue weight a little. Probably more than enough to balance out the black tank filling up under most use patterns.
Fresh tank filling increases tongue weight by more. I haven't measured, but just eyeballing it I'd guess on the order of 90lbs.
|
|
|
|
|
10-10-2020, 05:12 PM
|
#25
|
|
Senior Member
Name: Elliott
Trailer: Bigfoot
Everywhere
Posts: 462
|
One last photo: Looking backwards at the black tank. You can see the shape of the tank a bit (not flat, and has a low spot that's slightly below the drain) as well as how little clearance there is between low spot and the reflectix on the under-body panel.
|
|
|
|
|
10-10-2020, 07:07 PM
|
#26
|
|
Senior Member
Name: Elliott
Trailer: Bigfoot
Everywhere
Posts: 462
|
A couple more photos.
Side profile of an under-body panel. Eyeballing, something like 1/16" fiberglass bonded to 1/4" plywood, then a very thin radiant barrier. I called it Reflectix before, but this is noticeably thinner. The actual non-radiant insulation is near-zero, though since it's next to a somewhat-enclosed air gap in places the radiant barrier isn't totally useless like it is on Scamps.
3/4" EPS along the side of the under-body compartment. You can see it stops around 1" (+/- 1/4") from the bottom. Add in the under-body panel and there's about a 3/4" gap. My additional foam should drop that to around 1/4". I may also stick radiant barrier to the EPS, but not sure if that's worth the hassle.
The bigger improvement will come from foam on the under-body panels. With the bubble wrap and plywood, I bet they're currently around R-0.4 and my changes will bump that to more like R-2.2.
There's a surprising amount of air circulation between the underbody and main cabin, especially when the furnace is running and forcing air up (and to a lesser extent down through drain holes). This keeps the compartment warm, but it also leaks a lot of heat. Probably almost as much as the windows. I'm hoping to cut that significantly.
|
|
|
|
|
10-10-2020, 08:15 PM
|
#27
|
|
Senior Member
Name: Tom
Trailer: BigFoot 25B25RT
Massachusetts
Posts: 592
|
Thanks
I want to thank you for this post and making me aware of this problem. I have quick release couplers on my hose so I couldn't stick the hose in and walk away. I did however hold it against the opening and I had to back off several times to release pressure and let it burp.
Yesterday I refilled it and now I am directing the stream from a few inches away and pinching the hose when it needs to burp. I could see this happening to me if the circumstances were different.
|
|
|
|
|
10-11-2020, 04:35 PM
|
#28
|
|
Senior Member
Name: Elliott
Trailer: Bigfoot
Everywhere
Posts: 462
|
Welp, sadly I may have to forget about the SeeLevel sensors. They require 18AWG, and what's there seems to be 22AWG based on OD (no AWG marked on the wire). They run through a lot of cabinets, so running new wire's not a good option. Emailed Garnet to see if I can get away with 2 sets of 3x22AWG in parallel.
|
|
|
|
|
10-23-2020, 12:29 AM
|
#29
|
|
Senior Member
Name: Elliott
Trailer: Bigfoot
Everywhere
Posts: 462
|
Garnet replied saying using 3x18AWG in parallel will work just fine, so looks like I'm still in business on the sensors. Ordered a bunch of parts, but also got kind of busy so I haven't made any physical progress.
Next up this weekend is dropping the tank to see if it has any significant damage. There's some scrapes on the corners, but thanks to the magic of youtube I've learned enough about polyethylene to be fairly sure that it won't be a problem. I'll probably shore them up a little just to make sure they don't leak or fail later, but seems like anything short of a large-scale structural failure is pretty easy to fix with some scrap plastic and a heat gun.
|
|
|
|
|
10-25-2020, 02:40 PM
|
#30
|
|
Senior Member
Name: Elliott
Trailer: Bigfoot
Everywhere
Posts: 462
|
Progress of sorts! It's no longer wedged in place. I ran across some problems removing the support bar. It just wouldn't budge on one end even with all the bolts removed. I removed a bit more styrofoam, and found that it's actually tack-welded in place. I'm really not clear on why, except maybe the assembler decided it's easier to tack it in place. I ended up just drilling it out and can't really think of any reason why it needed to be there at all.
The tank popped back up into place fairly easily and the bar returned closer to its original shape than I expected, but it's still worse for wear and should probably be replaced. Not sure it can be removed entirely without taking the tank out, which turned out to be harder than I'd hoped.
I was thinking I could just drop the tank once the bar was loose, but that turns out to not be the case. I can't slide it over without removing the fill tube and vent tube fixtures and I can't drop it without sliding it. If they were accessible that'd be an easy task, but they're sort of around a corner and in a crowded space. I may need a couple specialized wrenches or something.
I'm a little tempted to just call it good and bolt things up, but the bend in the support bar concerns me a little and I'm not 100% sure there's no leaks or weak spots where the tank got scraped up. On the other hand, I'm not 100% sure I'll be able to get the tank out even if I unscrew the fixture.
|
|
|
|
|
10-25-2020, 03:47 PM
|
#31
|
|
Senior Member
Name: Henry
Trailer: BigFoot
Tennessee
Posts: 1,311
|
Perhaps just call it a day and put it back together. Plan a trip to the factory and have them take care of it.
Nothing to do with Big Foot, but I was taking a plant tour of the Oliver travel trailer. I left the group and wandered over to the repair area and saw a square hole cut out of the side of one unit. I asked about it and was told it was the only way it could be repaired. Tech said once it was fiberglassed over no one would be able to tell there had been a hole.
My point is that the manufacturers has ways of repairing things that would give some of us nightmares. The Oliver has inner and outer fiberglass hulls, the design of which they are proud, and rightly so. Right up until something has to be repaired that is located between the two. I probably would have bought the thing but I had a Casita at the time The floor plans are too similar. BF is much, much better.
__________________
2019 Big Foot 25RQ with cargo box, onboard Cummins LP 2500 generator, solar panels, and 2019 Ram 2500 4x4, 6.7L Cummins with ARE Shell.
|
|
|
|
|
10-25-2020, 05:53 PM
|
#32
|
|
Senior Member
Name: Elliott
Trailer: Bigfoot
Everywhere
Posts: 462
|
Yeah. As far as that goes I think cutting the tank out then cutting a "notch in the fiberglass and styrofoam would be the "easy" repair like that. Could probably get away with only cutting the fiberglass and not the plywood, too. But it'd remove a tiny bit of strength right below the fridge and would probably require tank replacement or much more extensive repair than I'd like. I'm hoping after I unscrew the fixtures there's enough flex in the tank and enough room to maneuver/tilt it so it'll come out without much of a fight.
|
|
|
|
|
11-09-2020, 06:10 PM
|
#33
|
|
Senior Member
Name: Charles
Trailer: Bigfoot
Georgia
Posts: 392
|
Let this be a lesson for anyone who reads this. The Bigfoot owners manual describes an adapter that you are supposed to use to fill the tank. This is because just shoving a hose in the filler neck is not the thing to do. I too have done this, and the filler hose blew off the fill port. Caught it the instant it happened and less than a couple of quarts of water inside, mopped up with terry towels within seconds, so no harm.
What you are supposed to use on ANY RV with the hose fill port is something like this......
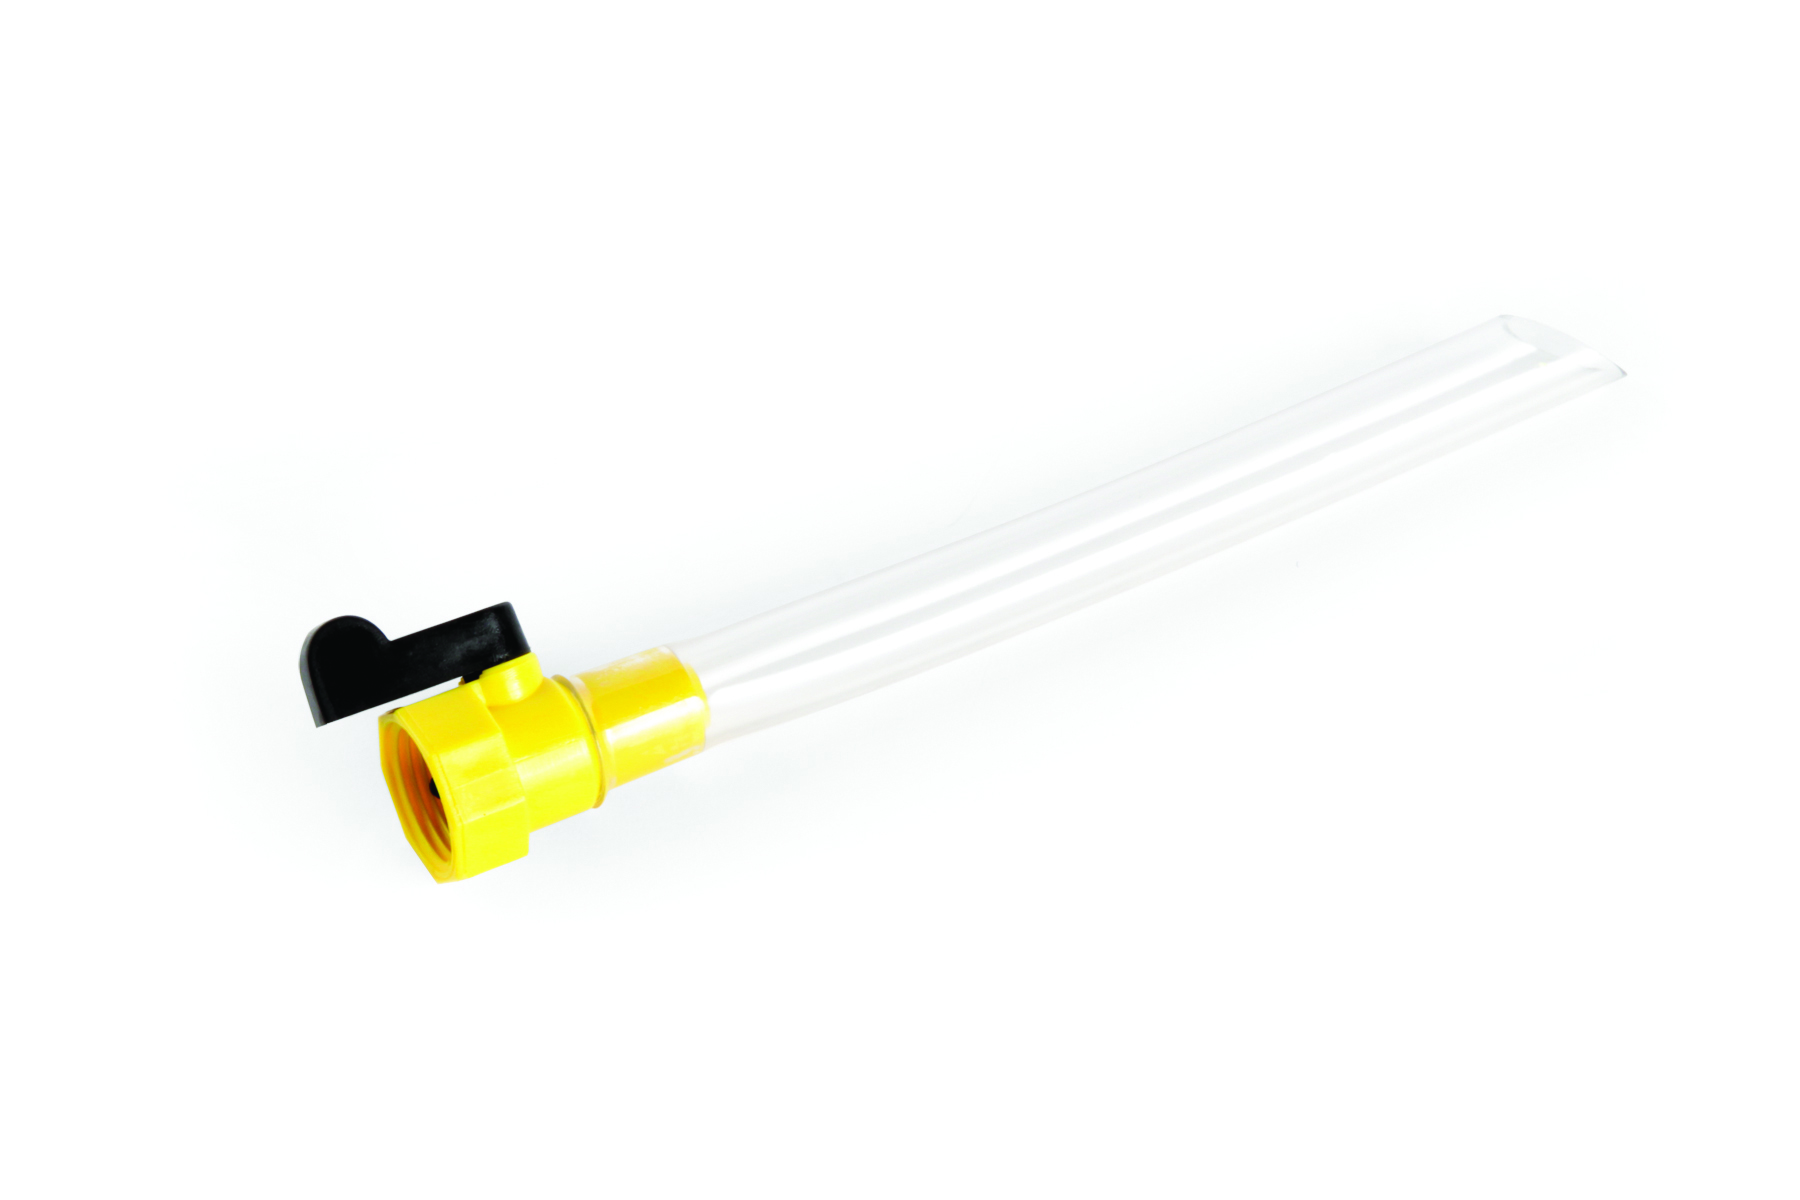
This is a Camco adapter, but you can make one easily, using clear tubing, 3/8 inside and 1/2 or so outside. The adapter won't block the port and so air can escape. The air vent is NOT designed to relieve the air from filling the tank, it is designed to allow air to enter as you draw water out of the tank.
I made mine because I wanted one long enough that the tube went all the way into the tank, because the fill hose is uphill, then downhill to the tank. The reason for this is that my tank fill port is nearly level with the outside fill port, and the original installation the hose was cut too short and had apparently come off before (I know because I found a small 90 degree slotted screwdriver wedged into the wiring harness just under the fill port). After my fiasco, I bought more fill port hose and made a longer hose, and raised it up and strapped it to the ceiling of the cargo compartment under the bed where the tank sits. In addition, I went to replace the vent line that was sagging and full of mold and broke the nipple on the outside fill port and ended up replacing it too.
Since my fill hose goes up hill, I need the long filler tube, it works well.
The new vent line is also clamped to the ceiling so it too goes up hill then down hill, thus preventing water from standing in the vent line. The fill tube was unspported from the factory and it too probably allowed puddling in the hose. The secondary benefit of this is that very little water splashes out of the fill port while driving down the road.
For anyone on the Bigfoot Owners Club Forum, I wrote about my water fill issues in June in the trailer section. Here is the link https://bigfootowners.com/forum/?min...ewtopic&t=2410 The link will only work if you are signed in to the BOCI Forum and then select the link.
Charles
__________________
'03 Ram 2500 CTD, 5.9HO PacBrake six speed std cab long bed Leer top and 2008 Bigfoot 25B21RB.. Previously, 2008 Thor Freedom Spirit 180, SOLD! 2007 Winnebago View 23H Motorhome, SOLD!
|
|
|
|
|
11-09-2020, 06:33 PM
|
#34
|
|
Senior Member
Name: Ray
Trailer: scamp
Indiana
Posts: 845
|
I have a fill adapter for my Scamp. It is a clear vinyl flexible hose that fits down in the fill neck. Then I hooked the hose to a barb to garden hose female brass adapter. Now this has a rubber gasket in the fitting and ai replace that with a piece of pottable rubber that I make into disk. Then a place a 1/8 inch hole in that to allow just a little water through.
|
|
|
|
|
11-21-2020, 10:20 AM
|
#35
|
|
Senior Member
Name: Tom
Trailer: BigFoot 25B25RT
Massachusetts
Posts: 592
|
owners manual
I am having problems with the solar install. More on that later and in a different place.
SO I got out the owners manual which I had looked over previously and I was looking for anything pertaining to the solar prewire. I came across a statement in bold type to not jam a garden hose into the water fill. I think I might have bulged mine a little. OH WELL.
|
|
|
|
|
11-21-2020, 01:21 PM
|
#36
|
|
Senior Member
Name: Henry
Trailer: BigFoot
Tennessee
Posts: 1,311
|
I probably over filled mine also, although I used on of those attachments that allows air into the tank while the water flows in. Filled the tank until the water came out. At one point I looked under the trailer and the tank does appear to be blueing, or at least the plastic plate on the bottom is sagging. I would like to add a couple of additional supports but doubt that I ever will.
__________________
2019 Big Foot 25RQ with cargo box, onboard Cummins LP 2500 generator, solar panels, and 2019 Ram 2500 4x4, 6.7L Cummins with ARE Shell.
|
|
|
|
|
11-23-2020, 12:39 AM
|
#37
|
|
Senior Member
Name: Elliott
Trailer: Bigfoot
Everywhere
Posts: 462
|
Good news, I managed to get the vent tube fitting off relatively easily with a 3/4" crow's foot wrench. It doesn't take a lot of force, but more than I could get on the fitting directly with my fingertips at an awkward angle.
Bad news, my attempt to remove the fill fitting has failed. I tried to use a cut-down sink strainer wrench, but it was a bit too large. Good news is, I'm fairly sure since 1-3/4" is too big 1-5/8" would be just about right. That's an odd socket size - too big for most normal sockets, but a bit too small for castle nut sockets. I've ordered a deep-socket impact that should be the same size, but something slimmer and cheaper would be better if it existed. If I had a 3-D printer and knew how to use it, I'd probably try to make a socket. Like the vent fixture, not a ton of force is needed. If it were sitting in front of me where I could get a good grip on it, hands might be enough. Or at least and adjustable wrench.
|
|
|
|
|
11-23-2020, 04:14 AM
|
#38
|
|
Senior Member
Name: Henry
Trailer: BigFoot
Tennessee
Posts: 1,311
|
You may need to grind down the sides of your socket to make it fit. I have had to grind a number of tools to get into tight spots.
3-D printers are intriguing, but learning the software is daunting. Which is to say it takes a real long term effort.
__________________
2019 Big Foot 25RQ with cargo box, onboard Cummins LP 2500 generator, solar panels, and 2019 Ram 2500 4x4, 6.7L Cummins with ARE Shell.
|
|
|
|
|
11-27-2020, 10:21 PM
|
#39
|
|
Senior Member
Name: Charles
Trailer: Bigfoot
Georgia
Posts: 392
|
In the process of replacing the filler hose and the vent line, the nipple for the vent line on the filler box broke, so I ended up searching the net and finding another filler box assembly and replacing it, easy and cheap.
I have a Brother Tz series label maker (actually 3 of them) and several different types and sizes of tape. I label stuff so other people will know what the heck is going on, and to not make the same kinds of mistakes I do. Also, much of the labeling on an RV is required by either the RIVA for certification or National Electric Code or other codes.
In this case, I made a new potable water label and also added that a fill adapter as described in the Bigfoot RV manual must be used. This is black on clear, not sure why the label is visible at all, something to do with the flash. With the naked eye is is about invisible.
Not that people can read and comprehend sometimes but hopefully if someone is helping me, they will stop and ask what this is all about.
Charles
__________________
'03 Ram 2500 CTD, 5.9HO PacBrake six speed std cab long bed Leer top and 2008 Bigfoot 25B21RB.. Previously, 2008 Thor Freedom Spirit 180, SOLD! 2007 Winnebago View 23H Motorhome, SOLD!
|
|
|
|
|
11-28-2020, 02:05 AM
|
#40
|
|
Senior Member
Name: Henry
Trailer: BigFoot
Tennessee
Posts: 1,311
|
Elliot, I had to Google "crow's foot wrench". I had no idea such a type of tool existed. Would have been very useful in years past. I may have to get a set.
Charles, I never really thought to label things in or on the trailer, think I will attempt the same. I have a label machine but not sure it will do labels that won't wash off or fade in the sunlight.
__________________
2019 Big Foot 25RQ with cargo box, onboard Cummins LP 2500 generator, solar panels, and 2019 Ram 2500 4x4, 6.7L Cummins with ARE Shell.
|
|
|
|
|
|
|
Currently Active Users Viewing This Thread: 1 (0 members and 1 guests)
|
|
|
| Thread Tools |
Search this Thread |
|
|
|
| Display Modes |
 Linear Mode Linear Mode
|
 Posting Rules
|
You may not post new threads
You may not post replies
You may not post attachments
You may not edit your posts
HTML code is Off
|
|
|
|
 » Recent Discussions
 |
|
|
|
|
|
|
|
|
|
|
|
|
|
|
|
|
|
|
|
|
|
|
|
|
|
|
|
|
|
|
|
|
|
» Upcoming Events |
No events scheduled in
the next 465 days.
|
|


