 |
|
 12-21-2018, 04:13 PM
|
#1
|
|
Senior Member
Name: bill
Trailer: 2013 Escape 19
The Mountains of North Carolina
Posts: 4,143
|
Thrifty Bill's 1977 Trillium 1300 Project
I bought a project Trillium 1300 in September, went up to Michigan to pick it up. Overall, it was pretty original and in pretty good shape. But it had been sitting neglected in a garage for the last fifteen years. The seller had never used it, just left it in his garage to work on later. Later never came, so it was time to hand it off. I've done a number of repairs and improvements to it, with individual threads on each step. I realized it would be better to have all of them linked together on one thread. So I will put new changes here, with links to prior work as well.
My thanks go out to all the Trillium experts out there. I have borrowed their great ideas. Without their assistance and postings, I would have been lost.
This is the first thread on the trailer, when I bought it. No idea how the forum comes up with these abbreviations!
http://www.fiberglassrv.com/forums/f...ion-87017.html
|

|

|
|
12-21-2018, 04:16 PM
|
#2
|
|
Senior Member
Name: bill
Trailer: 2013 Escape 19
The Mountains of North Carolina
Posts: 4,143
|
Seven wire tow vehicle plug:
The four wire plug was shot, and since I use my F150 for towing, a seven wire plug made more sense. And if/when I replace the axle, I will use one with brakes, so the extra wires will come in handy!
http://www.fiberglassrv.com/forums/f...ion-87459.html
|
|
|
|
|
12-21-2018, 04:17 PM
|
#3
|
|
Senior Member
Name: bill
Trailer: 2013 Escape 19
The Mountains of North Carolina
Posts: 4,143
|
Anyone who has owned a Trillium knows the window seals are a weakness. So I removed all the windows with the exception of the door window, replaced rotten wood and installed new sealing materials.
http://www.fiberglassrv.com/forums/f...all-87190.html
|
|
|
|
|
12-21-2018, 04:23 PM
|
#4
|
|
Senior Member
Name: bill
Trailer: 2013 Escape 19
The Mountains of North Carolina
Posts: 4,143
|
Painting cabinet doors, and replacing some of them.
I'm pleased how this turned out. I wanted to match the original upholstery, so I used a burnt orange paint to do the cabinet doors. I replaced three of the doors that were damaged, with nice 1/2 inch birch plywood (11 ply!) A local wood salvage store has supplied the plywood, along with butcher block that I am using for the tables.
Why this link shows Boler for sale is beyond me.
http://www.fiberglassrv.com/forums/f...urs-87611.html
|
|
|
|
|
12-21-2018, 04:28 PM
|
#5
|
|
Senior Member
Name: bill
Trailer: 2013 Escape 19
The Mountains of North Carolina
Posts: 4,143
|
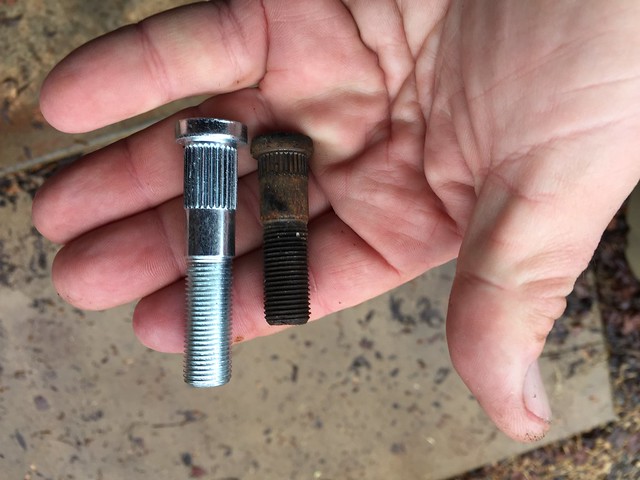
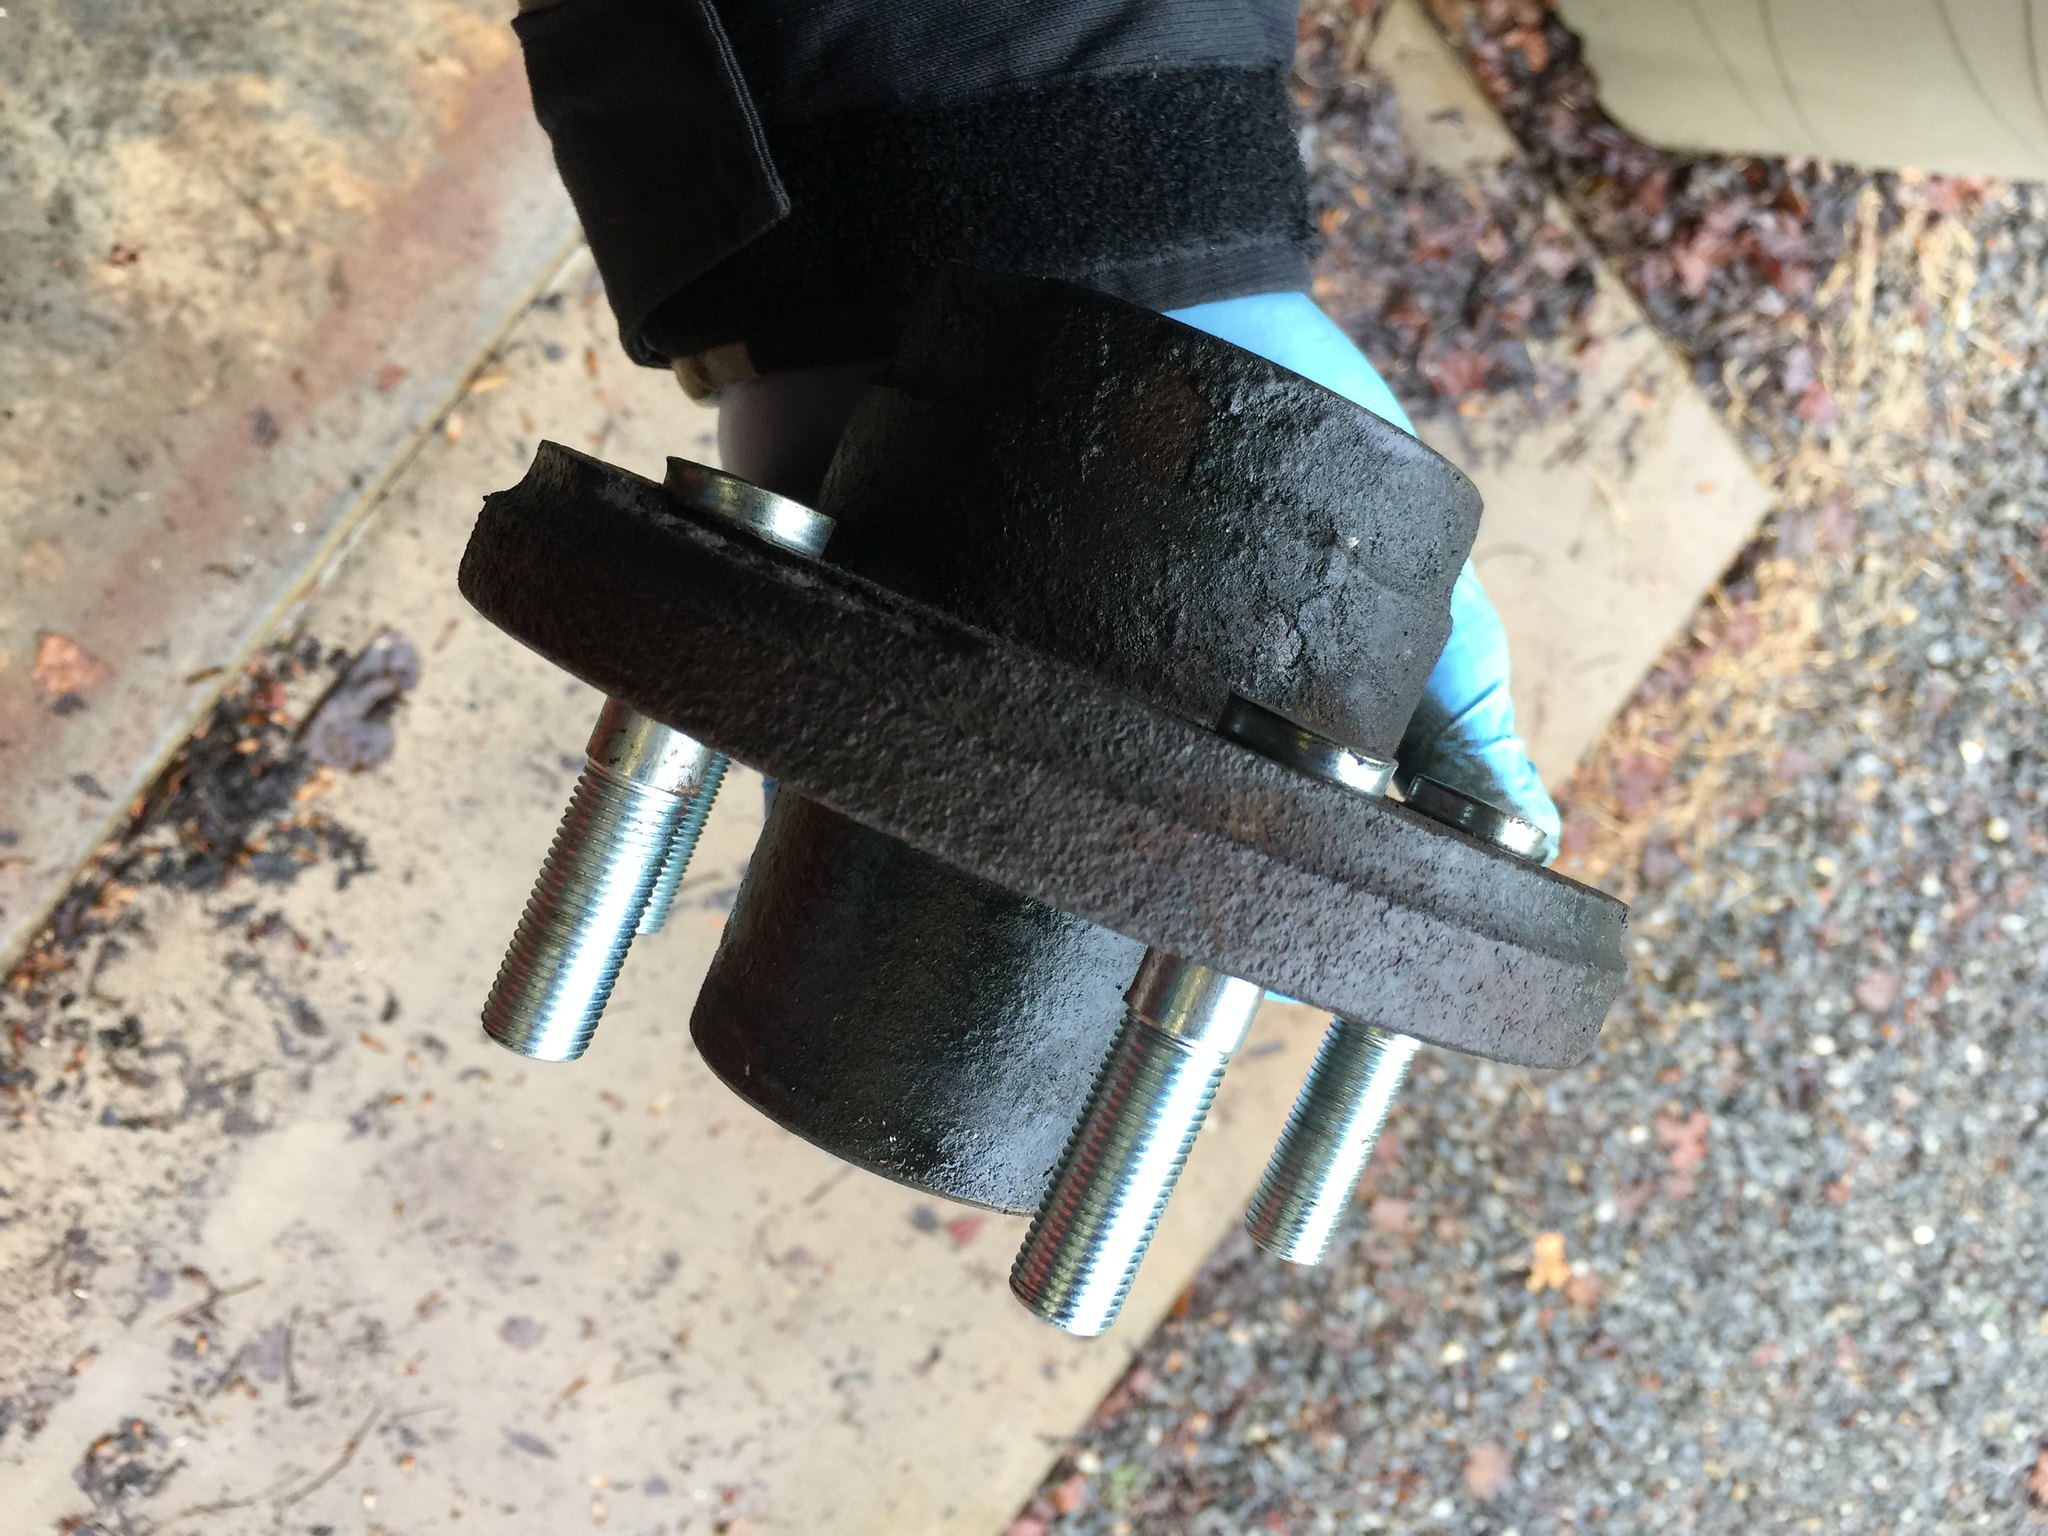
Next job: I knew the wheel bearings needed service, and since I wanted to install a set of alloy wheels, I decided to replace all the bearings and seals. I also needed to change out the hub studs, as they were too short for the replacement wheels.
I followed the suggestions of others and located a set of 14 inch alloy wheels from a Ford Ranger. I was able to pick up a set of four for $50 off Craigslist. Score in my book!
Once the hubs were removed, I used a screwdriver as a chisel and drove out the old bearings. Care is needed to not mar the bearing surfaces!
I bought a set of bearing drivers from Amazon, $21. This set came in really handy! Made seating the bearings easy, without damage. A brass punch would have served me well.
 1977 Trillium Wheel Upgrade 1977 Trillium Wheel Upgrade by wrk101, on Flickr
|
|
|
|
|
12-21-2018, 04:38 PM
|
#7
|
|
Senior Member
Name: bill
Trailer: 2013 Escape 19
The Mountains of North Carolina
Posts: 4,143
|
New (used) wheel installed.
 1977 Trillium Wheel Upgrade 1977 Trillium Wheel Upgrade by wrk101, on Flickr
|
|
|
|
|
12-21-2018, 05:23 PM
|
#8
|
|
Senior Member
Name: Shelby
Trailer: Casita SD
Tennessee
Posts: 1,109
|
Thanks for consolidating, I've been following this project with interest. Very attractive wheels, btw.
|
|
|
|
|
12-21-2018, 07:07 PM
|
#9
|
|
Senior Member
Name: bill
Trailer: 2013 Escape 19
The Mountains of North Carolina
Posts: 4,143
|
Can't find my frame bolt update, so I will post here.
My 1977 Trillium had 8 bolts attaching the body to the frame. Two per side in the rear dinette benches, typical bolts that went all the way through the frame, and two per side in the front gaucho, attached to small angle iron clips welded to the frame.
Three out of the four angle iron clips had broken off, so I had a local welder install replacements for me. All of the bolts were rotted almost completely through, making removal "a snap" literally.
All of the bolts rotted out in the section that was in the plywood of the floor. The portions in the frame as well as inside the body of the trailer were fine. I replaced with galvanized for a couple of reasons, rather than stainless. First, they were readily available. Secondly, the original bolts lasted 41 years (OK, the last ten not so much). But 25 to 30 year life is plenty IMHO. The frame will likely need replacement before these new bolts wear out.
|
|
|
|
|
12-21-2018, 07:17 PM
|
#10
|
|
Senior Member
Name: bill
Trailer: 2013 Escape 19
The Mountains of North Carolina
Posts: 4,143
|
Another upgrade thread I am looking for is my swap of the inside lights with LEDs. I now have a lot more light and it uses a lot less power. Since the original converter is very limited in capacity (72 watts), reducing the load from inside lighting was important. The old incandescent lights used about 18 watts per bulb. With three lights over the sink, four lights around the dinette, and one light on the front gaucho, you are talking 144 watts versus 72 watt capacity. Oops! I actually INCREASED the amount of lighting inside, replacing most of the single bulb incandescent units with dual bulb LED units. The gaucho now has two bulbs, over the sink I have four, I have two on each side of the dinette, one over the rear window and a reading light on the vertical closet side wall facing the dinette. So that's 12 lights where I used to have 8. Each LED draws about 3 watts, so I now am at a total of 36 watts, well under my converter capacity, despite having a lot more light.
|
|
|
|
|
12-21-2018, 07:19 PM
|
#11
|
|
Senior Member
Name: bill
Trailer: 2013 Escape 19
The Mountains of North Carolina
Posts: 4,143
|
Quote:
Originally Posted by ShelbyM

Thanks for consolidating, I've been following this project with interest. Very attractive wheels, btw.
|
Yes, I made a mess of it, with individual threads on various projects on the same trailer. Easier for everyone to have it all in one place.
Thanks for the compliment, I like the wheels too! Drove to Knoxville, TN to get them, thats a trip from here.
|
|
|
|
|
12-22-2018, 12:22 PM
|
#12
|
|
Senior Member
Name: Lee
Trailer: Casita
Texas
Posts: 493
|
Those are really nice looking wheels
__________________
Lee
|
|
|
|
|
12-22-2018, 06:45 PM
|
#13
|
|
Senior Member
Name: bill
Trailer: 2013 Escape 19
The Mountains of North Carolina
Posts: 4,143
|
Working on the door right now. Probably a week long project at my slow pace.
|
|
|
|
|
12-25-2018, 03:10 PM
|
#14
|
|
Senior Member
Name: bill
Trailer: 2013 Escape 19
The Mountains of North Carolina
Posts: 4,143
|
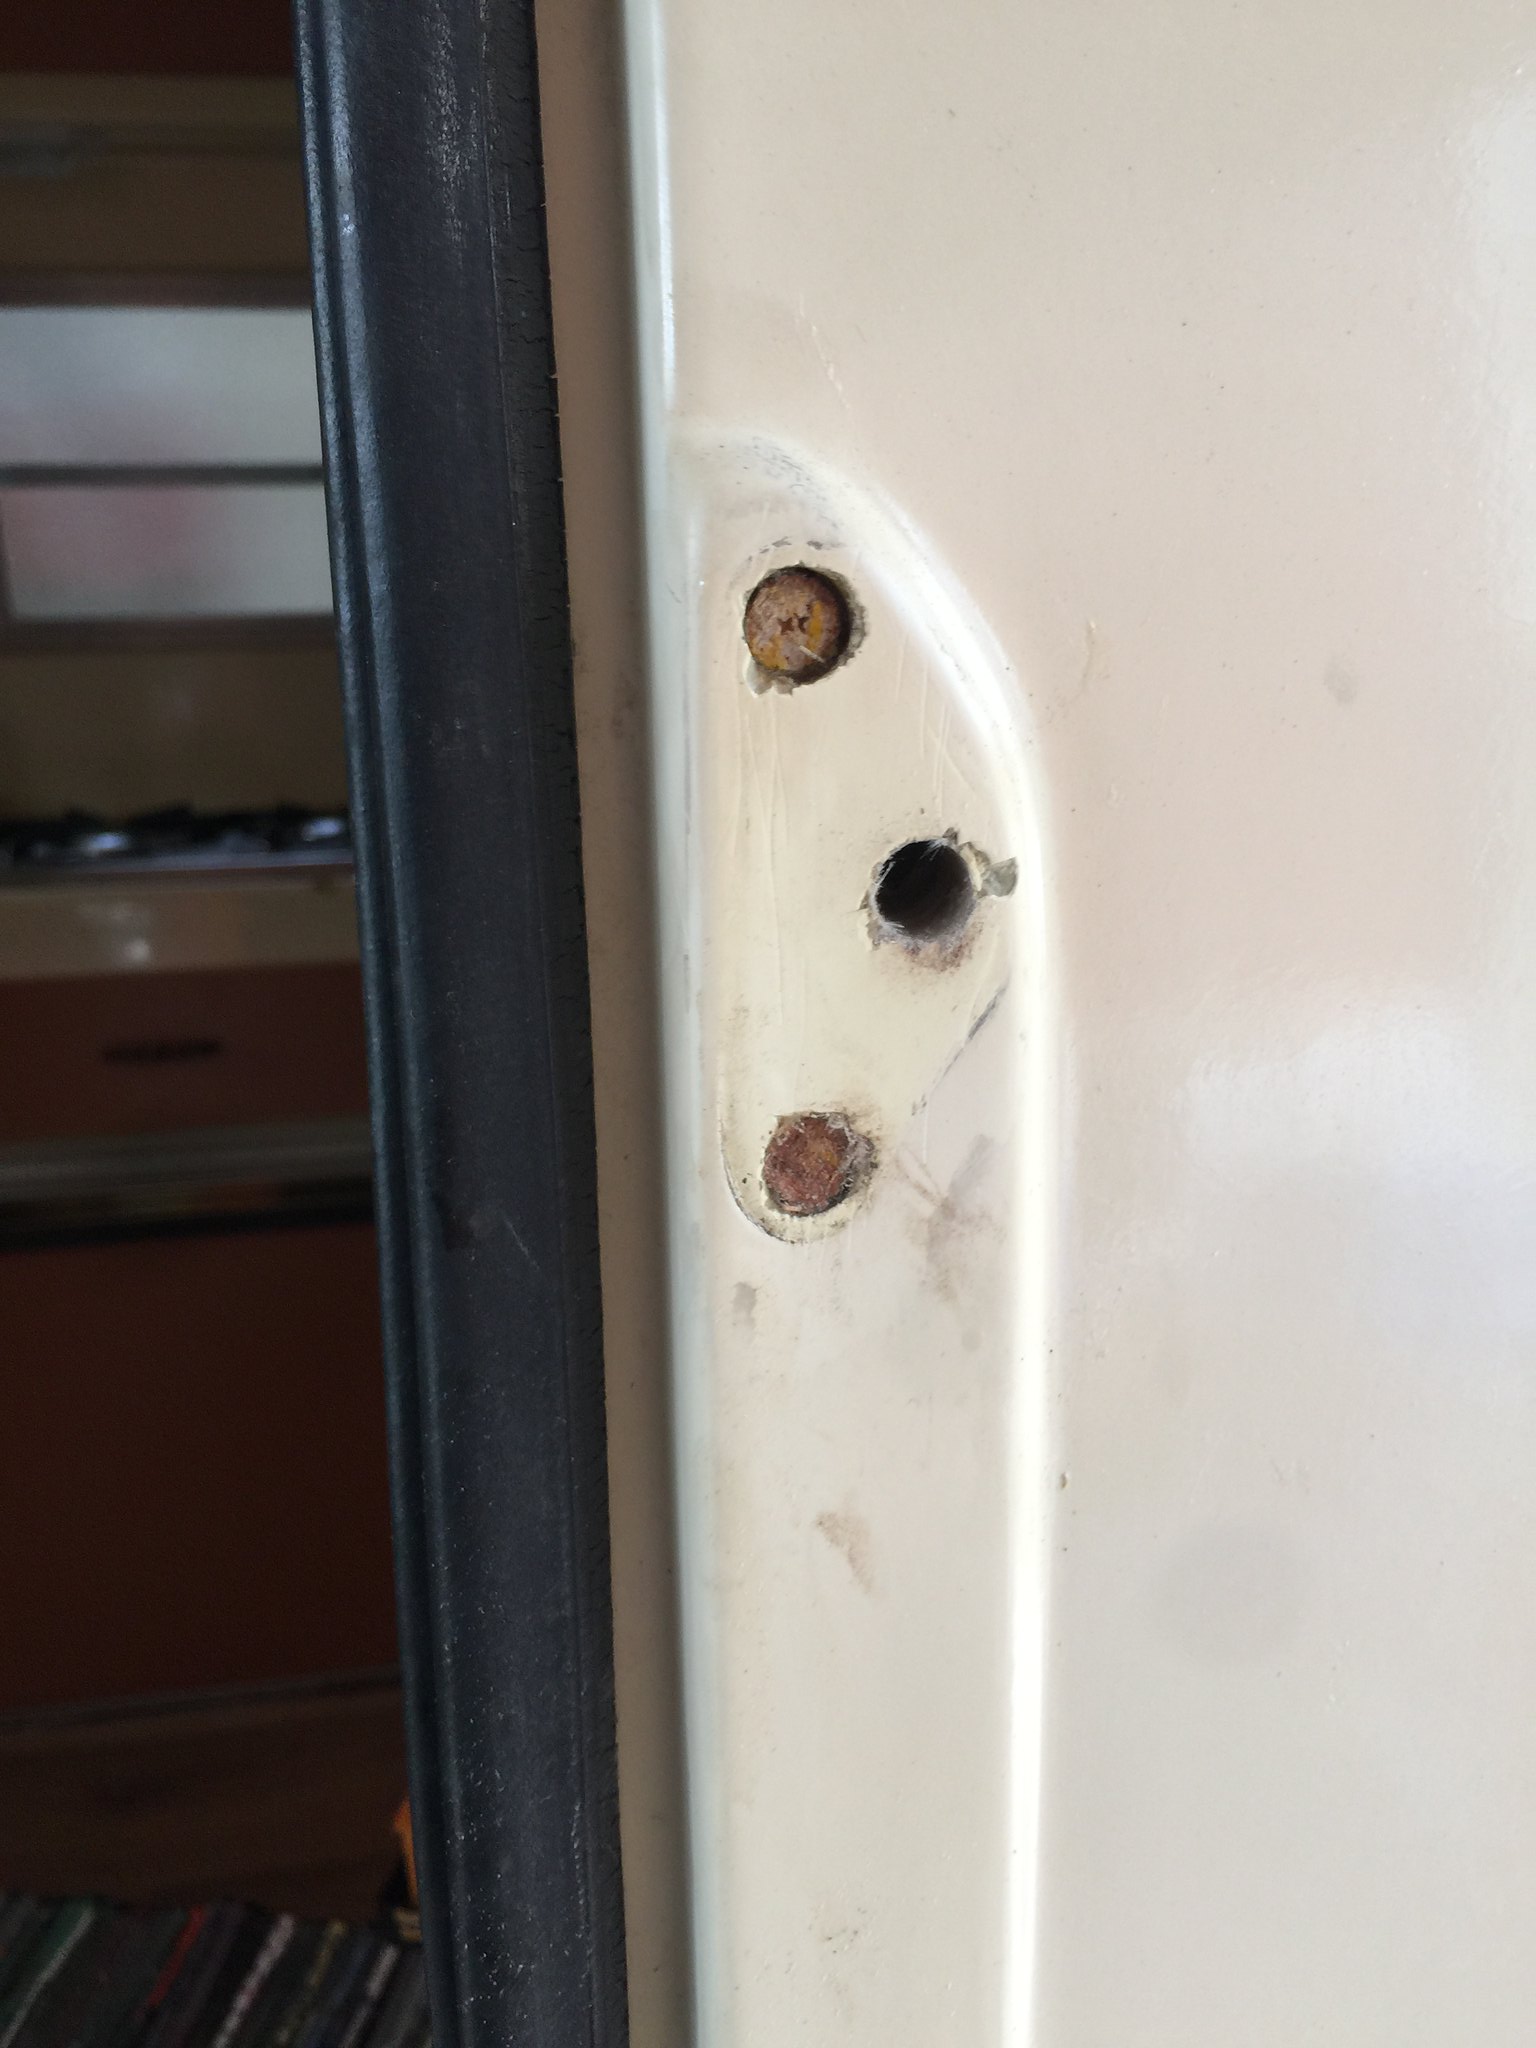
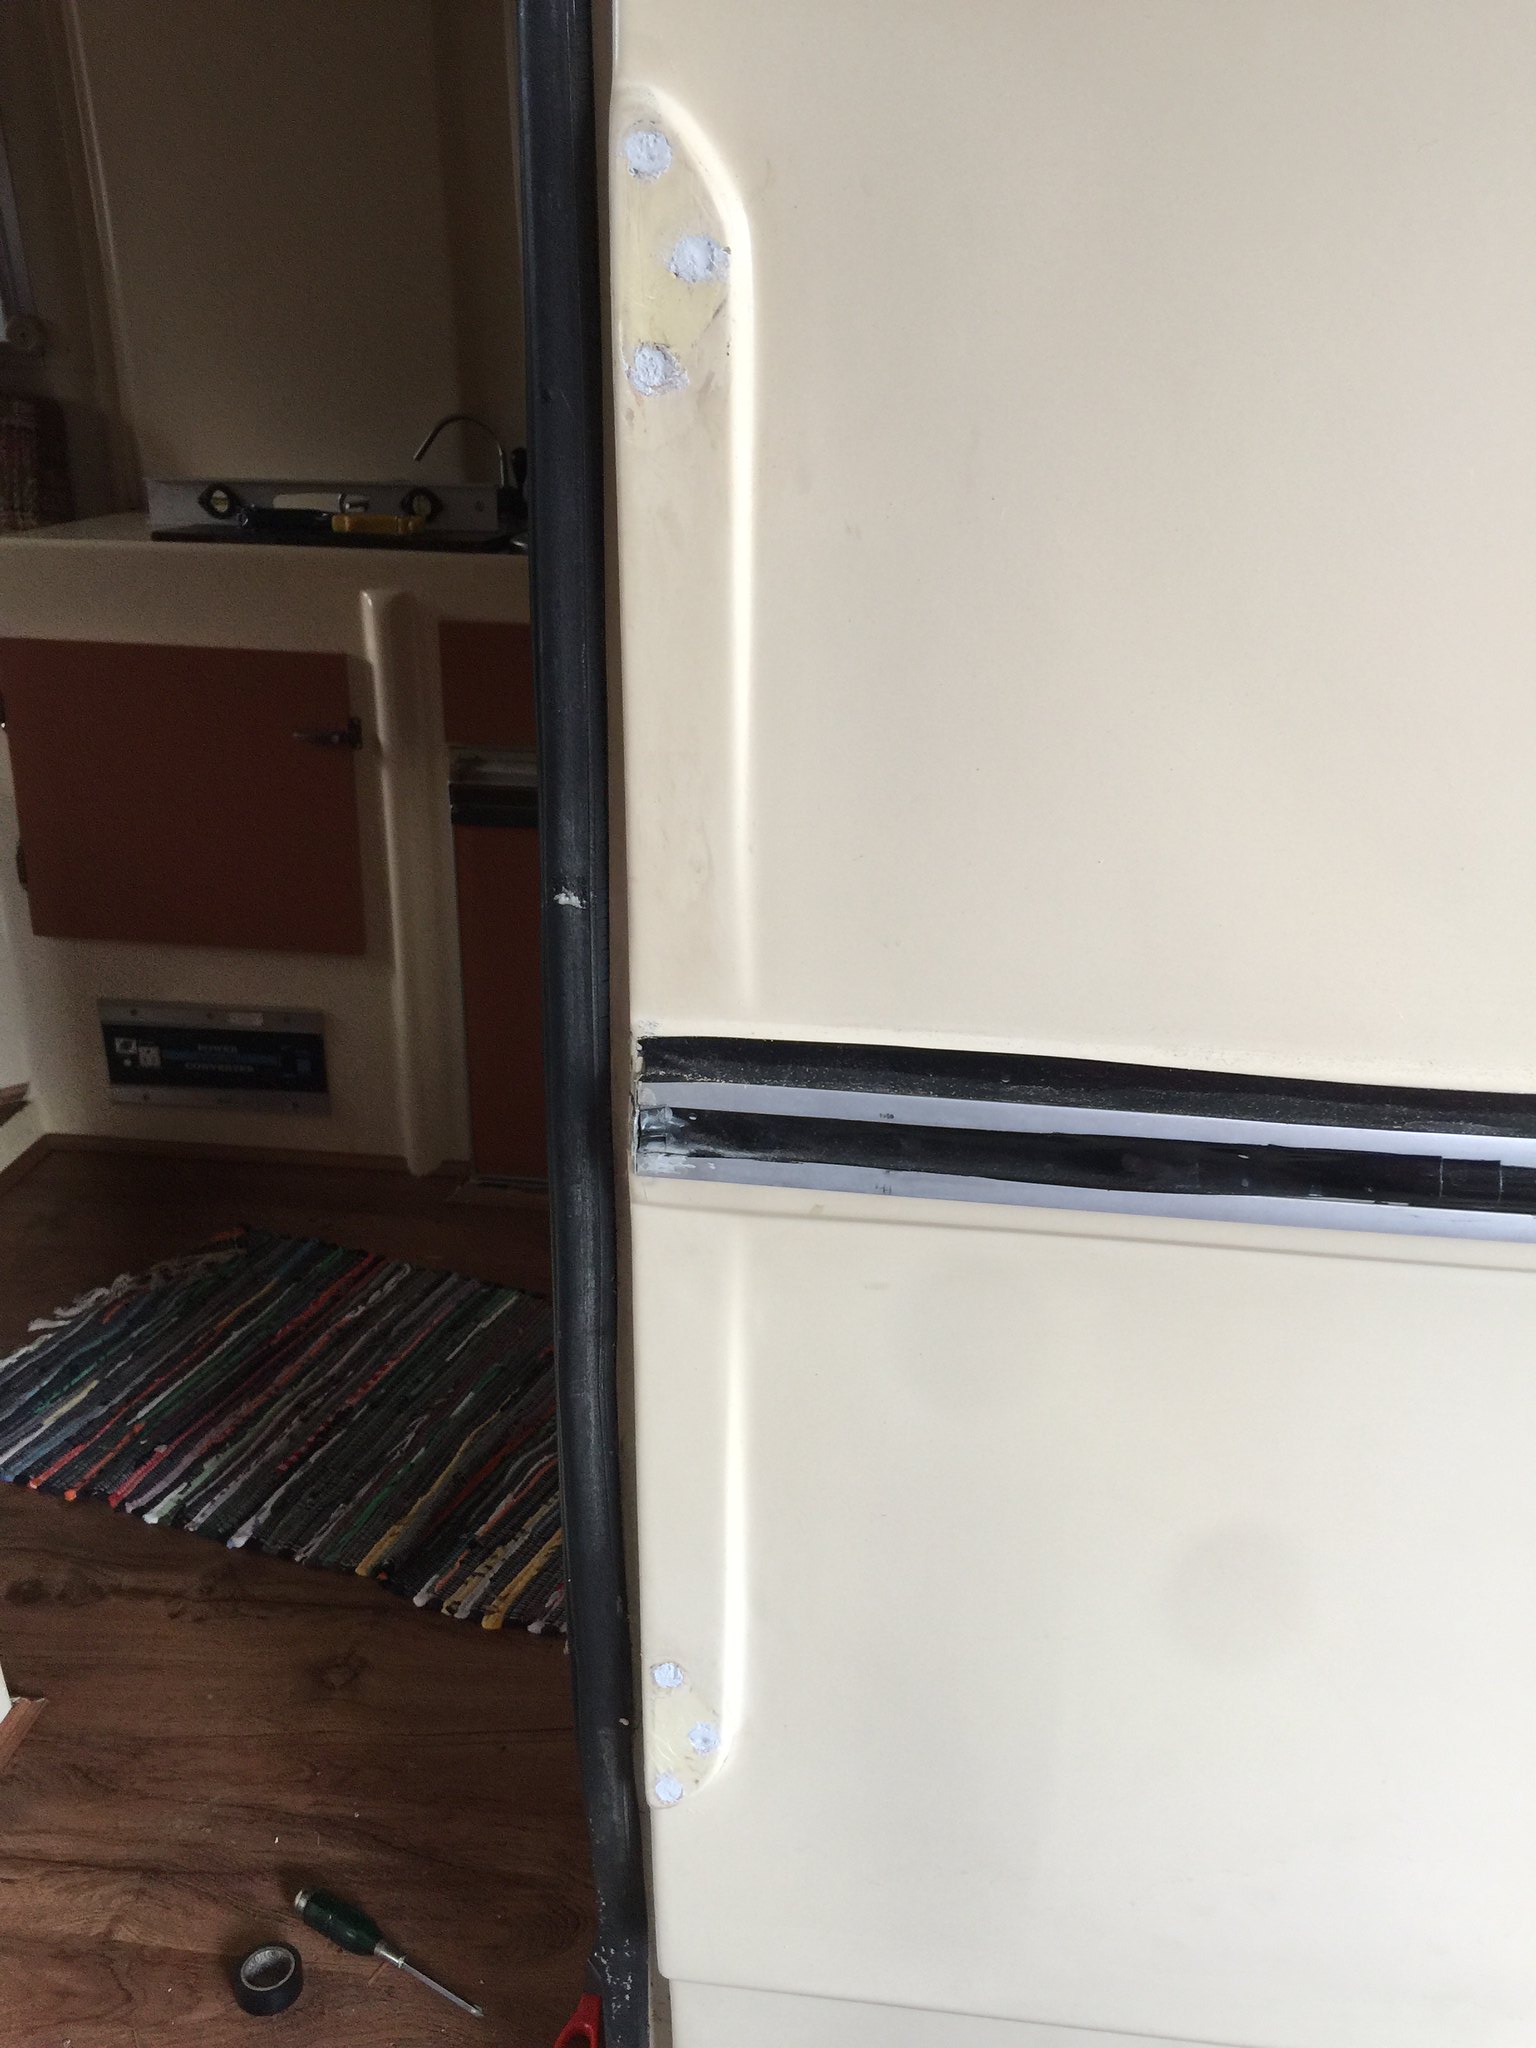
Main reason for this repair is that the door was no longer latching.
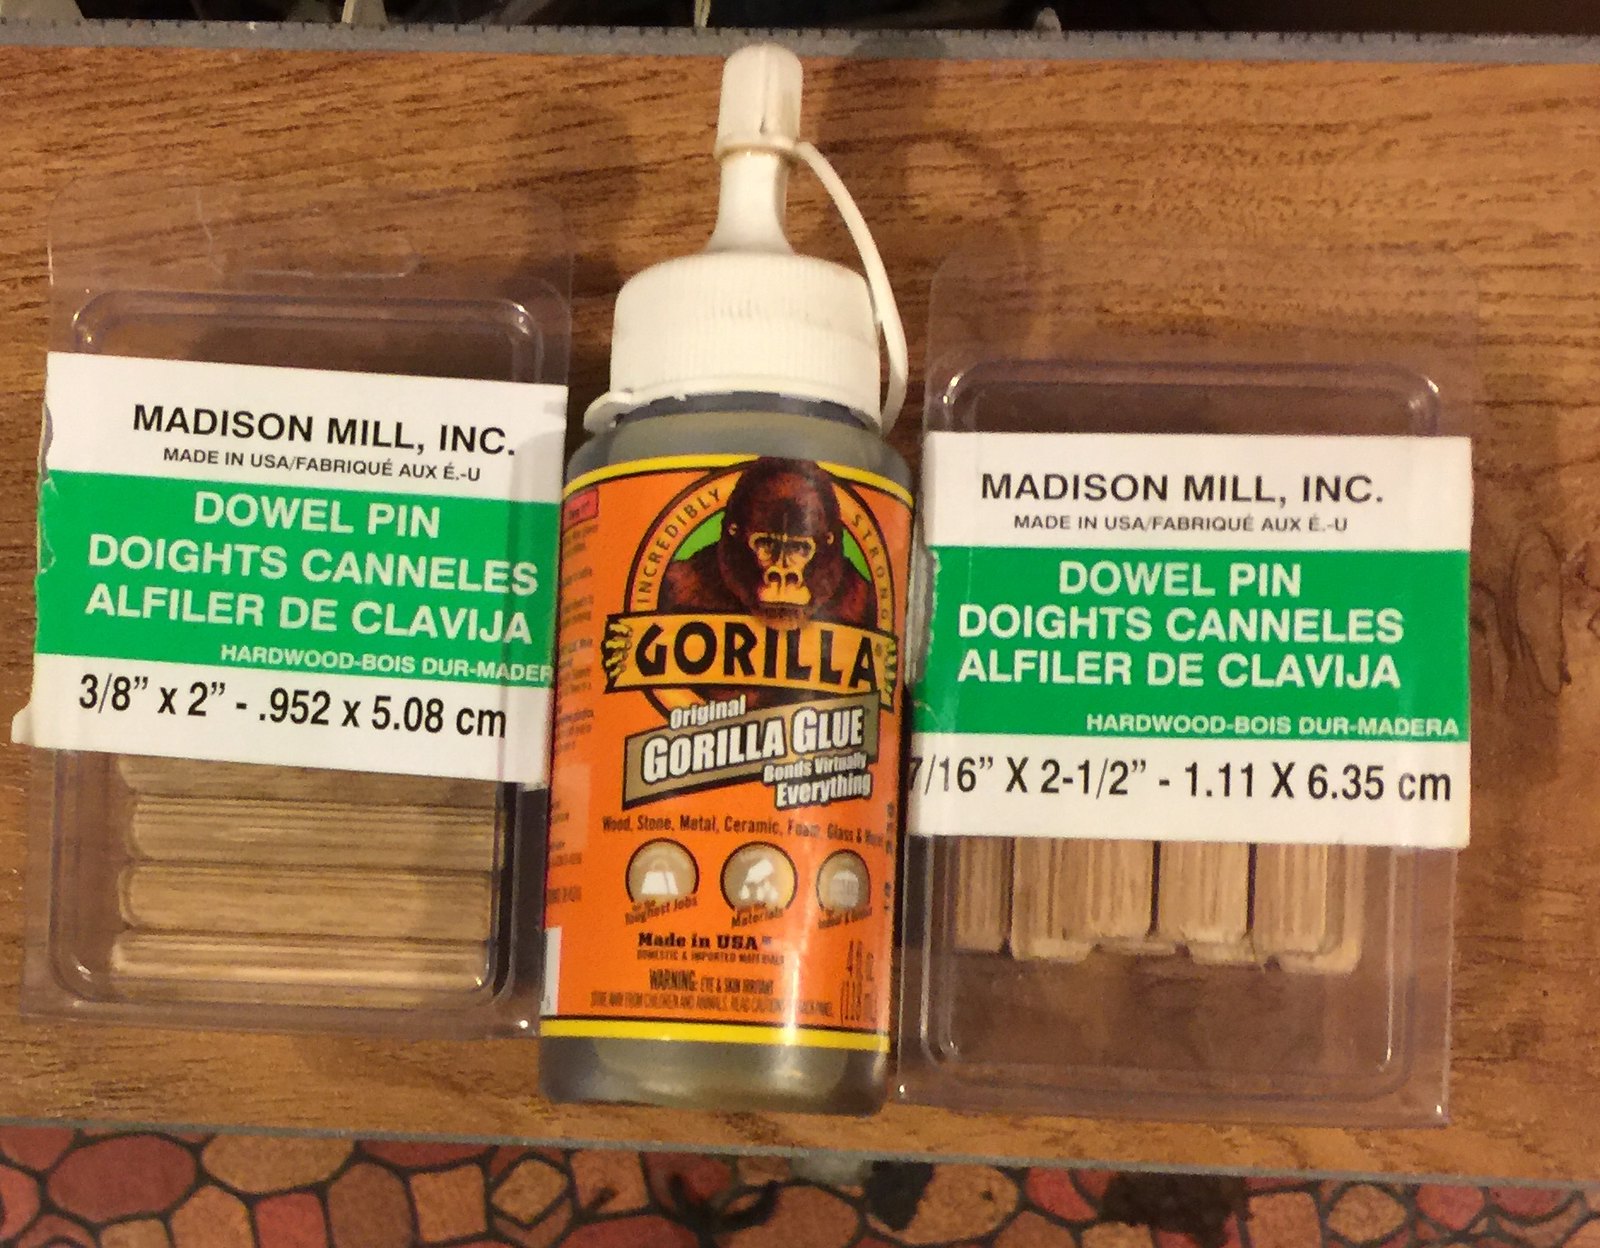
Got the door done a little faster than I anticipated. Drilled out the screw holes where original screws were attached. Used 3/8" dowel plugs on the door, and 7/16 dowel plugs on the trailer body. Gorilla glued them in place, then covered the plugs with a simple JB weld fiberglass patch putty.
Set door in place, shimmed it up to the proper height and screwed it in place. Butyl tape placed under the hinges.
I really like Raz's repair method better. In the end, I went with a simpler repair, trailer is already 41 years old, if I can get 20 years out of this repair, that would be great. Original hinges had no sealing material underneath them.
I got a new set of hinges with the trailer, so that helped!
 1977 Trillium Door Fix 1977 Trillium Door Fix by wrk101, on Flickr
 1977 Trillium Door Fix 1977 Trillium Door Fix by wrk101, on Flickr
 1977 Trillium Door Fix 1977 Trillium Door Fix by wrk101, on Flickr
|
|
|
|
|
12-25-2018, 03:14 PM
|
#15
|
|
Senior Member
Name: bill
Trailer: 2013 Escape 19
The Mountains of North Carolina
Posts: 4,143
|
|
|
|
|
|
01-07-2019, 07:29 PM
|
#16
|
|
Junior Member
Name: Brian
Trailer: 1980 Trillium 1300
Ontario
Posts: 26
|
Belly band
Bill has your belly band already been patched? Your band looks different
|
|
|
|
|
01-07-2019, 08:55 PM
|
#17
|
|
Senior Member
Name: bill
Trailer: 2013 Escape 19
The Mountains of North Carolina
Posts: 4,143
|
No, belly band and getting the propane system up and operational is in the next phase.
|
|
|
|
|
07-05-2021, 08:49 PM
|
#18
|
|
Senior Member
Name: bill
Trailer: 2013 Escape 19
The Mountains of North Carolina
Posts: 4,143
|
Decided to add some of my belly band commentary here. First, kudos to Randy Bishop and David Tilston, as I copied their methods repeatedly in my project. "Engineer by Xerox!" "Pinch with Pride!"
Just like others, removal of the old band was step 1. Mine had a serious of foolish repairs on it, making the band removal more involved.
Step 2 is grinding. I used a side grinder, with a flap sanding disk. Really worked fast! Wear a mask, goggles and a bunny suit!
|
|
|
|
|
07-05-2021, 08:54 PM
|
#19
|
|
Senior Member
Name: bill
Trailer: 2013 Escape 19
The Mountains of North Carolina
Posts: 4,143
|
More pictures. Used two layers of Bondo Glass, topped off with regular Bondo to provide a smoother finish. No chance I am ready to do auto body work! Had to grind out to remove every rivet plate, and also to knock down the humps in the fiberglass from the rotten plates.
|
|
|
|
|
07-05-2021, 08:59 PM
|
#20
|
|
Senior Member
Name: bill
Trailer: 2013 Escape 19
The Mountains of North Carolina
Posts: 4,143
|
Then topped off with regular Bondo and painted the seam.
|
|
|
|
|
|
|
Currently Active Users Viewing This Thread: 1 (0 members and 1 guests)
|
|
|
 Posting Rules
|
You may not post new threads
You may not post replies
You may not post attachments
You may not edit your posts
HTML code is Off
|
|
|
|
 » Recent Discussions
 |
|
|
|
|
|
|
|
|
|
|
|
|
|
|
|
|
|
|
|
|
|
|
|
|
|
|
|
|
|
|
|
|
|
» Upcoming Events |
No events scheduled in
the next 465 days.
|
|


 My Solo Trillium
 Its Bigger On The Inside

 Linear Mode


